
Fujimi 1/72 D3A1 'Val'
Kit Number: 35501
Price: $24.99
Decals: For five versions, all early war, two in green and grey, three overall grey plus enough codes and letters to do any early war Val.
Reviewer: Scott Van Aken
Date of Review: 24 September 1997
The D3A was Japan's premier naval dive bomber of the early war period. It was credited with sinking more Allied ships than any other Axis type during the war. A rather archaic aircraft with fixed wheels, slow speed and a very long range, the Val was eventually replace by the D4Y 'Judy' in 1943. Although replaced, it still soldiered on in training and secondary roles until the end of the war.
 This particular kit is part of a 2 kit presentation produced to mark the
50th anniversary of the end of WWII. While the packaging is really
more appropriate to mark the Pearl Harbor anniversary, I guess that would
have been a bit much. Fujimi's Val comes in light grey plastic with finely
etched markings. There are enough bits and pieces on the huge decal
sheet to do two complete aircraft. Typical of Fujimi (actually, all
Japanese kits) is the breakdown of parts to allow the later version (D3A2)
with an improved canopy. This feature presents the greatest problem
when building the kit as I found it impossible to get a good fit without
destroying much of the detail around it with filler.
This particular kit is part of a 2 kit presentation produced to mark the
50th anniversary of the end of WWII. While the packaging is really
more appropriate to mark the Pearl Harbor anniversary, I guess that would
have been a bit much. Fujimi's Val comes in light grey plastic with finely
etched markings. There are enough bits and pieces on the huge decal
sheet to do two complete aircraft. Typical of Fujimi (actually, all
Japanese kits) is the breakdown of parts to allow the later version (D3A2)
with an improved canopy. This feature presents the greatest problem
when building the kit as I found it impossible to get a good fit without
destroying much of the detail around it with filler.
The cockpit is rather bare consisting of two seats, an instrument panel (for which a decal is supplied), and a control stick. There is no mention in the instructions for the rear machine gun, yet all versions carried one. The parts are in the kit and a simple matter to install. After much internet discussion, I painted the interior parts a green color instead of the kit's suggestion of Aotake Blue. The interior was installed in the fuselage, the gun added and the fuselage sections joined together. Then the upper decking was installed and due to a poor fit, was puttied to death. This kit did display quite a bit of flash for a Japanese kit, but this is undoubtedly due to the mold having been used for a huge number of kits.
The two-piece wings were next assembled along with the spatted undercarriage. The wheels are part of the spat assembly and non-functional. Before assembly of the wings you must open up a set of holes for the outer bomb racks. Do not open the outermost set as the early Val did not have two wing racks. Next the engine was painted and detailed and placed in the cowling. This cowling is a three-piece assembly consisting of two halves and a cowl ring. The assembly is quite fiddly, and was not accomplished putty free.
The wings were then attached to the fuselage, filler being needed at the rear. Next the cowling was attached and the fit is not the best. The fuselage appears to be more oval than the cowling. This required a lot of filing, filling and sanding to achieve a good shape. Next the horizontal stabilizers and other bits and pieces were added to the kit prior to painting. The canopy fit very well and took seemingly forever to mask thanks to a myriad of small square frames endemic of the type. After the dive brakes, pitot tubes, bomb racks.... were installed, the kit was sprayed using Tamiya IJN grey. Once that was dry, Future was applied in several coats to achieve a gloss finish suitable for decaling. Finally, flat black was applied to the cowling and areas of the forward fuselage that were masked off with tape.
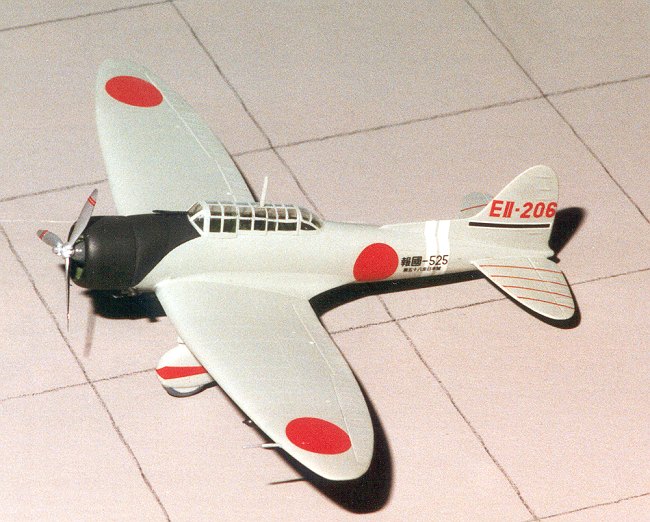
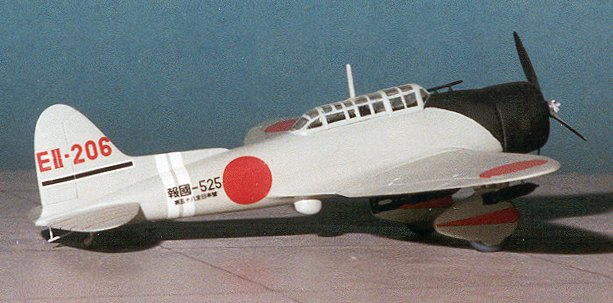
Decal selection for this kit is one of the more difficult undertakings. All the schemes are quite nice, but I settled on a rather common scheme of an aircraft from the Zuikaku from the Pearl Harbor raid. This aircraft has presentation markings on it to give it a bit of individuality. The Fujimi decals fit very well and reacted positively to Microscale solvents. After decal placement, final kit pieces (bombs, antenna) were installed and the kit coated with a semi-matt, taking care not to overspray the flat black.
Overall a nicely finished kit. Not the easiest to construct, but worth the effort as it is more detailed than Airfix's much older offering.
Fujimi 35501 1/72 D3A1 'Val' construction notes
11 Jan '97
 After the debacle with the Matchbox
Buffalo, I think it is time to build a quality kit. I have built a number
of Fujimi kits of this era, including a lot of Ju-87s that were just super kits.
This particular one comes two to a box and is labeled as an anniversary
kit celebrating 50 years since the end of WWII. What is odd is that the
box art shows two different Vals taking off to bomb Pearl Harbor!. Oh
well, you cannot second guess marketing guys. Upon opening the bags
containing the kits, I looked for any signs of age. There was a small
amount of flash on most of the pieces, but not enough to be a problem and all
looked to be easily cleaned up. It is molded in typical Japanese light
grey plastic and has sufficient detail for this scale. Instrument panels
are decals and that's OK as the clear plastic for the canopy (one piece) is not
crystal clear. The decal sheet is incredible giving decals for six
colorful aircraft. Three in overall light grey, one in silver and two in camouflage
green over grey. All have various tail bands, fuselage bands and/or red
tails.
After the debacle with the Matchbox
Buffalo, I think it is time to build a quality kit. I have built a number
of Fujimi kits of this era, including a lot of Ju-87s that were just super kits.
This particular one comes two to a box and is labeled as an anniversary
kit celebrating 50 years since the end of WWII. What is odd is that the
box art shows two different Vals taking off to bomb Pearl Harbor!. Oh
well, you cannot second guess marketing guys. Upon opening the bags
containing the kits, I looked for any signs of age. There was a small
amount of flash on most of the pieces, but not enough to be a problem and all
looked to be easily cleaned up. It is molded in typical Japanese light
grey plastic and has sufficient detail for this scale. Instrument panels
are decals and that's OK as the clear plastic for the canopy (one piece) is not
crystal clear. The decal sheet is incredible giving decals for six
colorful aircraft. Three in overall light grey, one in silver and two in camouflage
green over grey. All have various tail bands, fuselage bands and/or red
tails.
So far all I have done is glue together the wing (after drilling some holes for the outermost bomb racks) and the landing gear. The Val has fixed gear like the Stuka, and Fujimi has decided not to mess with individual wheels and has them molded with the wheel pants. I notice that the interior is supposed to be painted that translucent blue color, but I'm not sure that is correct. Anyone know? I had read that anywhere there were people was supposed to be painted some other color, like a green or brown. More next week.
19 Jan '97
Little additional work, although I have assembled the big bomb and painted a few other parts. I believe I will paint the rest of the interior a green color as I have heard nothing from anyone on this subject. Still trying to decide what scheme to do.
26 Jan '97- 18 Sept '97
No additional work--This could be my next long term project!!
18 Sept '97
Getting back into the swing of things, I
did indeed paint the interior a green color that is a bit darker than the
standard Chromate Green. I have also installed the seats, control column,
instrument panel and gun. The instruction says nothing about the rear gun but
the aircraft plainly carried one so I installed it.
The fuselage was glued together, the upper fuselage/canopy attachment then glued
on and a lot of putty applied where needed. The insert for the canopy (the D3A2
has a different one), is particularly poor fitting and several applications of
filler were needed. As that dried and was shaped, I painted the engine and glued
together the cowling. The cowling is a three piece affair consisting of two
sides and a front ring. While this increases the chances of goofs, it does a
much better job than a single cowling and leaves a nice, round cowling. Naturally,
it needed some putty (all my kits do).
After the fuselage was sanded smooth, I attached the wing. There was need for
filler at the front and rear of the wing/fuselage join. Once dry and smooth, the
tailplanes were attached with no problems. I then attached the engine/cowling
assembly. There were several gaps at the top and side of the cowling, as if the
fuselage was oval and the cowling round. Not a pretty sight and more filler was
needed. After all this was done, I had a lot of panel lines to rescribe.
Final assembly consisted of attaching the wing bomb racks, landing gear, dive
brakes, tail hook, canopy and a few other bits and pieces. The canopy was masked
(ten zillion tiny windows) and the kit prepped for painting.
25 Sept '97
Well, it is finally done. I painted the aircraft an overall IJN grey using Tamiya paint. Then the black anti-glare panel was done using Testors flat black. The overall kit (except the black area was sprayed with future in preparation for the decals. The Fujimi decals are really very good despite being a bit thick. Recommended.
Copyright ModelingMadness.com. All rights reserved.