Hasegawa 1/72 N1K2-J Shiden-kai
|
KIT # |
B1 |
|
PRICE: |
350 yen |
|
DECALS: |
Three options |
|
REVIEWER: |
Scott Van Aken |
|
NOTES: |
|
BACKGROUND |
Please visit the preview to see what is in the box and to read a short history on the type.
|
CONSTRUCTION |
This was one of those kits I picked up for a few reasons. One, it has been at least 20 years since I last built one and the one I did then I painted in all the wrong colors. Face it, 20 years ago, green was green and light grey was light grey. It resulted in a number of models that when I look at them now, I'm somewhat shocked that I could have been so dumb. But I was and so were a lot of people. Secondly, it was a pretty easy build. No major problems that I could remember. Finally, and probably the main reason I bought it (besides it being pretty cheap) was to use the latest Yellowhammer decals on it. Yep, the old 'buy a kit because you have a cool set of decals' situation!
 As with most kits, I started by gluing the interior
bits together. Nothing fancy here and much of the interior is not only
quite bare, but has a seat that I'm sure is totally wrong for the plane,
but back when this kit was engineered, most would obligingly put the
included pilot into the seat to cover up all the nakedness and wrongness
in the cockpit. I did look for an Eduard interior set for it, but was
unable to find one at the local shop so there you have it. When the bits
were all together, I painted them and the side walls an Aotake that I
adulterated with some green. Well, actually, the only mixing bottle I had
already has a bit of green in it and adding the Aotake to it gave me a
greenish Aotake. So send a hoard of lawyers after me.
As with most kits, I started by gluing the interior
bits together. Nothing fancy here and much of the interior is not only
quite bare, but has a seat that I'm sure is totally wrong for the plane,
but back when this kit was engineered, most would obligingly put the
included pilot into the seat to cover up all the nakedness and wrongness
in the cockpit. I did look for an Eduard interior set for it, but was
unable to find one at the local shop so there you have it. When the bits
were all together, I painted them and the side walls an Aotake that I
adulterated with some green. Well, actually, the only mixing bottle I had
already has a bit of green in it and adding the Aotake to it gave me a
greenish Aotake. So send a hoard of lawyers after me.
While that was drying, I realized that I could insert the cockpit from the underside so glued the fuselage halves together. Did the same to the wings. Fit was quite good and no filler was used on the joins. Just some sanding when all was dry to get rid of the glue that oozed out of the seams. The area around the guns on the wings was a bit tricky and the mold flash was a bit more than the usual, but some serious scraping took care of it.
I then glued in the instrument panel, which had the decal applied and snuggled down with some Solvaset after it was nearly dry. Then the interior was glued in place. The upper area under the canopy was brush painted black, though on second thought, it may well have been the upper surface green. Or it may not. These planes were not painted until they were completed from what I can determine from various books, so perhaps black is the appropriate color.
 The wings were then glued in place. I'd been warned
that there may be a step at the wing roots, but none reared its ugly
head. I did have a bit of a small gap on either side so filled that area.
I also had a touch of a step on the lower aft wing/fuselage join, an area
that frequently needs filler on most single engine props. While that was
drying I fit on the horizontal tail planes. These seem a tad thin for the
join area, but fit well.
The wings were then glued in place. I'd been warned
that there may be a step at the wing roots, but none reared its ugly
head. I did have a bit of a small gap on either side so filled that area.
I also had a touch of a step on the lower aft wing/fuselage join, an area
that frequently needs filler on most single engine props. While that was
drying I fit on the horizontal tail planes. These seem a tad thin for the
join area, but fit well.
Back at the front, I painted the engine and crankcase aluminum, then did a bit of a wash with dirty thinner and painted those odd looking induction pipes a dark metal color just to set it off a bit. The canopy was then masked using Tamiya tape. As old as this kit is, it has seen a lot of molds as the framing wasn't as crisp as I've seen on other kits of this era; seeming to disappear in places. Once masked, it was attached using non-fogging superglue. The engine was placed in the cowling and the cowling glued onto the front of the fuselage. I then stuffed tissue in the engine opening in preparation to paint.
I also filled in the ejector pin marks in the landing gear legs and the inner gear doors. The outer door pin marks will be hidden by the gear itself. I assembled the four part drop tank as these planes seemed to normally carry them and if I left it off I'd have to fill some holes in the lower wing. I then sanded and polished the kit as much as I could to remove as many scratches as possible. This plane was to have a bare metal undersides so I had to get it as smooth as possible. I was fairly successful. Then it was time to paint.
|
COLORS AND MARKINGS |
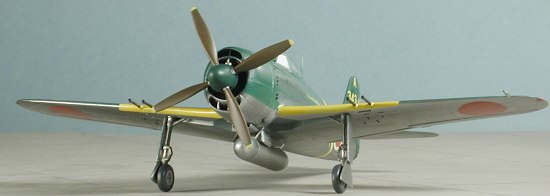
As I mentioned, this plane, and just about all of
the N1K2-Js had a bare metal lower fuselage. We all know that bare metal
is more than one shade so, armed with many bottles of Alclad II, I went
to work. I used no primer and sprayed right onto the
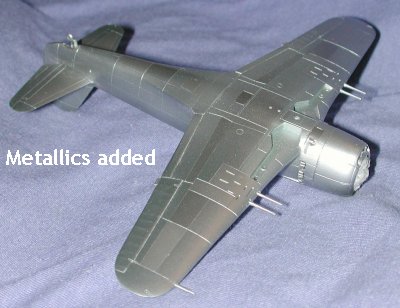 bare plastic/filler. The key
is to hold the airbrush at a respectable distance so that it does not get
a chance to puddle on the plastic. That is death as the concentrated
Alclad II will craze the plastic.
bare plastic/filler. The key
is to hold the airbrush at a respectable distance so that it does not get
a chance to puddle on the plastic. That is death as the concentrated
Alclad II will craze the plastic.
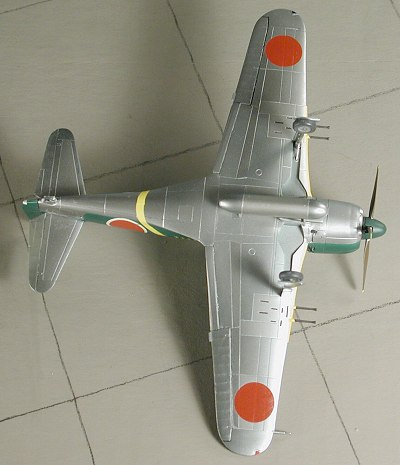
I first applied several light coats of standard Aluminum to the entire kit; top and bottom. After about an hour of drying, I masked off several panels on the underside and sprayed them with Duraluminum, which is a tich lighter than the regular Aluminum. Giving it another hour to dry, I started removing the masking and reapplied the same tape (waste not, want not) to some other panels which I sprayed with Dark Aluminum. During all this I sprayed the main landing gear with Steel. The end result is quite effective as the three colors on the lower surface are close to each other, but you can still tell they are not the same. I've often seen (and built) models where the metallic shades were quite different and easy to see. For the most part, that is too big a contrast and it just looks a bit odd.
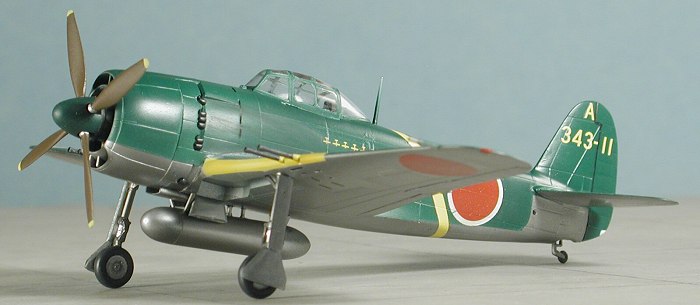
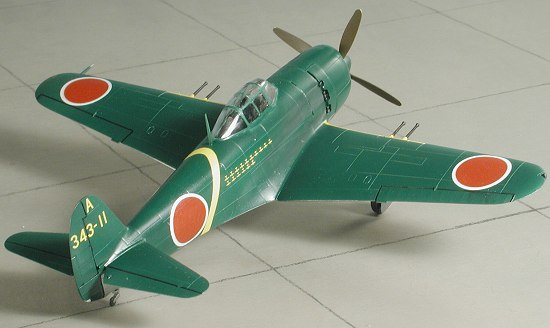
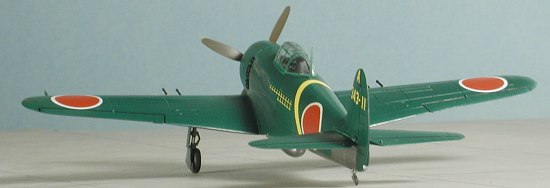
The next task was to paint the upper surfaces. I had to dig into some books to see if the line here was soft or hard. The instructions for the decals showed a hard line and this was verified by the Famous Aircraft of the World #53 (newest series). Though it was sprayed on, the line is so tight that it would take a more than my airbrush could produce to duplicate it. Digging into the new Colourcoat line of enamels, I came up with good old Kawanishi dark green for the upper surface. This is a bit of a more bluish green than most you are used to and quite dark as well. I sprayed it on the upper surface after masking the demarcation line. I misted it on in several coats as the aluminum paint tended to slightly reject the paint around the panel lines.
 Once that was on, I masked off the leading edges of
the wing in order to put on the yellow ID stripes. Perhaps it would have
been easier to paint it first before the rest of the kit, but either way
gives good results. I first used Floquil Reefer White lacquer to give a
good background for the rather translucent yellow. The Yellow was
Xtracolor RLM 04 that I had left over from another project. Though there
is a specific Japanese ID yellow done by several companies, the truth is
that this could be many different shades from a near orange to a very
pale yellow, so anything at hand will be just fine.
Once that was on, I masked off the leading edges of
the wing in order to put on the yellow ID stripes. Perhaps it would have
been easier to paint it first before the rest of the kit, but either way
gives good results. I first used Floquil Reefer White lacquer to give a
good background for the rather translucent yellow. The Yellow was
Xtracolor RLM 04 that I had left over from another project. Though there
is a specific Japanese ID yellow done by several companies, the truth is
that this could be many different shades from a near orange to a very
pale yellow, so anything at hand will be just fine.
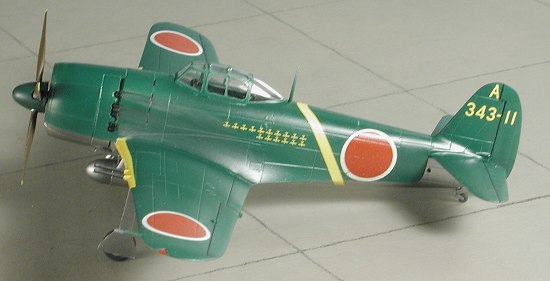
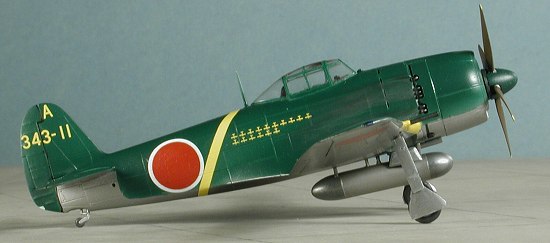
Next were the decals. Now the Yellow Hammer sheet I used does not have full roundels for the 1/72 offerings so those will have to come from another source. The kit decals are just way too bright a red. Fortunately, I have a sheet of hinomarus that was produced by IPMS Spruce Goose back in 1983. Now 20 year old decals can be fussy, but these have held up quite well other than a bit of yellowing on some of them. I coated a few with Microscale Superfilm to be sure they wouldn't break up, but when I used the untreated white background circles, I found that this wasn't necessary. Only 'problem' was that they tended to stick a bit to the backing sheet. Other than that, they went on just fine and succumbed to Microscale's solvents. I also had little trouble the the YellowHammer sheet. I used sheet 48029 and picked CPO Shoichi Sugita's aircraft. I really wanted to do one with the number in the hinomaru, and also one with the kill markings, but apparently those were not displayed together so I picked the kills! I should also mention that the instructions state that they are unsure if the upper wing insignia had the white surround or not. I put them on mine as it just made it look neater.
|
FINAL CONSTRUCTION |
 With the decals on, I continued with the construction. The landing
gear, which had been painted steel, had Bare Metal Foil Chrome put on
their oleos and were glued in place. The prop, which had been painted
using Colourcoat's Japanese primer, had the roots painted aluminum and
the forward tips in yellow using Vallejo acrylics. I then glued the prop,
hub and backing plate together. I used Floquil's Weathered Black for the
tires as the old standby RLM 66 is a lighter shade and this just looks
better.
With the decals on, I continued with the construction. The landing
gear, which had been painted steel, had Bare Metal Foil Chrome put on
their oleos and were glued in place. The prop, which had been painted
using Colourcoat's Japanese primer, had the roots painted aluminum and
the forward tips in yellow using Vallejo acrylics. I then glued the prop,
hub and backing plate together. I used Floquil's Weathered Black for the
tires as the old standby RLM 66 is a lighter shade and this just looks
better.
I had thought about drilling out the gun barrels, but decided against it. I'd tell you I'll get to it at a later time, but like many other things on models left undone, that 'later time' seems to be 'never' for the most part! I also didn't rig the antenna, again, because it would not last long as I tend to break those things within days of finishing the model. The upper surface was given a coat of matt semi-gloss while the underside was left alone. As you know, clear coats tend to dull metallic finishes. I also have a feeling that the control surfaces, which were fabric, should have been some color other than aluminum, but none of my meager references said anything about it.
 Other final bits were cutting apart and gluing on the landing gear
doors, gluing on the lower oil cooler intake and the drop tank. I then
returned to the paint and did red, blue and white for the position
lights; aluminum for the pitot tip, gunmetal for the gun barrels and
burnt iron for the exhaust stacks. These and the gun barrels had little
bits of flat black painted on them. I then let it sit for a while before
applying the pastels for the exhaust. Since these planes were flown by
the best of the best, it seems to me that they'd have been kept in really
good shape.
Other final bits were cutting apart and gluing on the landing gear
doors, gluing on the lower oil cooler intake and the drop tank. I then
returned to the paint and did red, blue and white for the position
lights; aluminum for the pitot tip, gunmetal for the gun barrels and
burnt iron for the exhaust stacks. These and the gun barrels had little
bits of flat black painted on them. I then let it sit for a while before
applying the pastels for the exhaust. Since these planes were flown by
the best of the best, it seems to me that they'd have been kept in really
good shape.
Last steps were to glue on the prop and remove the masking from the canopy and the kit was now a model!
|
CONCLUSIONS |
 I gotta tell you that these Hasegawa single-engine prop
fighters are a great way to build a really nice model in a minimum of time.
This is especially true if you have a nice decal sheet to go along with it
and don't want to obsess over details. Yeah, the wheel wells are too
shallow and the cockpit is barren as the dry valleys of Antarctica compared
to modern 1/72 kits, but the idea here is to limit stress and these do a
great job of it. What's more, if you don't have to have the latest boxing,
you can get them for five or six dollars, easily a third of what the most
recent boxings cost. Best of all, the plastic is exactly the same!
I gotta tell you that these Hasegawa single-engine prop
fighters are a great way to build a really nice model in a minimum of time.
This is especially true if you have a nice decal sheet to go along with it
and don't want to obsess over details. Yeah, the wheel wells are too
shallow and the cockpit is barren as the dry valleys of Antarctica compared
to modern 1/72 kits, but the idea here is to limit stress and these do a
great job of it. What's more, if you don't have to have the latest boxing,
you can get them for five or six dollars, easily a third of what the most
recent boxings cost. Best of all, the plastic is exactly the same!
March 2004
1308 in a series
Copyright ModelingMadness.com. All rights reserved. No reproduction in part or in whole without express permission from the editor.
If you would like your product reviewed fairly and quickly , please contact the editor or see other details in the Note to Contributors.