 Kit Number: JT 12
Hasegawa 1/48 Ki-61 `Tony'
Kit Number: JT 12
Price: $25.25
Decals : Three versions, all JAAF
Date of review: January 1995
Well folks, another Hasegawa 1/48 kit. One expects it to be superb and this reviewer must admit that it is. I had almost no trouble with the kit and used very little filler. One must remember that I always have some trouble and use some filler somewhere, no matter how perfect the kit. Anyway, the only spot I had trouble with was with the wing/fuselage joint where I needed a bit of filler.
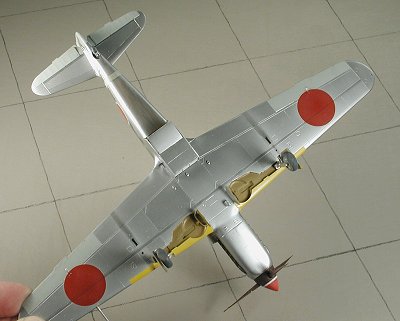
 The interior is very good and I used (you guessed it) Reheat instrument decals
to add that little bit of extra. This brings up my one disappointment with
the kit. There is no opening canopy with the kit to display the work you
put into the interior. Sure, you can get a vacuformed version, but I think
that for the price, one should be included. The interior color is listed
as a medium brown so I used yellow zinc chromate mixed with some USAF Vietnam
tan and got an interesting color to use for this undercoat.
The interior is very good and I used (you guessed it) Reheat instrument decals
to add that little bit of extra. This brings up my one disappointment with
the kit. There is no opening canopy with the kit to display the work you
put into the interior. Sure, you can get a vacuformed version, but I think
that for the price, one should be included. The interior color is listed
as a medium brown so I used yellow zinc chromate mixed with some USAF Vietnam
tan and got an interesting color to use for this undercoat.
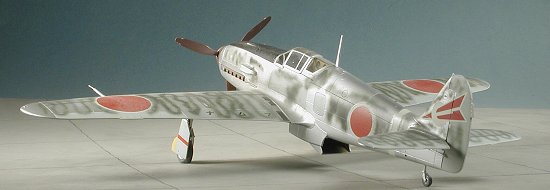
The rest of the kit just falls together beautifully. A positionable radiator exhaust door is a nice touch and lets one see the nicely molded radiator that is prominent under the belly of the Tony. The only bit I added are True Details wheels although they are not really necessary.
 Now on to the best part of the kit, the painting. I basically build models
to be a canvas for a camouflage scheme and Japanese Army planes are superb
for that. As with most Tonys, this one is in bare metal with fabric control
surfaces. I first painted the aircraft in overall gloss white as an undercoat
for the Metallizer finishes. Then the yellow of the wing leading edges was
painted. There is still some debate as to whether these should be a bright
yellow or a yellow orange. I have painted both colors and some in between.
Frankly, I imagine they were hand painted with whatever was available. One
thing I gather from reading about Japanese camouflage during WWII, it that
the colors were not as strictly controlled as in other countries so close
is good enough.
Now on to the best part of the kit, the painting. I basically build models
to be a canvas for a camouflage scheme and Japanese Army planes are superb
for that. As with most Tonys, this one is in bare metal with fabric control
surfaces. I first painted the aircraft in overall gloss white as an undercoat
for the Metallizer finishes. Then the yellow of the wing leading edges was
painted. There is still some debate as to whether these should be a bright
yellow or a yellow orange. I have painted both colors and some in between.
Frankly, I imagine they were hand painted with whatever was available. One
thing I gather from reading about Japanese camouflage during WWII, it that
the colors were not as strictly controlled as in other countries so close
is good enough.
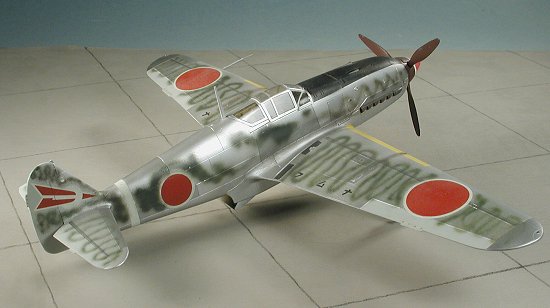
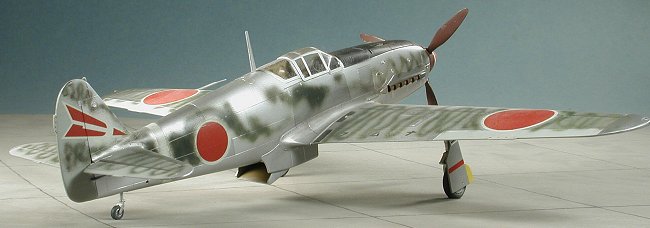
 After the yellow was painted on the wings and masked, the fabric control
surfaces were painted a light grey and masked off. Then several shades of
Metalizer were applied to various parts of the aircraft. The scheme I had
chosen had a 'mirror-wave' (whatever that means) camouflage applied to the
top of the aircraft. I like these snaky camo schemes, but this one required
me to apply the paint after the decals had been applied. I used kit
decals and followed the scheme that was given therein. I then thinned down
a Japanese Army green (Tamiya acrylic so I could clean up the mistakes with
water) and carefully applied the camouflage. Much to my surprise, I made no
goofs and managed to do a credible job of the scheme. The last thing I did
was paint the anti-glare panel a blue-black and then dig out the pastels
for engine/gun exhaust and general filth.
After the yellow was painted on the wings and masked, the fabric control
surfaces were painted a light grey and masked off. Then several shades of
Metalizer were applied to various parts of the aircraft. The scheme I had
chosen had a 'mirror-wave' (whatever that means) camouflage applied to the
top of the aircraft. I like these snaky camo schemes, but this one required
me to apply the paint after the decals had been applied. I used kit
decals and followed the scheme that was given therein. I then thinned down
a Japanese Army green (Tamiya acrylic so I could clean up the mistakes with
water) and carefully applied the camouflage. Much to my surprise, I made no
goofs and managed to do a credible job of the scheme. The last thing I did
was paint the anti-glare panel a blue-black and then dig out the pastels
for engine/gun exhaust and general filth.
The completed kit looks just great! Because of the superior detail, it is a major improvement over the Otaki Ki-61 I did that now sits in the San Diego Aerospace Museum. This jewel is highly recommended to those who have graduated from snap-tights.
Copyright ModelingMadness.com. All rights reserved. No reproduction in part or in whole without express permission from the editor.