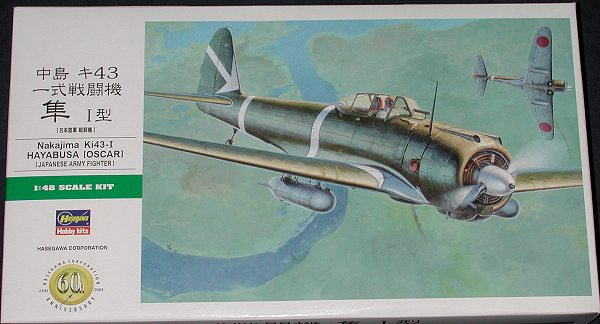
Hasegawa 1/48 Ki-43-I Hayabusa
|
KIT # |
9080 (JT 80) |
|
PRICE: |
$24.00 |
|
DECALS: |
Two aircraft |
|
REVIEW : |
|
|
NOTES: |
` |
|
BACKGROUND |
A look in the box and a brief history of the plane can be found here.
|
CONSTRUCTION |
Just looking at the kit, you can see that it is well made and well engineered. Construction should be a breeze with little trouble. The first parts that I started on were the interior and the wings. For the interior, I glued in all the parts that would be painted the same color. This was the seat, back wall, side walls, and control stick. The side walls were actually glued onto the inside of the fuselage prior to painting. One needs to be careful with these side panels as the fit is a bit sloppy. These were all painted Nakajima interior green using Aeromaster colors.
Once the wings and tips were dry they were mated. Just as I
feared, the fit was not that good. In fact, not only were the tips thicker than
the wing ends, but the angle at which they fit wasn't the same. I know Hasegawa
did this to use the same basic wing for several kits, but I personally don't
like it. It left me with gaps to fill and the need to sand down the thicker tips
to match the rest of the wing, effectively destroying detail on the wing tip and
small section of aileron. Now that I'm finished whining.......
While all this was going on, the fuselage was glued together, the side panels
given a dark wash and drybrushed with aluminum. I did need a tiny bit of filler
on the upper fuselage where a chunk had been taken out of the plastic when
removing it from the sprue. Then the rest of the interior was given the wash/drybrush
treatment and glued in place from the underside. Next, the wing was glued on.
Fit on the upperside is super. What I did find, however, was that there is a gap
at the back of the wing that will have to be filled.
 Meanwhile, the wing tips were worked on. These have some raised ejector pin
marks that need sanded down prior to gluing. While that was drying, the wing
itself was glued together. I have started using a precision glue applicator
(actually a glass tube with a small diameter piece of stainless tubing in the
tip; sort of like a pipette that is used in biology and chemistry classes). This
really is a very good idea and is much easier to use than a paint brush for
liquid glue application.
Meanwhile, the wing tips were worked on. These have some raised ejector pin
marks that need sanded down prior to gluing. While that was drying, the wing
itself was glued together. I have started using a precision glue applicator
(actually a glass tube with a small diameter piece of stainless tubing in the
tip; sort of like a pipette that is used in biology and chemistry classes). This
really is a very good idea and is much easier to use than a paint brush for
liquid glue application.
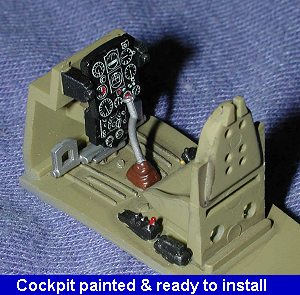 Moving back to the interior, some detail painting was done to the side walls and
interior bits. The rudder pedals painted aluminum and glued in place. After
painting the two instrument panels black, the decals were placed on them and hit
with Solvaset when nearly dry. This made them suck down onto the raised detail
and they look just great. The two panels were then glued onto the stubs for them
in the interior. The lower one fit beautifully, while the upper one is a a bit
of an angle as it just wouldn't completely fit flush. Of course, maybe it is
supposed to fit with the bottom part sticking out a bit.
Moving back to the interior, some detail painting was done to the side walls and
interior bits. The rudder pedals painted aluminum and glued in place. After
painting the two instrument panels black, the decals were placed on them and hit
with Solvaset when nearly dry. This made them suck down onto the raised detail
and they look just great. The two panels were then glued onto the stubs for them
in the interior. The lower one fit beautifully, while the upper one is a a bit
of an angle as it just wouldn't completely fit flush. Of course, maybe it is
supposed to fit with the bottom part sticking out a bit. I then turned my attention to the tailplanes. These fit so well,
that you may be inclined not to even glue them in place! At this time, I also
looked into trying to get the butterfly flaps to fit in the closed position. As
I mentioned in the preview, no photos could be found with these things deployed
while on the ground. Unfortunately, they are too thick to fit into the recesses
provided. Besides, Hasegawa did not engineer the kit to have them stowed. This
leaves two choices. One is to build the kit with them deployed on the ground,
which it seems the rarely were. Secondly, you could just grind away at the
existing flaps until they eventually fit. Either way, you have to fill three
ejector pin holes in each of these flaps as they will be quite visible if left
alone.
I then turned my attention to the tailplanes. These fit so well,
that you may be inclined not to even glue them in place! At this time, I also
looked into trying to get the butterfly flaps to fit in the closed position. As
I mentioned in the preview, no photos could be found with these things deployed
while on the ground. Unfortunately, they are too thick to fit into the recesses
provided. Besides, Hasegawa did not engineer the kit to have them stowed. This
leaves two choices. One is to build the kit with them deployed on the ground,
which it seems the rarely were. Secondly, you could just grind away at the
existing flaps until they eventually fit. Either way, you have to fill three
ejector pin holes in each of these flaps as they will be quite visible if left
alone.
|
CAMO & MARKINGS |
Now having a complete airframe, the kit had the cockpit stuffed with
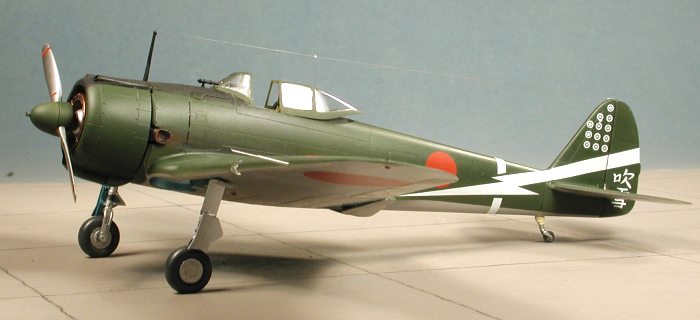
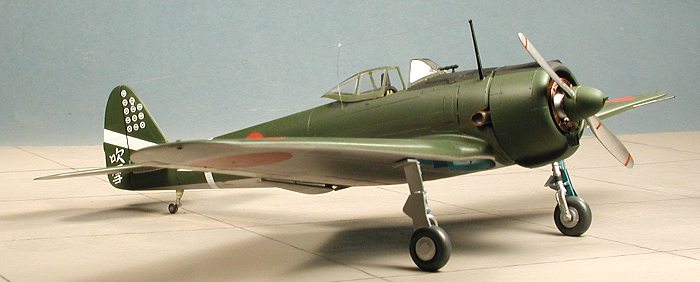
tissue and it was off to the paint shop. I had decided on building a plane flown
by MSgt Satoshi Anabuki, who survived the war with a score of 39 kills. These
markings come from the Aeromaster SP48-04, 'Eagles of the Rising Sun'. The only
other -I Oscar in this sheet was that of Kato, which is also on the kit decals.
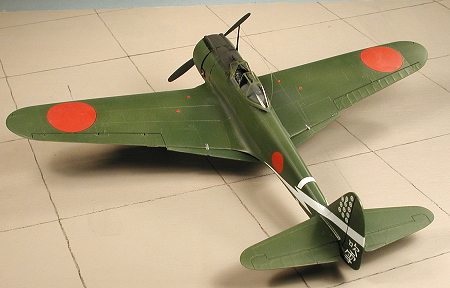
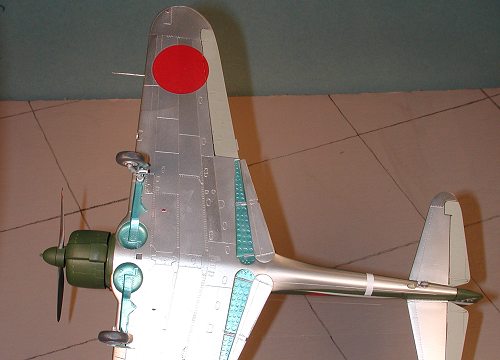
I basically followed the Aeromaster directions for painting. The plane was
Nakajima Army Green on the upper surface and bare metal undersides. No yellow
IFF wing stripe was used at the time of the war that is depicted by this plane.
 The first thing I did was to paint the upper surface green using Aeromaster
Nakajima Army Green. When dry, I sprayed the underside of the control surfaces
with Aeromaster's Army Grey Green, a common color for fabric control surfaces.
The controls were then masked. Next I sprayed Metallizer aluminum on all the
undersides, not being too concerned with overspray. I used the Metallizer sort
of like an undercoat for the Alclad II. Metallizer seems to be a much more
benign lacquer than the Alclad so I decided to see what happens when using it.
Once dry it was lightly buffed with a cloth and Alclad Aluminum was sprayed over
the area. Then areas of the underside were masked off and panels sprayed with
other colors of Alclad Aluminum to give a patchwork effect.
The first thing I did was to paint the upper surface green using Aeromaster
Nakajima Army Green. When dry, I sprayed the underside of the control surfaces
with Aeromaster's Army Grey Green, a common color for fabric control surfaces.
The controls were then masked. Next I sprayed Metallizer aluminum on all the
undersides, not being too concerned with overspray. I used the Metallizer sort
of like an undercoat for the Alclad II. Metallizer seems to be a much more
benign lacquer than the Alclad so I decided to see what happens when using it.
Once dry it was lightly buffed with a cloth and Alclad Aluminum was sprayed over
the area. Then areas of the underside were masked off and panels sprayed with
other colors of Alclad Aluminum to give a patchwork effect.
|
MORE CONSTRUCTION |
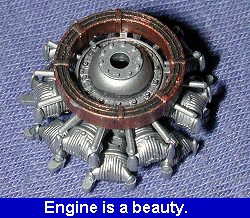 Returning to the workbench, the engine was assembled. This is a nicely
detailed affair that was painted aluminum and then given a healthy black wash.
The circular oil cooler was hand painted copper with Tamiya copper and also
given a nice wash. Wheel wells, flap wells and inner gear doors were hand
painted Aotake using Aeromaster Acrylics. The landing gear is a rather
interesting construct. In order to make maximum use of sprues, the part where
the wheel fork attaches to the gear is separate from the strut. It is then glued onto
the strut in the direction it needs to go. Like the wing tips, this saves money
for Hasegawa, but results in a part that is difficult to get properly aligned.
Especially since the keyway prevents it! The solution is a healthy dose of glue
and while the plastic is soft, gently force the proper alignment.
Returning to the workbench, the engine was assembled. This is a nicely
detailed affair that was painted aluminum and then given a healthy black wash.
The circular oil cooler was hand painted copper with Tamiya copper and also
given a nice wash. Wheel wells, flap wells and inner gear doors were hand
painted Aotake using Aeromaster Acrylics. The landing gear is a rather
interesting construct. In order to make maximum use of sprues, the part where
the wheel fork attaches to the gear is separate from the strut. It is then glued onto
the strut in the direction it needs to go. Like the wing tips, this saves money
for Hasegawa, but results in a part that is difficult to get properly aligned.
Especially since the keyway prevents it! The solution is a healthy dose of glue
and while the plastic is soft, gently force the proper alignment.
While that was drying, the attachment points for the combat flaps were glue in place. I next did the prop and spinner. This assembly is a bit of interesting engineering. The prop is a two-bladed version on the -I. It was painted bright aluminum on the face and flat black on the back. The lower half of the spinner is in two parts and traps the blade in between them. The tip of the spinner is separate and glues onto the rest of the assembly. This makes it easy to do those schemes where the spinner is two different colors. After that was done, the canopy was masked and painted with Nakajima Army Green.
The landing gear were then glued in place and when dry, the wheels attached. The tail wheel was painted and then slipped into the plastic sleeve. The kit was then sprayed with clear gloss acrylic in preparation for the decals.
|
DECALS AND FINAL STEPS |
 The first decals I put on were the fuselage Hinomarus. Then the fuselage
band. They reacted well to Solvaset and snuggled right down. It was then that I
realized that I had forgotten to paint the black anti-glare panel on the plane
so when the decals were dry, I ziggied to the paint room and made up for the
glitch! Returning to the workbench, I put on one of the large white lightning
bolts. This is not an easy decal to use. In addition, I had to cut away at a bit
of the fuselage band as shown in the decal instructions. Fortunately, it came
away without too much trauma. While that band was drying, I put on the wing
Hinomarus using the kit decals. The Aeromaster sheet only provides a small
number of insignia, requiring you to buy their Japanese insignia sheet. A
problem now that Aeromaster is out of business! The rest of the decals went on
without any trauma.
The first decals I put on were the fuselage Hinomarus. Then the fuselage
band. They reacted well to Solvaset and snuggled right down. It was then that I
realized that I had forgotten to paint the black anti-glare panel on the plane
so when the decals were dry, I ziggied to the paint room and made up for the
glitch! Returning to the workbench, I put on one of the large white lightning
bolts. This is not an easy decal to use. In addition, I had to cut away at a bit
of the fuselage band as shown in the decal instructions. Fortunately, it came
away without too much trauma. While that band was drying, I put on the wing
Hinomarus using the kit decals. The Aeromaster sheet only provides a small
number of insignia, requiring you to buy their Japanese insignia sheet. A
problem now that Aeromaster is out of business! The rest of the decals went on
without any trauma.
With the decals in place, the kit was given a coat of clear semi-matte to seal in the decals. Then it was on to the final pieces. The maneuvering flaps were glued in place as was the radio mast. This was painted flat black. The wing pitot tube was installed and painted aluminum as were the landing lights inside the leading edge of the wing. Moving to the cockpit, the telescopic gun sight was glued in as were the canopy bits. Gluing on the engine cowling was followed by the prop and spinner. Affixing the radio antenna and a bit of grunging up with pastels were the final steps.
|
CONCLUSIONS |
Hasegawa has provided us with yet another great WWII Japanese fighter model. Not sure how many they will sell here in the US, but I'm sure they will be well received in the home market. There are a huge number of markings that can be applied to the various versions of the Ki-43 and I'm sure that this alone will keep Hasegawa producing a multiplicity of boxings to cover many of them. It also helps that the kit is very well engineered (other than those areas I fussed about in the review) and can be built by almost anyone!
Review kit courtesy of me and my wallet!
September 2001
Copyright ModelingMadness.com. All rights reserved. No reproduction in part or in whole without express permission from the editor.
If you would like your product reviewed fairly and fairly quickly, please contact the editor or see other details in the Note to Contributors.
Back to Reviews Page 2015