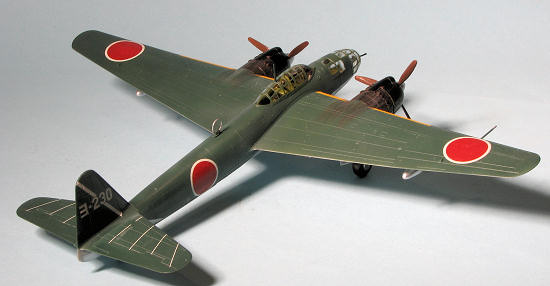
Hasegawa 1/72 P1Y1 'Ginga' (Torpedo Version)
| KIT #: | 00025 |
| PRICE: | $45.00 SRP when new |
| DECALS: | Several options |
| REVIEWER: | Scott Van Aken |
| NOTES: | 1999 boxing with resin torpedo |
| HISTORY |
The Japanese never really had a fast, twin engined medium bomber
until 1944 when the Army deployed its Ki-67 Hiryu and the Navy its P1Y1 Ginga
(Milky Way). Until then, they had relied on updated prewar designs that were
unsuitable for the kind of war they had gotten themselves into. The development
of the Ginga was a rocky road to say the least. Design work started in 1940
 with
the aim of building a plane that was the equivalent of the Ju-88 or B-25. To do
that, required a sleek airframe and powerful engines. Unfortunately, the
Nakajima Homare engine was chosen. This engine showed a great deal of promise
and so many aircraft builders wanted it for their new designs. When it worked
well it was a superb powerplant, however that was the problem. It rarely worked
as advertised.
with
the aim of building a plane that was the equivalent of the Ju-88 or B-25. To do
that, required a sleek airframe and powerful engines. Unfortunately, the
Nakajima Homare engine was chosen. This engine showed a great deal of promise
and so many aircraft builders wanted it for their new designs. When it worked
well it was a superb powerplant, however that was the problem. It rarely worked
as advertised.
When the prototype Gingas were made it was found that they had a
lot of hydraulic systems that just didn't seem to want to work properly. Even in
the best of times, maintenance was not easy and there were a number of problems
with the hydraulics. Despite this, the plane was put into production, hoping
that the difficulties could be cured while the planes were being built. It just
didn't work out that way. Despite production P1Y1 aircraft coming off the
production lines in late 1943, it wasn't until October of 1944, when over 450
airframes had been produced, that the
 Navy finally accepted the aircraft. Even
then a large number were found unsuitable for service due to serviceability and
reliability problems.
Navy finally accepted the aircraft. Even
then a large number were found unsuitable for service due to serviceability and
reliability problems.
Despite these problems, the aircraft was found to meet the expectations of the Navy in terms of speed, range and bomb load. Eventually the engine situation with the Homare became tolerable, but it was feared that production of engines would be insufficient. To that end, Kawanishi decided to install Mitsubishi Kasei engines, which offered similar power as the Homares but were much more reliable. This was the P1Y2, many of which were developed as the P1Y2-S night fighter. As experience with the plane increased, serviceability improved and a number of interesting modifications and variants were suggested. However, the end of the war put a halt to all these plans.
| THE KIT |
This is another of the continuing line of Hasegawa twin-engined bombers. As you can see from the sprue image, there are quite a few parts and pieces to it. However since the Frances was not built in too many different variants, there are not a lot of interchangeable subassemblies to cause construction problems.
Molded in Hasegawa's usual grey plastic, the level of
detailing is all that we have come to expect from Japan's premier aircraft kit
producer. There were a few parts that had rather thick mold seams and a few
ejector pin markings will have to be filled, the most difficult of those being
in the bomb bay, but overall, there are no mold problems with the parts
themselves. I have read that when one cuts away the braces inside the engine cowlings
to use a razor saw and work carefully. Apparently it is easy to split open the
cowling! Typically, the cockpit is somewhat basic
 and relies on decals for
instruments.
and relies on decals for
instruments.
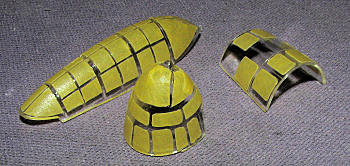
The P1Y1 is not an aircraft that offers a lot of options. In fact, the only ones are to have the bomb bay open or closed and whether to use the wing drop tanks or not. I can tell you that if you have been hanging on to the old Revell kit of the Frances, you can now sell it off or put it into your kit collection of oldies as this is a much better kit. What added extra to the MSRP of this kit is a resin torpedo. To use it, one has to add the resin section of bomb bay, cut on the bomb bay doors, and cut away fuselage sections behind the extant bay opening to lengthen the bay. This is all clearly shown in the instructions and should not be a problem for an intermediate modeler.
Instructions are very good, as one would expect. Paint callouts are from the Gunze range, though you can substitute your favorites from Testors or Tamiya or Humbrol. Apparently only one unit flew this variant, and that was the Yokosuka Air Group. Thought only one full tail code is provided, there are enough extra numbers to do just about any plane in the Group. Now the Frances can be painted any way you want as long as it is green over light grey with yellow wing leading edges. If you don't want to paint the yellow parts, then use what is supplied on the decals. T Decals are the standard Hasegawa ones which can work well, but need some care in application.
| CONSTRUCTION |
I got this kit on sale for a mere $10 as the previous owner had already tried
cutting away the fuselage for the lengthened bomb bay and had botched it. Still,
I know how to fix minor glitches and so decided to give this one a go. Many
years ago I had built the
 Revell version of this aircraft. That was a fairly
nice kit for its time, rivets and all, but was rather lacking in some of the
detail we now take for granted.
Revell version of this aircraft. That was a fairly
nice kit for its time, rivets and all, but was rather lacking in some of the
detail we now take for granted.
Anyway, the first thing I did was start to build subassemblies. This meant wheels, drop tanks and the engine nacelles. I also glued together all the interior bits save the rear gun as these would all be painted Mitsubishi Interior Green. There is a bulkhead that is made from clear plastic so the clear portions of it were masked off prior to installation. I then did some prepainting.
I have been trying a ready to spray paint by Tru-Color and did the wheel wells and other bits with their Aluminum paint. It goes on quite well and looks very good. Comparable to Alclad II Aluminum in terms of the shade. The interior was painted using Colour-Coats' paint from their Japanese line.
 I
then added the instrument decals to the interior. These work well and
considering it will be only visible through the canopy, are adequate for the
job. I would suggest not installing the pilot's rather oddly shaped
seat until after the pilot console decals are applied. I also used so
I
then added the instrument decals to the interior. These work well and
considering it will be only visible through the canopy, are adequate for the
job. I would suggest not installing the pilot's rather oddly shaped
seat until after the pilot console decals are applied. I also used so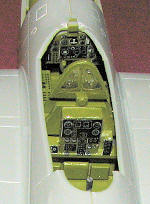 me PMA
1mm tape for seat belts. I do not think Japanese bombers used a shoulder
harness, but even if they did, the belts are better than nothing. The rear
gun was then glued in place in the stowed position.
me PMA
1mm tape for seat belts. I do not think Japanese bombers used a shoulder
harness, but even if they did, the belts are better than nothing. The rear
gun was then glued in place in the stowed position.
The interior was then cemented together in stages. As usual, I used superglue to fill any seams as it will not shrink and will not chip when one rescribes any lost detail.
After opening the holes for the drop tanks, I
installed the wheel well inserts and cemented the wings together. After the
usual seam work on the leading edge, I installed the engine nacelle rear
pieces and then the firewall section that includes the ejector exhaust. The
lower oil cooler intake was also installed. I used one of the engine
cowlings to ensure that all the bits were properly
 aligned. I then attached
the tail wheel housing. This was a bit undersized so needed a couple of
super glue filler applications. Next, the wings. These are an exceptional
fit. They are keyed to make sure they are tight and after applying glue to
both the roots and the wings they were simply pressed together. You can see
in the image above of the cockpit how well they fit. The clear bits were
then masked, no a short process, and then glued into place on the fuselage.
Fit is very good. I should mention that the nose cannon is in two parts. The
body of the gun fits inside the nose piece and then later, one attaches the
barrel. A great way to do this sort of thing.
aligned. I then attached
the tail wheel housing. This was a bit undersized so needed a couple of
super glue filler applications. Next, the wings. These are an exceptional
fit. They are keyed to make sure they are tight and after applying glue to
both the roots and the wings they were simply pressed together. You can see
in the image above of the cockpit how well they fit. The clear bits were
then masked, no a short process, and then glued into place on the fuselage.
Fit is very good. I should mention that the nose cannon is in two parts. The
body of the gun fits inside the nose piece and then later, one attaches the
barrel. A great way to do this sort of thing.
| COLORS & MARKINGS |
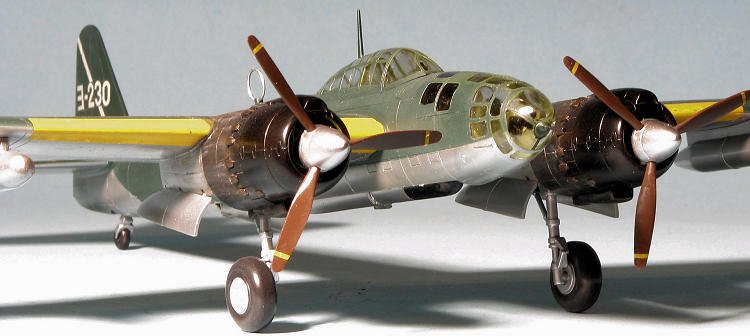
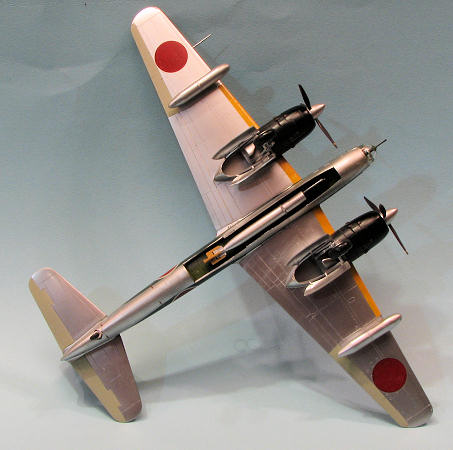
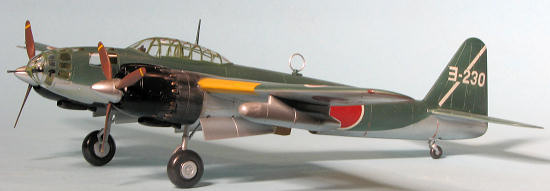 I painted the outside of the clear bits with the
interior shade and painted the engine nacelles (the forward part) with black.
The black was then masked off and the underside had all the areas that needed it
painted with Tru-Color's aluminum. I had tacked on the bomb bay doors (which are
not used for the torpedo version) to help seal up the bay to keep paint out of
it. The horizontal stabilizers were painted separately from the fuselage. Upper
surfaces were painted with Colorcoats Nakajima Exterior Green as this was the
shade called out in the instructions. I masked between the upper and lower
surfaces to get a sharp demarcation line.
I painted the outside of the clear bits with the
interior shade and painted the engine nacelles (the forward part) with black.
The black was then masked off and the underside had all the areas that needed it
painted with Tru-Color's aluminum. I had tacked on the bomb bay doors (which are
not used for the torpedo version) to help seal up the bay to keep paint out of
it. The horizontal stabilizers were painted separately from the fuselage. Upper
surfaces were painted with Colorcoats Nakajima Exterior Green as this was the
shade called out in the instructions. I masked between the upper and lower
surfaces to get a sharp demarcation line.
| FINAL CONSTRUCTION |
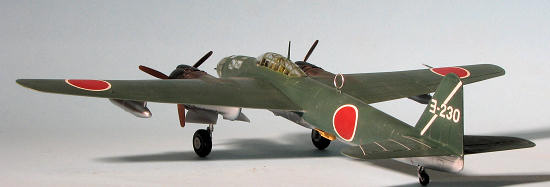
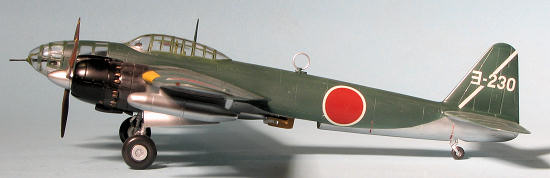
 Once that was done, I started applying the decals. Now normally, Hasegawa
decals hold up rather well and these were only 13 years old. However, they
proved to be rather brittle and none of the markings of any size made it off
the backing without some part of them cracking or chipping. I also stupidly
applied the wing leading edge decals instead of painting them. Despite using
Mr.Mark Softer, which is supposed to be formulated for Japanese kit decals,
I did not get a good seat and you can see light and dark areas on these
markings when looking closely at them. Since the sheet gives options for the
tail numbers, I used one of them for the last digit just to be a bit
different from the kit. There really are not a lot of decals for this
aircraft and so those who are not as slow as I could probably have them on
in a day. It took me about four as I put on a pair, let them dry a bit and
then used setting solution. After that dries, I go on to a few more and
repeat till done.
Once that was done, I started applying the decals. Now normally, Hasegawa
decals hold up rather well and these were only 13 years old. However, they
proved to be rather brittle and none of the markings of any size made it off
the backing without some part of them cracking or chipping. I also stupidly
applied the wing leading edge decals instead of painting them. Despite using
Mr.Mark Softer, which is supposed to be formulated for Japanese kit decals,
I did not get a good seat and you can see light and dark areas on these
markings when looking closely at them. Since the sheet gives options for the
tail numbers, I used one of them for the last digit just to be a bit
different from the kit. There really are not a lot of decals for this
aircraft and so those who are not as slow as I could probably have them on
in a day. It took me about four as I put on a pair, let them dry a bit and
then used setting solution. After that dries, I go on to a few more and
repeat till done.| CONCLUSIONS |
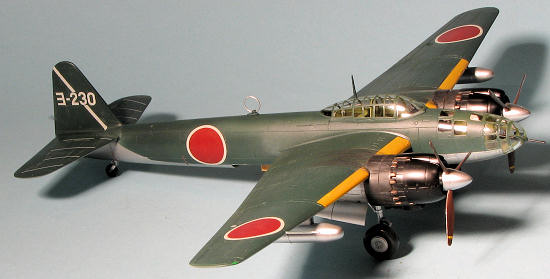
 I
have to say that I enjoyed building this one. It is not super complex and the
addition of the torpedo makes for an interesting variant of a plane that did not
have a ton of variants. This is not the first Ginga I have built, as many years
back, I tackled the old Revell kit. While that is still a fairly nice kit for
its era, this one vastly supercedes it in terms of fit and overall detail. I
know that Japanese twins are not the most popular subjects around, but if you
find yourself wanting to build one, this would be an excellent choice. While not
currently in their catalogue, they can be pretty easily found from the usual
sources. I got mine from a sales table for less than 1/4 the retail price.
I
have to say that I enjoyed building this one. It is not super complex and the
addition of the torpedo makes for an interesting variant of a plane that did not
have a ton of variants. This is not the first Ginga I have built, as many years
back, I tackled the old Revell kit. While that is still a fairly nice kit for
its era, this one vastly supercedes it in terms of fit and overall detail. I
know that Japanese twins are not the most popular subjects around, but if you
find yourself wanting to build one, this would be an excellent choice. While not
currently in their catalogue, they can be pretty easily found from the usual
sources. I got mine from a sales table for less than 1/4 the retail price.
| REFERENCES |
http://en.wikipedia.org
April 2012 Copyright ModelingMadness.com. All rights reserved. No reproduction in part or in whole without express permission from the editor.
If you would like your product reviewed fairly and fairly quickly, please contact the editor or see other details in the Note to Contributors.