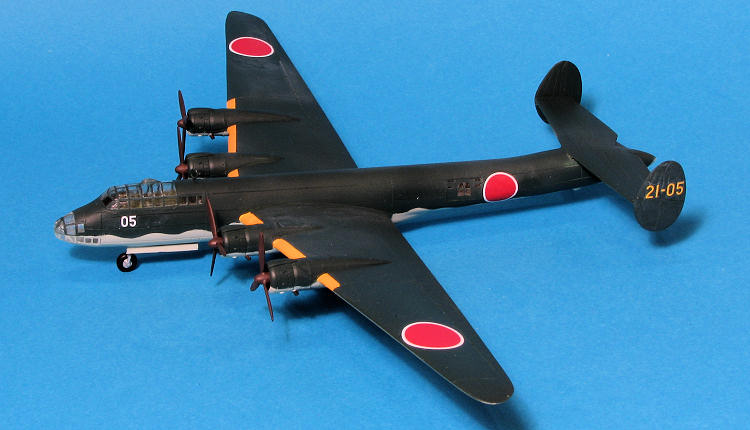
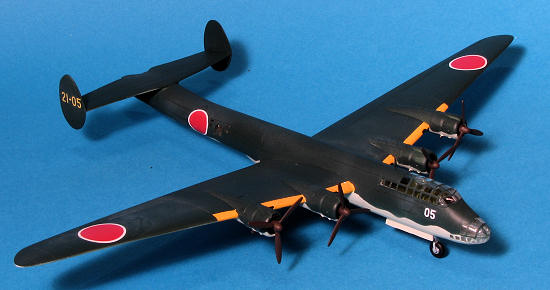
Anigrand 1/144 G5N 'Shinzan'
| KIT #: | AA-4037 |
| PRICE: | $96.00 MSRP |
| DECALS: | Two options |
| REVIEWER: | Scott Van Aken |
| NOTES: | Resin, includes Ki-78, E16A, and R2Y aircraft as well |
| HISTORY |
In 1938, with success of the Mitsubishi G4M
attack bomber, the Japanese Navy issued requirement for an advanced four-engine
heavy bomber which
could operate more long-range and bomb load than the G4M.
Nakajima and Kawanishi were selected to create two new bombers, one was the
land-based airplane and the other was flying boat. Kawanishi agree d to tackle
the flying boat that became H8K Emily, and Nakajima took the land-based bomber
that led to the G5N Shinzan program. The G5N Shinzan was the first Japanese
large aircraft ever built. The Japanese Army also interested in this heavy
bomber. The Army owned Douglas DC-4E was handed over to Nakajima for both the
Navy G5N and Army Ki-68 programs. Nakajima engineers took the wings, landing
gears and powerplant installation from the DC-4E to complete the G5N1 prototype.
The first prototype made its first flight in 1942. Performance was as
disappointing as the DC-4E (not surprising as it used the same wings and
engines). A total of six prototypes were completed. Four prototypes were
converted to G5N-2 transport airplanes. Due to the lack of experience with large
aircraft development, the G5N program was cancelled in 1944.
d to tackle
the flying boat that became H8K Emily, and Nakajima took the land-based bomber
that led to the G5N Shinzan program. The G5N Shinzan was the first Japanese
large aircraft ever built. The Japanese Army also interested in this heavy
bomber. The Army owned Douglas DC-4E was handed over to Nakajima for both the
Navy G5N and Army Ki-68 programs. Nakajima engineers took the wings, landing
gears and powerplant installation from the DC-4E to complete the G5N1 prototype.
The first prototype made its first flight in 1942. Performance was as
disappointing as the DC-4E (not surprising as it used the same wings and
engines). A total of six prototypes were completed. Four prototypes were
converted to G5N-2 transport airplanes. Due to the lack of experience with large
aircraft development, the G5N program was cancelled in 1944.
| THE KIT |
I'm pleased to see Anigrand continuing to do
large aircraft in 1/144 scale like this. Like most of their 1/144 kits, it
comes with three other aircraft. In this case the Aichi E16A floatplane,
Yokosuka R2Y, and Kawanishi Ki-78. The E16A saw unit service, the R2Y never
made it out of initial construction, and the Ki-78 was only built as a
prototype.
 I mentioned last time I previewed an Anigrand kit that the quality of the
kits seems to have been improving. This one is also quite nicely cast,
though it does have some molding air pockets on wing tips and the sides of
the wing nacelles. I also had one wing tip with a large chunk removed. None
of these are any problem for those with resin kit experience, though I'd be
delighted if all the molded parts were perfect.
I mentioned last time I previewed an Anigrand kit that the quality of the
kits seems to have been improving. This one is also quite nicely cast,
though it does have some molding air pockets on wing tips and the sides of
the wing nacelles. I also had one wing tip with a large chunk removed. None
of these are any problem for those with resin kit experience, though I'd be
delighted if all the molded parts were perfect.
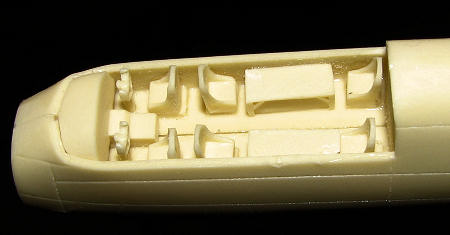
The kit has a nicely done interior that you should be able to see through
the clear resin cockpit glass. In fact, this aircraft has quite a lot of
clear bits to be attached. Now you can do either the bomber prototypes or
the later transport versions by leaving off the upper turret. I found the
wheel wells and interior free of those pesky resin balls that plagued
earlier kits. The landing gear appear to be quite sturdy as they will need
to be as the builder has to jam pack the nose with as much weight as will
fit to keep it from tail sitting. I need to point out how very nicely done
each of the forward engine nacelles are molded. A lot of detail and crisply
done as well.
The
instructions are well done with the usual exploded views from the top and
bottom quarters to show where the bits fit. On the Shinzan, an additional
view of the fit of the interior bits is provided. The Shinzan can be done in
two schemes. One is the usual dark green over light grey with yellow wing
leading edges. The other has Earth added to the upper camo scheme in a
disruptive pattern. Though not shown, at least some of these planes were
painted orange on the underside if one is to believe several popular
illustrations of the type. As usual, you get two identical decal sheets to
take care of the usual insignia and tail codes. These are very nicely
printed and will provide no surprises, though they are a tad thicker than
what you may be used to.
| CONSTRUCTION |
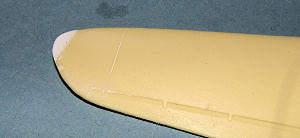
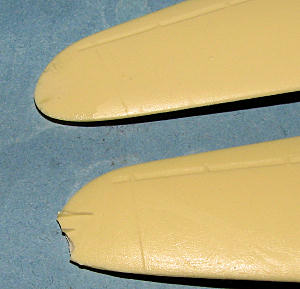 With all resin kits it is best to start by fixing any
molding glitches that you find. In this case it meant cutting the wing tip clean
and adding in a section of plastic card to replace it. A razor saw easily
removed the broken area
With all resin kits it is best to start by fixing any
molding glitches that you find. In this case it meant cutting the wing tip clean
and adding in a section of plastic card to replace it. A razor saw easily
removed the broken area
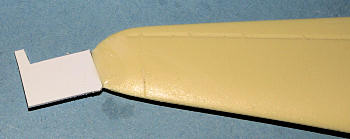 and a piece of card was superglued into place. I used a
rather large piece as it was easier to handle. Then much of the card was cut
away with my handy Xuron flush cutters and a sanding stick took care of the
rest. I used the good wing to be sure the tips were the same shape.
and a piece of card was superglued into place. I used a
rather large piece as it was easier to handle. Then much of the card was cut
away with my handy Xuron flush cutters and a sanding stick took care of the
rest. I used the good wing to be sure the tips were the same shape.
 After
that, I worked on getting the fuselage prepped. The wings were test fitted to be
sure they'd fit well and I had to do a bit of carving on the tail attachment
area. Once that was done, it came time to start filling in the forward fuselage
with weight to be sure
After
that, I worked on getting the fuselage prepped. The wings were test fitted to be
sure they'd fit well and I had to do a bit of carving on the tail attachment
area. Once that was done, it came time to start filling in the forward fuselage
with weight to be sure
 this wouldn't
be a tail sitter. When it looked like there was enough, I taped all the major
assemblies to be sure it would have enough and when satisfied, I added a bit
more. At this time, the fuselage was glued together, a mistake.
this wouldn't
be a tail sitter. When it looked like there was enough, I taped all the major
assemblies to be sure it would have enough and when satisfied, I added a bit
more. At this time, the fuselage was glued together, a mistake.
 It
was a mistake because it made it very difficult to get the side rear
transparencies in place and flush. In fact, it was nigh near impossible so the
fit here isn't very good. However, we learn and move along. The cockpit section
was built up while the large air voids on the side of some of the nacelles was
filled and filed. The interior was painted with a nice dark green as I didn't
have any Nakajima Interior Green to use (and yes, the color is available).
The usual bits were painted black to add some interest.
It
was a mistake because it made it very difficult to get the side rear
transparencies in place and flush. In fact, it was nigh near impossible so the
fit here isn't very good. However, we learn and move along. The cockpit section
was built up while the large air voids on the side of some of the nacelles was
filled and filed. The interior was painted with a nice dark green as I didn't
have any Nakajima Interior Green to use (and yes, the color is available).
The usual bits were painted black to add some interest.
Around this time, the wings were glued in place. The fit is actually very good, but later I decided to fill in a few small seams. With wings in place, the tail planes were added. The horizontal stab is a single piece and quite thin so it warps rather easily. I now had a complete airframe so started strafing cats to ensure its viability. No resistance was met.
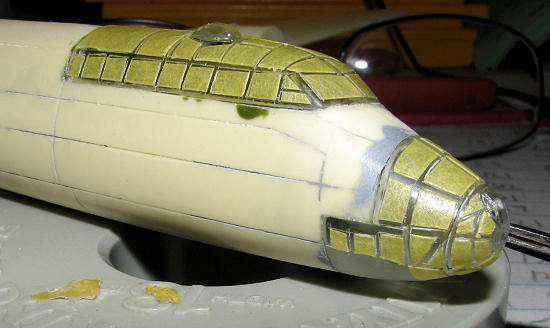
 Time to start working on clear bits. First, the ones I was
going to use were removed from the sprues and sanded down. The main cockpit
piece needed to have the back section removed to fit in place as the rear sets
impeded it otherwise. It turned out that the instrument panel top also needed
some sanding for optimal fit. Then the parts were glued in place using clear
paint, which is surprisingly strong and doesn't fog. The three nose
transparencies were glued on in the same manner as was the initial rear gun
transparency. I then noticed that these didn't exactly fit flush so out came the
fill to smooth the transparency-to-fuselage join. It also meant sanding into the
transparencies, but I felt it was the only way to do things. This took several
applications and then the kit sat for a few weeks while I moved on to other
projects.
Time to start working on clear bits. First, the ones I was
going to use were removed from the sprues and sanded down. The main cockpit
piece needed to have the back section removed to fit in place as the rear sets
impeded it otherwise. It turned out that the instrument panel top also needed
some sanding for optimal fit. Then the parts were glued in place using clear
paint, which is surprisingly strong and doesn't fog. The three nose
transparencies were glued on in the same manner as was the initial rear gun
transparency. I then noticed that these didn't exactly fit flush so out came the
fill to smooth the transparency-to-fuselage join. It also meant sanding into the
transparencies, but I felt it was the only way to do things. This took several
applications and then the kit sat for a few weeks while I moved on to other
projects.
 Upon return, I started
masking the transparencies. This is not exactly a quick job and took quite a
while. During the delay, I found a Koku-Fan FAOW (Famous Aircraft of the World)
that included the Liz and it had a number of photos, some in color, of this
plane. I had also decided to cut down on masking by doing the transport version.
The kit includes plugs for the upper turret, lower gun position and the tail
cone transparency. These were glued in place and after the usual filler and
sanding I continued with the kit. Interestingly, the instructions are mum on
these pieces without any illustrations of them, though they are, of course,
included in the kit. Decal and painting instructions show the transport version
complete with all the bomber glass gun positions.
Upon return, I started
masking the transparencies. This is not exactly a quick job and took quite a
while. During the delay, I found a Koku-Fan FAOW (Famous Aircraft of the World)
that included the Liz and it had a number of photos, some in color, of this
plane. I had also decided to cut down on masking by doing the transport version.
The kit includes plugs for the upper turret, lower gun position and the tail
cone transparency. These were glued in place and after the usual filler and
sanding I continued with the kit. Interestingly, the instructions are mum on
these pieces without any illustrations of them, though they are, of course,
included in the kit. Decal and painting instructions show the transport version
complete with all the bomber glass gun positions.
Now I had enough to start painting.
| COLORS & MARKINGS |
 Step one was to paint the leading edges of the wings in white, which I did
using Mr. Color lacquers. This provided a base for the Testors Model Master
yellow I used for the ID markings. After all that dried, I masked over it and
painted the underside in Nakajima Navy Grey, a Colourcoats enamel paint. That
was masked and having forgotten to add the engines, I did so at this time after
grinding out the usual resin blobs in the nacelles. The upper surface was then
painted in Nakajima Navy Green, yet another fine Colourcoats shade.
Step one was to paint the leading edges of the wings in white, which I did
using Mr. Color lacquers. This provided a base for the Testors Model Master
yellow I used for the ID markings. After all that dried, I masked over it and
painted the underside in Nakajima Navy Grey, a Colourcoats enamel paint. That
was masked and having forgotten to add the engines, I did so at this time after
grinding out the usual resin blobs in the nacelles. The upper surface was then
painted in Nakajima Navy Green, yet another fine Colourcoats shade.
As you can imagine, there was the usual back and forth painting, some of it with a brush. The engines were brush painted Citadel's Mithril Silver and given a black wash as was the engine oil cooler intake. This same silver was used for the landing gear bays, inside of the gear doors as well as the wheel hubs and gear legs.
| FINAL CONSTRUCTION |
Next step was to install the landing gear after painting the main gear tires
black. Much to my delight, I'd put in enough nose weigh so no worries on tail
sitting. The gear doors were attached at this time and I turned my attention to
the props. Things were going
 rather smoothly. It was with some dismay that I
realized that Anigrand had supplied three blade props. Every photo of the G5N in
the reference showed four blade versions. I contacted Anigrand about it a few
days ago, sending a couple of photos. They quickly got back to me stating I was
the first to bring this to their attention and in about a month they would have
four blade props available. So if you have bought this kit, give them five or
six weeks and contact them about getting the proper replacement.
rather smoothly. It was with some dismay that I
realized that Anigrand had supplied three blade props. Every photo of the G5N in
the reference showed four blade versions. I contacted Anigrand about it a few
days ago, sending a couple of photos. They quickly got back to me stating I was
the first to bring this to their attention and in about a month they would have
four blade props available. So if you have bought this kit, give them five or
six weeks and contact them about getting the proper replacement.
Meanwhile, I decided to continue with the wrong props. These were assembled without too much fuss. I lost a couple of the blades (don't ask me where they went) so had to make some replacements out of card stock. These were then painted Japanese A/N Brown Primer using an old bottle of Aeromaster acrylic. It took two coats. I also installed the steerable DF loop antenna and painted a bunch of glitches.
The model was then given a clear gloss coat for the decals. These went on without any problems, though they do refuse to snuggle into engravings, even with Solvaset. Looking at an old color photo of this plane taken at the end of the war, it seems that perhaps the nose number should be yellow instead of white, but it isn't a biggie. With the decals in place, a coat of Polly Scale matte clear was applied. I then carefully removed what seem to be hundreds of tiny window masks. After that, the intakes were painted black , the props attached using clear paint and that was it.
| CONCLUSIONS |
Anigrand kits are not for everyone. The builder needs to have the skills necessary to complete a resin kit. This means some troubleshooting abilities and some skill with a grinding bit on a motor tool or patience with files and such. However, if you want a kit such as this, which is available no where else, then it well worth the effort to learn the skills and build some of these. They get easier as experience grows and will provide an excellent way to put some really large planes on your shelf without taking up a lot of space. Anigrand seems quite committed to doing 1/144 and I'm very pleased that they are. Adding in the extra aircraft also adds extra value to the kit.
| REFERENCES |
The Anigrand web site.
Koku Fan FAOW #90, Navy Experimental Heavy Attack Bombers, October 1977
Copyright ModelingMadness.com. All rights reserved. No reproduction in part or in whole without express permission from the editor.
If you would like your product reviewed fairly and quickly, please contact the editor or see other details in the Note to Contributors.