Fine Molds 1/48 C5M2 'Babs'
| KIT #: | FB 24 |
| PRICE: | 3240 yen plus shipping |
| DECALS: | Three options |
| REVIEWER: | Scott Van Aken |
| NOTES: | 2018 tooling |
| HISTORY |
The Mitsubishi Ki-15 (九七式司令部偵察機 Kyunana-shiki sireibu teisatsuki) was a Japanese reconnaissance aircraft and a light attack bomber of the Second Sino-Japanese War and Pacific War. It began as a fast civilian mail plane. It was a single-engine, low-wing, cantilever monoplane with a fixed tailwheel undercarriage; it carried a crew of two. It served with both the Imperial Japanese Army and Navy (as the C5M). During World War II it was nicknamed "Babs" by the Allies.
 The Japanese Navy, impressed by the performance of this
aircraft, ordered 20 examples of the Ki-15-II under the designation
“Navy Type 98 Reconnaissance Plane Model 1," or Mitsubishi
designation C5M1, even before the Army. The Navy subsequently acquired
30 C5M2 aircraft which had an even more powerful 708 kW
(949 hp) Nakajima Sakae 12 engine. They were used for reconnaissance
duties.
The Japanese Navy, impressed by the performance of this
aircraft, ordered 20 examples of the Ki-15-II under the designation
“Navy Type 98 Reconnaissance Plane Model 1," or Mitsubishi
designation C5M1, even before the Army. The Navy subsequently acquired
30 C5M2 aircraft which had an even more powerful 708 kW
(949 hp) Nakajima Sakae 12 engine. They were used for reconnaissance
duties.
| THE KIT |
 Since this is a two seat aircraft, there is a lot of interior detail as a
lot will be visible through the greenhouse. Things like the fuselage
fuel tank and the floor camera are part of the fit. You also get a complete
radio suite for the rear gunner/radio operator/observer. Full sidewall
framing is separate and will eventually encase the cockpit assembly.
Since this is a two seat aircraft, there is a lot of interior detail as a
lot will be visible through the greenhouse. Things like the fuselage
fuel tank and the floor camera are part of the fit. You also get a complete
radio suite for the rear gunner/radio operator/observer. Full sidewall
framing is separate and will eventually encase the cockpit assembly.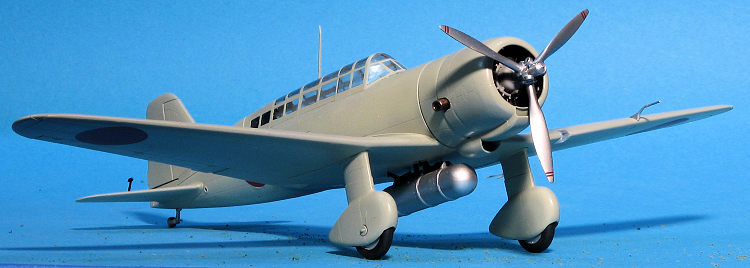 Instructions
are well done with parts of it in English and Gunze paints being the
standard reference. The colors of all three options are overall Mitsubishi
Navy Grey. I'm not sure if this is the concrete color of the Zero or not.
These planes were heavily used in the first year or so of the Pacific War
for reconnaissance, especially in the New Guinea area. I just finished
reading a book on this theater of operations and discovered its widespread
use so this kit is quite timely. The box art plane is from the Tainan Air
Group based at Rabaul in August of 1942. You also get V-18 which was of the
same unit based at Lae and X-14 of the 3rd Air Group based at Bali in March
1942. The decal sheet is nicely printed and until someone does aftermarket,
remains your main option.
Instructions
are well done with parts of it in English and Gunze paints being the
standard reference. The colors of all three options are overall Mitsubishi
Navy Grey. I'm not sure if this is the concrete color of the Zero or not.
These planes were heavily used in the first year or so of the Pacific War
for reconnaissance, especially in the New Guinea area. I just finished
reading a book on this theater of operations and discovered its widespread
use so this kit is quite timely. The box art plane is from the Tainan Air
Group based at Rabaul in August of 1942. You also get V-18 which was of the
same unit based at Lae and X-14 of the 3rd Air Group based at Bali in March
1942. The decal sheet is nicely printed and until someone does aftermarket,
remains your main option.
| CONSTRUCTION |
First thing I did was to check over the parts to see what was where. I ran into two issues with the H sprue. One was that the roll bar piece had broken in half and only half of the bar was there. The other half was not in the kit bag. The other is that one of the two small caps for the landing gear was gone from the sprue. It was also not in the bag. It was good to find out this before opening the holes for the roll bar. For the other I eventually just cut a section of sprue the right diameter for the hole and installed that.
 One starts with the cockpit. This is considerably more
involved than that of the recent Claude build. I glued together as many of
the pieces that would be the same color before painting those parts and the
inside of the fuselage with AK Interactive Mitsubishi interior green. This
paint is rather thin and so required a couple of coats. A pair of small
holes for the camera mount need to be opened in the aft compartment floor.
There are decals for the instrument panel, but none for the radio. I found
that getting the side framework pieces properly aligned with the three
bulkheads provided for the interior to be quite a chore. Even with clamping,
things just did not want to line up. Fortunately this is flexible enough
that attaching this assembly to the fuselage and then closing the halves was
enough to force things to straighten out. Fine molds has quite large
attachment areas for the interior and a few other parts, which really
helped. Before closing the fuselage there are a few holes and slots that
need opened.
One starts with the cockpit. This is considerably more
involved than that of the recent Claude build. I glued together as many of
the pieces that would be the same color before painting those parts and the
inside of the fuselage with AK Interactive Mitsubishi interior green. This
paint is rather thin and so required a couple of coats. A pair of small
holes for the camera mount need to be opened in the aft compartment floor.
There are decals for the instrument panel, but none for the radio. I found
that getting the side framework pieces properly aligned with the three
bulkheads provided for the interior to be quite a chore. Even with clamping,
things just did not want to line up. Fortunately this is flexible enough
that attaching this assembly to the fuselage and then closing the halves was
enough to force things to straighten out. Fine molds has quite large
attachment areas for the interior and a few other parts, which really
helped. Before closing the fuselage there are a few holes and slots that
need opened.
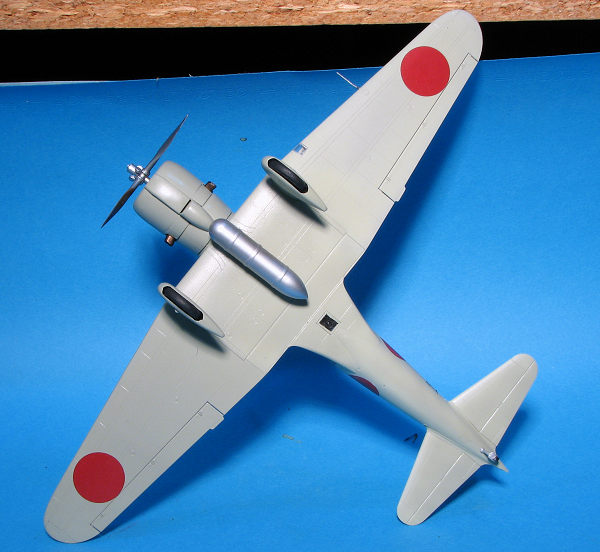
I found the fuselage halves to fit fairly well, but not as well as with the Claude. A bit more work with filler was needed on the join. While that was being attended to in terms of sanding, I assembled the upper and lower wing halves after opening the holes for the drop tank. I did not build up the machine gun at this time, preferring to wait until just before attaching the canopy section. I did, however, attach the rudder and the nice interlocking tailplanes. When that was done, the wings were attached. Again, a good fit though the lower rear wing/fuselage join needed some filler; probably due to my excessive sanding on the fuselage.
 The engine also did not quite go together as smoothly as
before. In particular, the intake and exhaust assembly did not seem to fit
into the depressions in the cylinders very well. It turns out that I royally
hosed the assembly of the engine. Not sure what I screwed up, but in the
end, I cut off all the little pipes that led to the engine and superglued
the exhaust in place. Whatever I did also meant that the keyway didn't match
the firewall so that was opened up and the engine glued in place at the
proper angle.
The engine also did not quite go together as smoothly as
before. In particular, the intake and exhaust assembly did not seem to fit
into the depressions in the cylinders very well. It turns out that I royally
hosed the assembly of the engine. Not sure what I screwed up, but in the
end, I cut off all the little pipes that led to the engine and superglued
the exhaust in place. Whatever I did also meant that the keyway didn't match
the firewall so that was opened up and the engine glued in place at the
proper angle.
I then started the somewhat laborious job of masking the greenhouse. With that done, I attached it to the fuselage (after painting the areas under it black and installing the rear machine gun) using a really fine clear cement that Kevin Dolin recommended. I can read nothing on the label, so cannot even recommend it! The lower and side observation windows were also masked and installed at this time. The main gear legs were attached and the front of the engine masked in preparation for painting.
| COLORS & MARKINGS |
 The
aircraft is an overall Japanese navy green-grey. I used Tamiya IJN
green-grey for this, but their earlier IJN grey is pretty much the same
shade. Once done, the airframe was given a coat of gloss clear in
preparation for the markings. Fine Molds decals are very nice and will
require a lot of liquid under them to keep them from sticking on first
contact. The three options are all pretty bland as things go with only
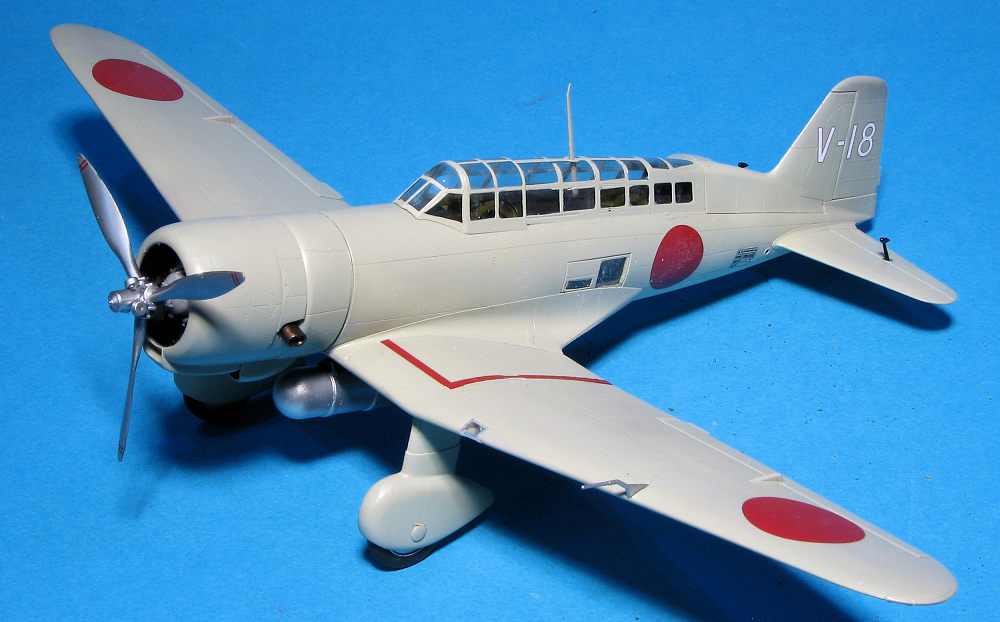
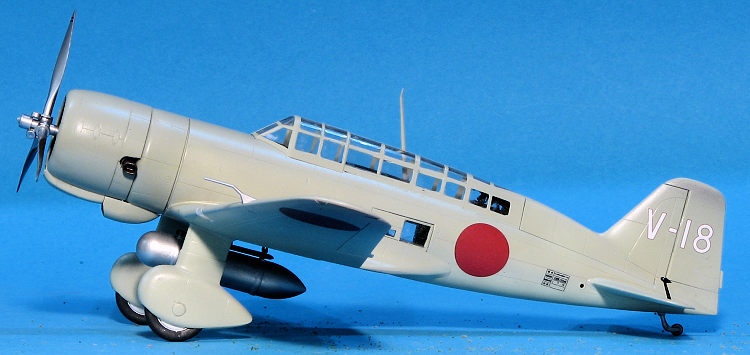
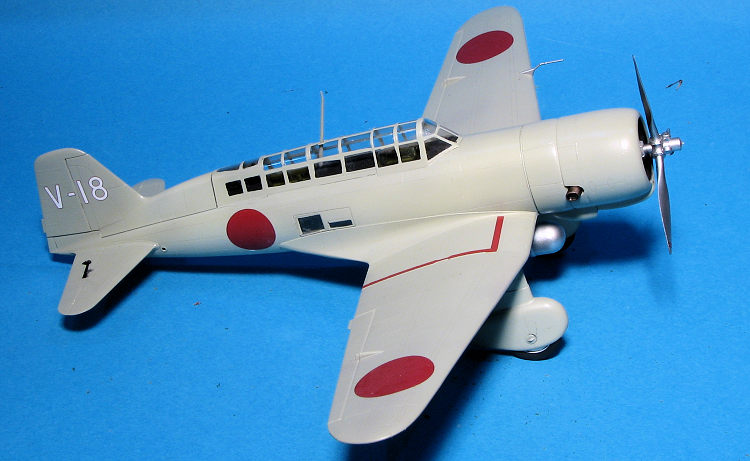
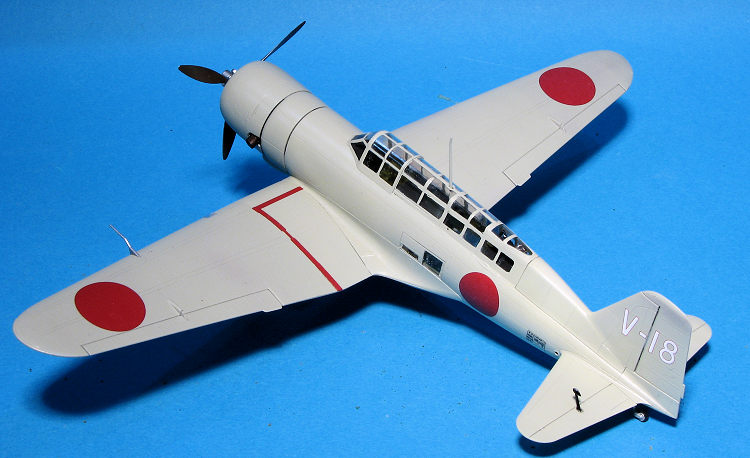
insignia and tail markings. I chose the one option that had red wing walkway
markings and did not have the bombs. This was a plane from the Tainan Air
Group based at Lae in New Guinea. I used Mr Mark Softer on the decals and
this prevented any silvering.
The
aircraft is an overall Japanese navy green-grey. I used Tamiya IJN
green-grey for this, but their earlier IJN grey is pretty much the same
shade. Once done, the airframe was given a coat of gloss clear in
preparation for the markings. Fine Molds decals are very nice and will
require a lot of liquid under them to keep them from sticking on first
contact. The three options are all pretty bland as things go with only
insignia and tail markings. I chose the one option that had red wing walkway
markings and did not have the bombs. This was a plane from the Tainan Air
Group based at Lae in New Guinea. I used Mr Mark Softer on the decals and
this prevented any silvering. | CONCLUSIONS |
Well, this one did not go as smoothly as the Claude and I'm going to blame me for any fit issues. It is more complex and so requires some more attention to be paid. However, the end result, as pretty much every modeler would agree with the end of their project, is well worth the time spent reaching that goal. Fine Molds will undoubtedly be releasing the C5M1 as the only difference is the engine as well as later boxings of this kit. If these sorts of aircraft are things you like, I can recommend getting one.
| REFERENCES |
https://en.wikipedia.org/wiki/Mitsubishi_Ki-15
17 August 2018
Copyright ModelingMadness.com. All rights reserved.
Purchased by me.
If you would like your product reviewed fairly and fairly quickly, please contact the editor or see other details in the Note to Contributors.
Back to the Main Page Back to the Review Index Page Back to the Previews Index Page