| KIT #: | 09070 |
| PRICE: | 2000 yen SRP |
| DECALS: | Two units |
| REVIEWER: | Scott Van Aken |
| NOTES: | 1999 boxing |
| HISTORY |
 Sometimes considered as the most
effective variant,[
the Model 52 was developed to again shorten the wings to increase speed and
dispense with the folding wing mechanism. In addition, ailerons, aileron trim
tab and flaps were revised. Produced first by Mitsubishi, most Model 52s were
made by Nakajima. The prototype was made in June 1943 by modifying an A6M3 and
was first flown in August 1943. The first Model 52 is said in the handling
manual to have production number 3904, which apparently refers to the prototype.
Sometimes considered as the most
effective variant,[
the Model 52 was developed to again shorten the wings to increase speed and
dispense with the folding wing mechanism. In addition, ailerons, aileron trim
tab and flaps were revised. Produced first by Mitsubishi, most Model 52s were
made by Nakajima. The prototype was made in June 1943 by modifying an A6M3 and
was first flown in August 1943. The first Model 52 is said in the handling
manual to have production number 3904, which apparently refers to the prototype.
Research by Mr. Bunzo Komine published by Mr. Kenji Miyazaki states that
aircraft 3904 through 4103 had the same exhaust system and cowl flaps as on the
Model 22. This is partially corroborated by two wrecks researched by Mr. Stan
Gajda and Mr. L. G. Halls, production number 4007 and 4043, respectively. (The
upper cowling was slightly redesigned from that of the Model 22.) An early
production A6M5 Zero with non separated exhaust, with an A6M3 Model 22 in the
background. A new exhaust system provided an increment of thrust by aiming the
stacks aft and distributing them around the forward fuselage. The new exhaust
system required "notched" cowl flaps and heat shields just aft of the stacks.
(Note, however, that the handling manual translation states that the new style
of exhaust com menced with number 3904. Whether this is correct, indicates
retrofitting intentions, refers to the prototype but not to all subsequent
planes, or is in error is not clear.) From production number 4274, the wing fuel
tanks received carbon dioxide fire extinguishers. From number 4354, the radio
became the Model 3, aerial Mark 1, and at that point it is said the antenna mast
was shortened slightly. Through production number 4550, the lowest exhaust
stacks were approximately the same length as those immediately above them. This
caused hot exhaust to burn the forward edge of the landing gear doors and heat
the tires. Therefore, from number 4551 Mitsubishi began to install shorter
bottom stacks. Nakajima manufactured the Model 52 at its Koizumi plant in Gunma
Prefecture. The A6M5 had a maximum speed of 565 km/h (351 mph)) at 6,000 m
(20,000 ft) and reached that altitude in 7:01 minutes.
menced with number 3904. Whether this is correct, indicates
retrofitting intentions, refers to the prototype but not to all subsequent
planes, or is in error is not clear.) From production number 4274, the wing fuel
tanks received carbon dioxide fire extinguishers. From number 4354, the radio
became the Model 3, aerial Mark 1, and at that point it is said the antenna mast
was shortened slightly. Through production number 4550, the lowest exhaust
stacks were approximately the same length as those immediately above them. This
caused hot exhaust to burn the forward edge of the landing gear doors and heat
the tires. Therefore, from number 4551 Mitsubishi began to install shorter
bottom stacks. Nakajima manufactured the Model 52 at its Koizumi plant in Gunma
Prefecture. The A6M5 had a maximum speed of 565 km/h (351 mph)) at 6,000 m
(20,000 ft) and reached that altitude in 7:01 minutes.
The other variant that can be made with this kit is the A6M5a, Model 52甲 (Kō, a). Starting at Mitsubishi number 4651, an armament change substituted the belt-fed Type 99-2 Mark 4 cannon, with 125 rounds per gun, in place of the drum-fed Type 99-2 Mark 3 cannon that carried 100 rounds per gun. Hence, the bulge in the underside of the wing for each cannon's ammunition drum was deleted and the ejection port for spent cartridge cases was moved. Thicker wing skinning was installed to permit higher diving speeds.
| THE KIT |
In 1985, Tamiya released their 1/48 upgraded A6M5. It was touted as the model of the year and built by many, many modelers. It was big, stupendous, a yuuge success. Forward a decade or so and we have Hasegawa doing not only an A6M5, but all the other major variations. It was even bigger. Considering that there have been more kits produced of the Zero than any other aircraft (and there are those that whine about too many 109s), it is a major money maker for Hasegawa. The kit still holds up well today, even though Tamiya has produced an even newer molding in this scale.
It should surprise no one that
this kit is somewhat modular. I say somewhat as there really is not all that
 much that is different between variants. One can pretty much use the same
engine, main fuselage and tail section as well as the landing gear and the
interior. Much of the change came with the engine cowling and the wings.
much that is different between variants. One can pretty much use the same
engine, main fuselage and tail section as well as the landing gear and the
interior. Much of the change came with the engine cowling and the wings.
In this case, Hasegawa has provided two different lower wing inserts for the two canon types. They also provide the engine cowling for the two nose mounted rifle calibre machine guns. This boxing also includes the ejector exhaust that were pretty much the norm for all A6M5 versions. Two different style drop tanks are included as well. One can pose the canopy open or closed, and there is also a blanking plate for the tail hook area for those planes that were land based. In the front is a two piece spinner with individual blades.
Markings are from planes from two units. The ED code was from the 302nd Naval Flying Group, based at Atsugi. The other has the numbers 653 as the prefix and was the 653rd Flying Group based on the aircraft carrier Zuiho. Both are in dark green over grey with yellow wing leading edges. These latter items will need to be painted on. Decals are old school which means they are a bit thick and the whites are off white. Unless you want to wait an age for the decals to clear the backing, you'll need hot water.
| CONSTRUCTION |
Often times I will simply
pick a box from a shelf and start on it in lieu of something more recent. So
it was with this one. The kit had already been taken out of its bag sometime
in the past so was a good candidate. It also offers the opportunity to try
the AK Interactive water based acrylic paints I purchased recently. So the
first step was to assemble most of the interior bits and when dry, these
were pai nted. I used no primer and did not thin the paint, using it right
out of the bottle after a lot of shaking. I'm not sure if I shook it enough
as the paint is rather glossy. Instructions on the bottle say to let it dry
24 hours, but it is dry enough to touch a lot sooner than that.
nted. I used no primer and did not thin the paint, using it right
out of the bottle after a lot of shaking. I'm not sure if I shook it enough
as the paint is rather glossy. Instructions on the bottle say to let it dry
24 hours, but it is dry enough to touch a lot sooner than that.
 been
eliminated by either a small spreader bar or by attaching the upper wings first.
For some reason, I've never been comfortable doing the latter so often have gaps
to fill.
been
eliminated by either a small spreader bar or by attaching the upper wings first.
For some reason, I've never been comfortable doing the latter so often have gaps
to fill. | COLORS & MARKINGS |
First thing I
did was to paint the yellow wing ID stripes. I first did the white then used the
yellow AK paint. This needs to be very well mixed and can be sprayed right from
the bottle. This was masked and the underside painted. For this I used some
Aeromaster shades. As most A6Ms were built by Nakajima, I used Nakajima Navy
Grey for the underside (this included the flaps and landing gear) and Nakajima
Navy Green for the upper surfaces. With the undersides painted, I brush painted
the Aotake gear wells and flap wells. The flap wells were then masked with tape
and the gear wells with Silly Putty. I then repainted the underside areas as
needed and masked those off. Then the upper surfaces save for the area around
the cockpit was painted. Note that the upper color wraps around a bit to the
underside, so you'll need some thin tape for the initial masking. I used 1mm PMA tape for the
initial curves and backed it up with generic kabuki tape.
you'll need some thin tape for the initial masking. I used 1mm PMA tape for the
initial curves and backed it up with generic kabuki tape.
At the cockpit, I added the head rest, gun sight, DF antenna and the radio mast. The rear transparency was then slid in place and glued. Same with the windscreen. I used Speedtape to hold the canopy in place as I wanted to pose it open. This then allowed me to spray the cockpit area. As a note, when I removed the canopy, the Speedtape proved too sticky for the acrylic paint on bare plastic and pulled some of it up. This was later repainted towards the end of the build.
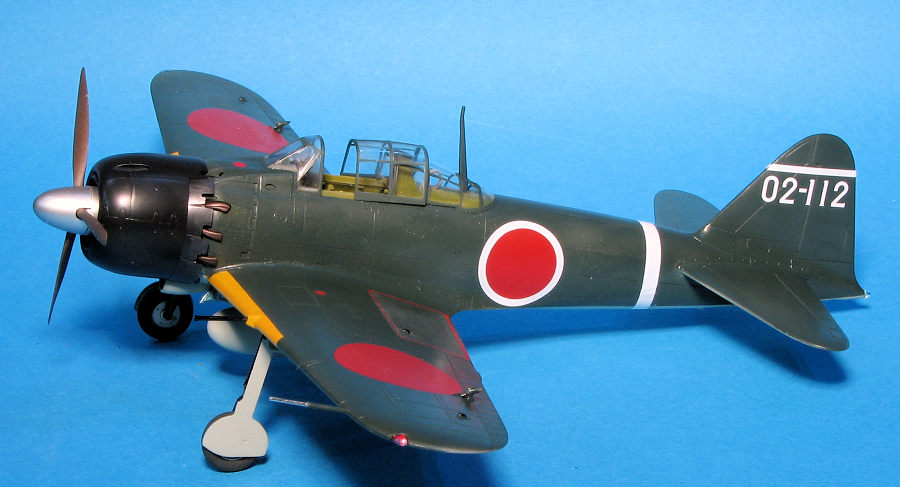
Main landing gear and wheels were then glued in as was the tail wheel piece. This allowed the plane to sit on its gear and I gave it a coat or two of clear gloss acrylic. When dry, I started applying markings. For this one I picked a scheme from the Aeromaster set 'Special Attack Squadrons' from 1996. This aircraft was with the 602nd Hikkoki and chosen to send to the Philippines where it was expended in 1944. As I don't weather planes, I chose to model it as it was when it was new. The decals worked fine except for the fuselage band, which broke into several pieces. Interestingly, the white stripe in the tail decal is shaped so that both decals are for the left side. None of the other markings were affected, though they started to curl until subjected to a dose of Microsol (red bottle). Some of the markings came from the kit decals.
I then continued attaching parts, like the gear doors, flaps, engine assembly, pitot tube and tail hook. A coat of clear semi-matt was then sprayed on. The last itmes to be attached were the gun barrels, the prop assembly and the tip/tail lights. These were a real pain to install because of their size and the difficulty of removing the sprue attachment bit. The masking was removed, the drop tank glued on and that was it. No exhaust stains, no weathering. I see from the photo that I bent one of the gun barrels moving the plane around.
| CONCLUSIONS |
| REFERENCES |
https://en.wikipedia.org/wiki/Mitsubishi_A6M_Zero
19 May 2017
Copyright ModelingMadness.com. All rights reserved.
If you would like your product reviewed fairly and fairly quickly, please contact the editor or see other details in the Note to Contributors.
Back to the Main Page Back to the Review Index Page Back to the Previews Index Page