| KIT #: | 12352 |
| PRICE: | $27.95 |
| DECALS: | Five options |
| REVIEWER: | Scott Van Aken |
| NOTES: | 2022 tooling |
| HISTORY |
 The A6M2 was the best naval fighter in the world during
1941/42. It had good speed, spectacular maneuverability, was fairly heavily
armed, and had incredible range. This was due to its light-weight construction
as much as anything else. This worked very well, at least for a while. But to
get that incredible performance, something had to be sacrificed. That was armor
protection for the pilot and for the fuel tanks. Those deficiencies were
eventually cured, but far too late in the war to be truly meaningful. Still, the
Zero was the scourge of the skies for the first portion of the war.
The A6M2 was the best naval fighter in the world during
1941/42. It had good speed, spectacular maneuverability, was fairly heavily
armed, and had incredible range. This was due to its light-weight construction
as much as anything else. This worked very well, at least for a while. But to
get that incredible performance, something had to be sacrificed. That was armor
protection for the pilot and for the fuel tanks. Those deficiencies were
eventually cured, but far too late in the war to be truly meaningful. Still, the
Zero was the scourge of the skies for the first portion of the war.
| THE KIT |
Many will say 'why do we need another Zero'. Well, of course we don't 'need' one, however, Academy has decided that they want one in their catalog. The aircraft sells quite well, especially in South Korea/Japan, so it would make sense from that standpoint as well.
The kit is quite well detailed and has several options and features that make it desirable. The cockpit is very well done with lots of small bits and pieces to provide detail that is lacking in earlier kits. There are also quite a few bits that fit on the sidewalls and Academy has provided a pilot figure. I would have liked to have seen a decal for the seat belt, but there is aftermarket to deal with that. There are also decals for the various instruments in the cockpit.
Once the cockpit and sidewalls have been built up, the
fuselage halves are closed and construction moves to the engine and cowling.
Unlike many other Zero kits, the exhaust is attached to the engine and extends
through openings in the cowling. There are also optional open or closed cowl
flaps. The prop is held in place by a po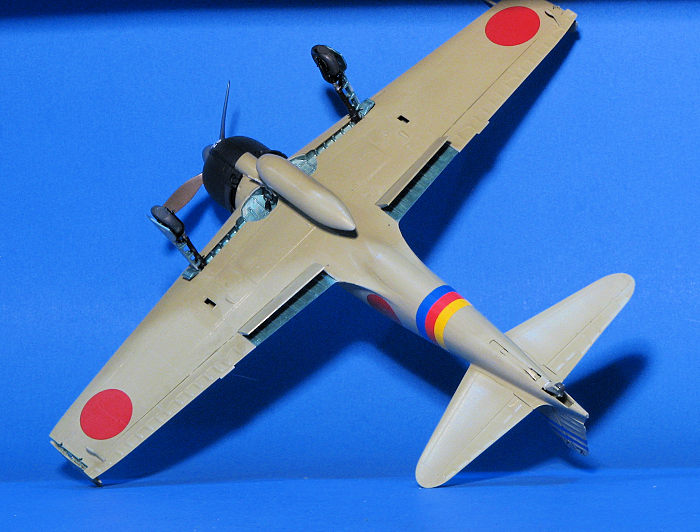 lycap so you can leave it off until
after painting. Academy provides masks for the black on the back of the props,
something I've not seen before.
lycap so you can leave it off until
after painting. Academy provides masks for the black on the back of the props,
something I've not seen before.
When building the wings, one must install the landing gear. I've been told that these cannot be properly installed once the wing halves have been joined. Again, there are masks for the wheels. When joining the wings, a polycap fits in the lower wing for the drop tank. Note that Academy wants you to paint the gear wells in Aotake. This is not correct as the wells were painted the underside color.
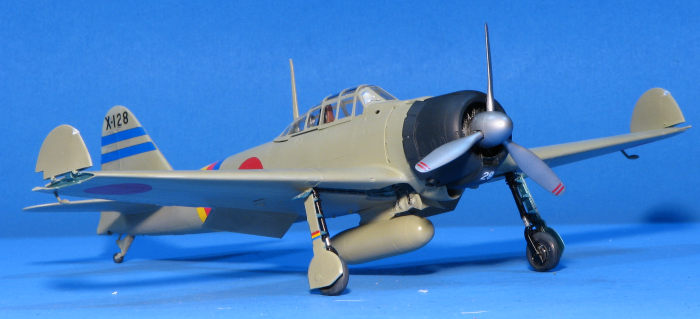
After attaching the wings, one then installs gear doors and wing flight control surfaces. On the early Zeros, the ailerons drooped with the flaps when those were extended. That option is provided by giving you two sets of tabs. You remove the set you won't use. While on the subject of the ailerons, the kit provides mass balances. I recently read that these items are only appropriate on early A6M2s, so it may be worthwhile to do a bit of research to see if your choice uses these. I also find the framework detailing on all the flight control surfaces to be a bit heavy-handed, but it can be sanded down somewhat. You are also provided two different flap pieces; one for raised and one for lowered. Then the horizontal stabs, tail cone and tail hook are installed. Academy does provide an in flight option for the main gear and the tail wheel. The tail hook can also be modeled lowered.
Other options are an open or closed canopy. Both of these use the same windscreen, but the closed option has the canopy molded in with the rear transparencies. Again, Academy has provided masks. Finally, the kit has the ability to have folded wing tips with a small insert that you use for whichever option you choose.
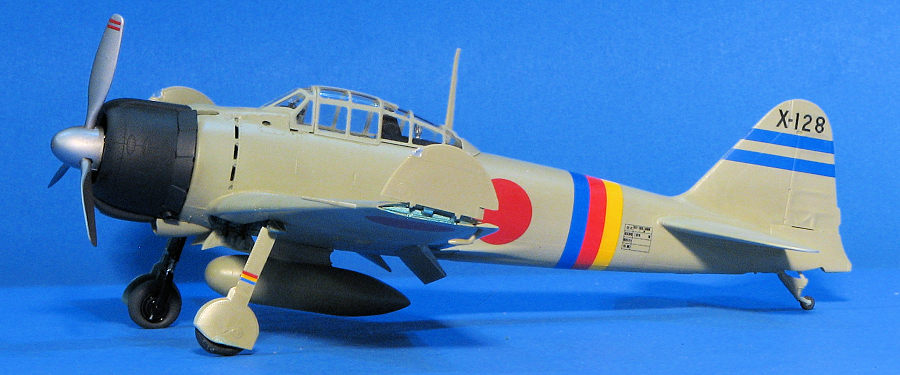
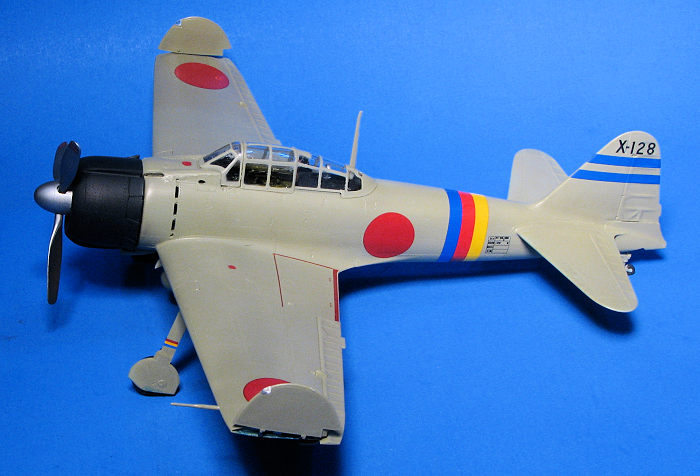
Instructions are well done and with a ton of different paint options. Five markings options are given, all of the planes in overall ame-iro (called 'grey' in the paint chart) with black cowlings. Five markings options are provided, all from carriers sunk at Midway. While the color placement guide only shows four of the five options, the fifth is shown on the box top. Decals are superbly printed and should work well. A full stencil guide is also provided.
| CONSTRUCTION |
 This is one of those builds that was inspired by a decal sheet. I recently
reviewed a couple of very nice LifeLike decal sheets and there were a lot of
A6M2 options in both sets. I'd heard that there were fit issues with this kit,
but no one had yet submitted a review of this kit so I figured I'd go ahead and
give it a go.
This is one of those builds that was inspired by a decal sheet. I recently
reviewed a couple of very nice LifeLike decal sheets and there were a lot of
A6M2 options in both sets. I'd heard that there were fit issues with this kit,
but no one had yet submitted a review of this kit so I figured I'd go ahead and
give it a go.
One the first things I noticed while building the cockpit was that there were no really positive join areas for any of the small parts. There were some areas highlighted as to where these bits would go, but nothing like pin and socket areas with a lot of butt joins. Particuilarly egregious was the instrument panel which is quite large and sits upon a 1mm square area. There are side braces but these are butt joins on equally small areas. Eventually I got the interior built and painted, but it took me about a week. Fitting this assembly into the interior was equally amorphous in terms of where things fit. Eventually it was glued in place and the fuselage halves were closed. With that done, the upper fuselage insert is attached. This didn't fit worth a hoot and some trimming was needed to the underside of the piece to get it in place.
I dealt with the usual fuselage seams and then moved to the wings. The main gear wells are two pieces and also do not have really positive fit areas. Test fitting the upper wings, I noticed that I'd have a gap in the front. So I only glued the forward part of the inner wings, clamping those in place. When dry, I finished the leading edge gluing, clamping those areas as well. When dry, the rear portion of the wings were glued in place and taped. Then the ailerons were glued in place in the neutral position.
 When it came to attaching the wings to the fuselage, I ran into real issues. The
forward part of the wing wouldn't come close to fitting. The bottom forward part
of the interior proved to be too low so I grapped the nippers and Dremel with
sanding drum started cutting/trimming parts of the interior that interfered
until the wing finally fit all the way down.
When it came to attaching the wings to the fuselage, I ran into real issues. The
forward part of the wing wouldn't come close to fitting. The bottom forward part
of the interior proved to be too low so I grapped the nippers and Dremel with
sanding drum started cutting/trimming parts of the interior that interfered
until the wing finally fit all the way down.
Time to deal with the tail cone. This piece also includes the tail gear. Fit on this was horrible. Getting the tail gear to properly fit was a real chore, but I finally got it in place. When this subassembly was mated to the rear fuselage, it was too wide. Clamps to the rescue to squeeze that together. When dry, any steps were sanded down and the front part of the tail gear was glued in place. In my mind, this is an area that could be done better along with several other parts that gave me trouble.
With that done, the tailplanes were installed, though not glued in so I could remove them after painting. During all of this, I assembled and painted the engine and the cowling. I used some of my Aeromaster acrylics for the blue-black cowling. I chose the open cowl flaps as I thought they looked cool. This assembly was set aside until after the rest of the airframe was painted.
Back at the wings, I assembled the wing tips and glued them in the raised position. Again, this was just to look a bit different as none of my previous 1/48 A6Ms had this feature. The clear parts were masked with the included canopy masks. These worked quite well as they are not only fairly thin, but also made of kabuki tape. They were then attached using Cementine clear glue. I then used the alternate main gear doors to mask the main gear wells and then proceeded to the paint shop.
| COLOLRS & MARKINGS |
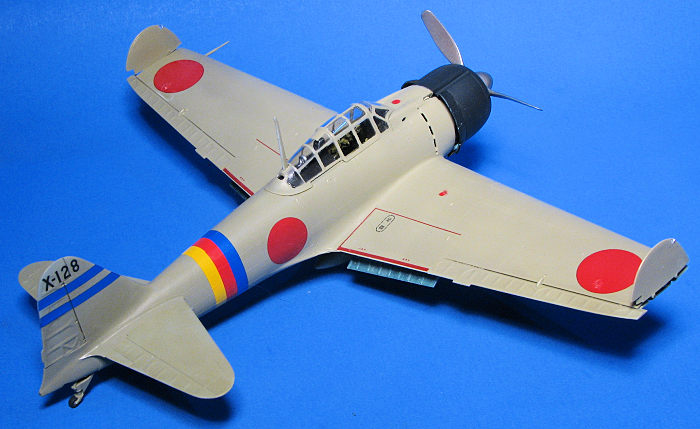
I had decided to do a set of markings for an overall brownish grey scheme. For this, I used AK Interactive's amber grey acrylic. This is actually quite good paint, but needs a little bit of thinner to airbrush properly. It took several coats to get good coverage. I also painted the gear door covers and the drop tank at this time.
When done, I removed the closed gear doors and installed the main landing gear. It was at this time that I reaized why Academy wanted me to install them at the same time as the main gear wells. To get them in place, I did some trimming of the legs and when dry, used additional super glue to ensure they would stay in place.
 Gear in place, I gave the airframe several thin coats of gloss clear. Once that
had cured, I started applying decals. I used kit decals for the common markings.
These worked superbly and snuggled down using Microsol. For the unique markings,
I used a set of markings from Lifelike sheet 48-063. These markings are for the
flight leader of the 3rd Kokutai at Takao AB on Tainan in December 1942. This
has a broad, multi-color fuselage band that did not fit the fuselage very well
and needed cut to keep from wrinkling.
Gear in place, I gave the airframe several thin coats of gloss clear. Once that
had cured, I started applying decals. I used kit decals for the common markings.
These worked superbly and snuggled down using Microsol. For the unique markings,
I used a set of markings from Lifelike sheet 48-063. These markings are for the
flight leader of the 3rd Kokutai at Takao AB on Tainan in December 1942. This
has a broad, multi-color fuselage band that did not fit the fuselage very well
and needed cut to keep from wrinkling.
With all the markings in place, it was time to add all the other bits. This included the main wheels and gear doors. The retraction mechanism for the inner main gear doors was not easy to get into place. I also found that the attachment points for the lower main gear doors had to be trimmed in order to get it in place. I installed the external aileron balances as this was an early A6M2 and these balances were standard until about the 350th airframe. I then installed the radio mast and attached the tailplanes.
With all the bits in place, the airframe was given a coat of clear semi-matte. Then the prop was installed, as was the pitot tube, and the masking removed from the windscreen and canopy. The final items were the clear bits for the formation lights. Naturally, I lost the one on the tail within a minute of installing it.
| CONCLUSIONS |
Overall, I found that the end result was pleasant. It was a bit more difficult a build than I thought it might be when I started. While I can blame myself for the issues I ran into, I can also tell you that the engineering of the kit was not consistent. Some part installations were superb, while others were a struggle. So, is it worth getting?. If you don't already have a stash of 1/48 A6M2 models and want the features offered in the Academy kit, then by all means, go for it. Some things to consider. It is about half the price of the latest from Eduard and Tamiya, about the same as what you can find a Hasegawa kit, and it is a bit more then the old Tamiya and the Fujimi offering.
6 March 2026
Copyright ModelingMadness.com. All rights reserved. No
reproduction in part or in whole without express permission from the editor.
If you would like your product reviewed fairly and
fairly quickly, please
contact
the editor or see other details in the
Note to
Contributors.