| KIT #: | 09170 (Jt110) |
| PRICE: | 2200 yen when new |
| DECALS: | Two units |
| REVIEWER: | Scott Van Aken |
| NOTES: | 1995 release |
| HISTORY |
The A6M3 model 32 was developed to provide improvements over the initial A6M2, which was a fairly successful aircraft. Changes included a more powerful (and heavier) engine which required shorter engine mounts and so less fuel in the forward fuel tank. Clipped wings were also part of the update. In addition, upgraded wing guns holding more ammunition also reduced fuel. Add these to the more thirsty engine and range was reduced by nearly 1,000 km and maneuverability was also somewhat sacrificed. Though not really liked by the navy, they bought 340 of them before switching to an improved model 22.
 In order to correct the deficiencies of the Model 32, a new version with
folding wingtips and redesigned wing was introduced. The fuel tanks were moved
to the outer wings, fuel lines for a 330 l (87 US gal) drop tank were installed
under each wing and the internal fuel capacity was increased to 570 l
(150 US gal). More importantly, it regained its capabilities for long operating
ranges, similar to the previous A6M2 Model 21, which was vastly shortened by the
Model 32.
In order to correct the deficiencies of the Model 32, a new version with
folding wingtips and redesigned wing was introduced. The fuel tanks were moved
to the outer wings, fuel lines for a 330 l (87 US gal) drop tank were installed
under each wing and the internal fuel capacity was increased to 570 l
(150 US gal). More importantly, it regained its capabilities for long operating
ranges, similar to the previous A6M2 Model 21, which was vastly shortened by the
Model 32.
However, before the new design type was accepted formally by the Navy, the A6M3 Model 22 already stood ready for service in December 1942. Approximately 560 aircraft of the new type had been produced in the meantime by Mitsubishi Jukogyo K.K.
According to a theory, the very late production Model 22 might have had wings similar to the shortened, rounded-tip wing of the Model 52. One plane of such arrangement was photographed at Lakunai Airfield ("Rabaul East") in the second half of 1943, and has been published widely in a number of Japanese books. While the engine cowling is the same of previous Model 32 and 22, the theory proposes that the plane is an early production Model 52.
The Model 32, 22, 22 kou, 52, 52 kou and 52 otsu were all powered by the Nakajima 栄 (Sakae) 21型 engine. That engine kept its designation in spite of changes in the different exhaust system for the Model 52.
| THE KIT |
The A6M has been a popular subject for modelers since the beginning of plastic modeling. The first really well done A6M was an A6M5 released by Tamiya in the mid 1980s that sold extremely well. Hasegawa's series of A6Ms started production in the early 1990s and continues today despite their being more detailed kits currently available. The reason for this is simple. They are not complex, provide a pretty nice cockpit right from the box, and are fairly easy to find. Probably the biggest down side of many earlier releases is the decal sheet with reds that are too bright and whites that are off-white. This kit has this issue.
Hasegawa has done a fine job of 'modularizing' this
kit and you can find the same base sprues in most of their Zero boxings.
External detailing is excellent and you are provided with a crystal clear canopy
suite that allows you to pose the canopy open if you so desire. The cockpit is
very nicely detailed and includes cockpit side panels. Decals are provided for
the r aised detail on the instrument panel and the side console. About the only
thing lacking is a seat belt. Note that IJNAF planes usually had a three point
harness like you have in your car and many pilots did not use the shoulder
strap.
aised detail on the instrument panel and the side console. About the only
thing lacking is a seat belt. Note that IJNAF planes usually had a three point
harness like you have in your car and many pilots did not use the shoulder
strap.
Once the cockpit is built, it is trapped between the fuselage halves. In fact, you can assemble the fuselage and install the cockpit from the underside through the wing opening. The insert for the cowling guns is one area that usually requires some extra attending when building the kit. You have a four piece engine assembly that fits to the front of the fuselage and the one-piece cowling fits over that. I'd leave both the engine and cowling off until the end to make painting easier.
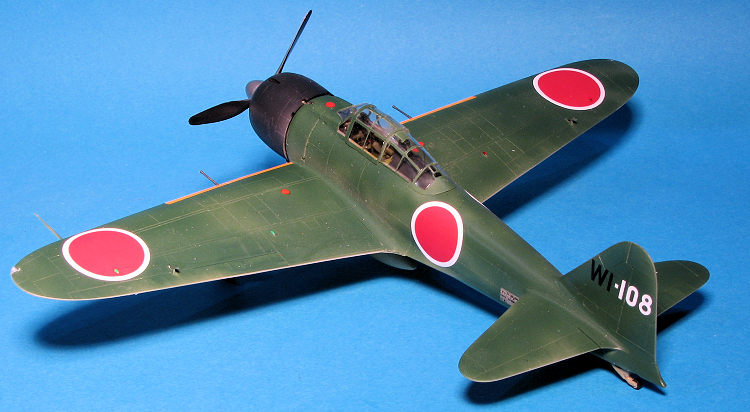
Note that the small trim tabs on the rudder and ailerons need to be removed. If you want to install a centerline drop tank, holes must be opened in the lower wing. The instructions show holes just outside the main gear wells being opened, and these are for the small cannon bulges. Before attaching the wing, an insert for the carb intake needs to be installed. On the underside, landing gear and gear doors are fit into place. The long barrel wing guns and tail hook are put in place. Other items to assemble are the five piece prop assembly , that attachment of the DF loop antenna, radio mast and the clear bits. Note that many of the Zeros in the South Pacific had the radios and the mast removed so check your references.
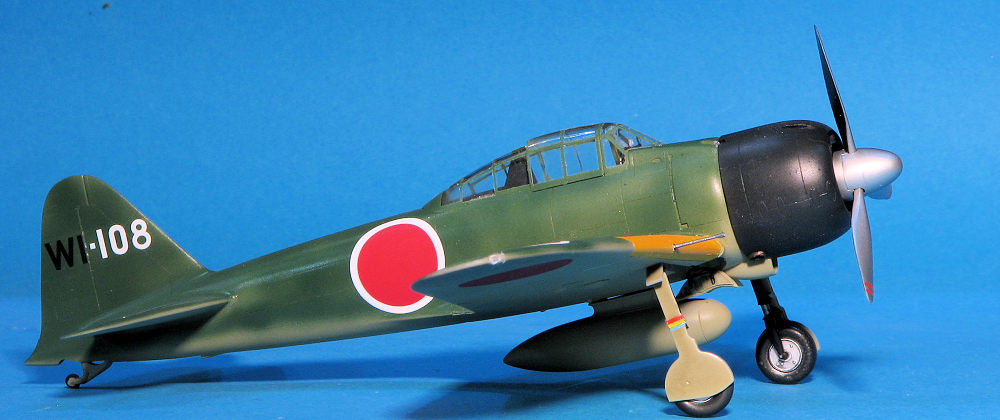
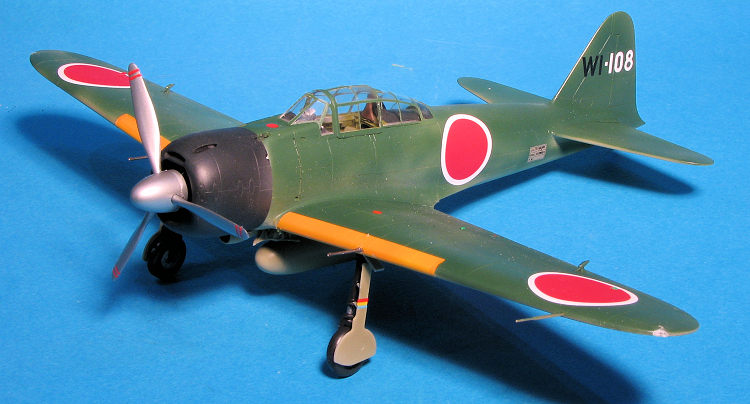
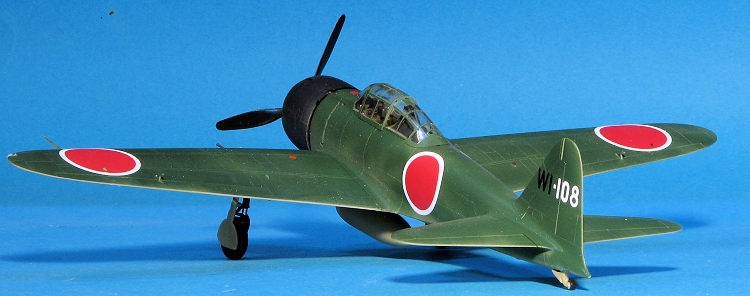
Instructions are standard Hasegawa of the time and use Gunze paint references. Two units are provided with tail numbers for multiple aircraft. The box art plane is listed as an unknown unit, though subsequently has been determined to be one of the 'Rabaul Kokutai' using whatever planes could be pulled together. The other is from the 582nd Kokutai. Both planes are in a dark green over ameriro. The decals are 'old school' and while they still may work well, it would be prudent to find replacements.
| CONSTRUCTION |
While I've not built as many Hasegawa Zeros as others have other brands/types of kits, I have built quite a few over the decades since these first saw store shelves. In that regard, there not much that is new to me regarding the building of this kit. I know that the upper cowling insert rarely fits as I'd like it to and that one has to be careful when attaching the wings. With that, I got underway.
First step was to glue the drop tank halves together. Then I opened the holes in the lower wing for the cannon bulges using a #65 drill bit. Then the wings were assembled. Meanwhile, I partially assembled the cockpit and gave all the interior bits a coat of Mitsubishi interior green. Then I started applying instrument decals. I used Mr Mark Softer to help them settle down. While all this was going on, I assembled the fuselage halves. Nice thing about low wing aircraft is that often you can do this prior to installing the interior. It took a lot of fiddling about to get the upper cowling insert in place without any steps. I also installed the blanking plate over the tail hook well as I am going to do a land based aircraft and these frequently had the hook removed and faired over.
 Attention returned to the interior where I added some Eduard seat belts then
attached the instrument panel. The gun sight was next. When all that had dried,
the side walls were attached and the interior put into place in the fuselage. I
then attached the tailplanes. While the glue was drying on those, I painted the
engine pieces using steel for the cylinders and Vallejo's Tinny Tin for the
manifold. This was given a black wash and a bit of dry brushing where the black
was too thick. This was set aside until near the end of the build.
Attention returned to the interior where I added some Eduard seat belts then
attached the instrument panel. The gun sight was next. When all that had dried,
the side walls were attached and the interior put into place in the fuselage. I
then attached the tailplanes. While the glue was drying on those, I painted the
engine pieces using steel for the cylinders and Vallejo's Tinny Tin for the
manifold. This was given a black wash and a bit of dry brushing where the black
was too thick. This was set aside until near the end of the build.
Things were moving along nicely. I installed the cannon bulges to the underside of the wing. The cowling was removed from the sprue and after some cleaning of flash, the little exhaust pieces were attached. I then attached the wing. The fit is superb. You really couldn't ask for anything better. The small carb intake piece was assembled and later attached. This aircraft was not going to have a radio mast or DF antenna so those holes were filled. I then did some preliminary painting by using Tamiya XF-1 white on the leading edges of the wings. When dry, these areas were painted yellow. I also painted the cowling using Aeromaster 'Mitsubishi Cowling Color' acrylic.
I then masked off the wing leading edge and installed the oil cooler insert. Then began the somewhat tedious job of masking the canopy. For this I used an Eduard set; #EX245. It is supposed to be for the A6M5, but all Zero greenhouses are just about the same. As a note, this airplane does not have a radio mast. Japanese radios were notoriously unreliable, a situation not helped by the hot, humid tropical climate in which this aircraft operated. As a result, many aircraft had their radios and ancillary equipment removed.
| COLORS & MARKINGS |
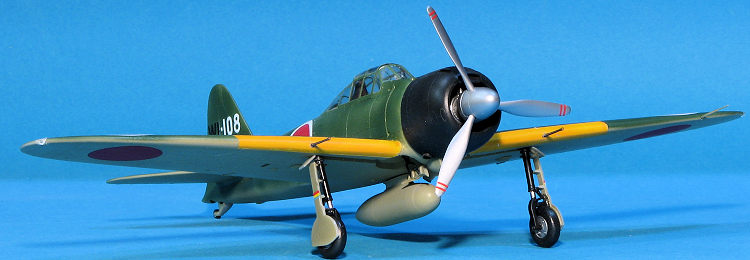 The kit was then brought back to the work room for attachment of the landing
gear and doors. As a quick note, all A6M3 aircraft were Mitsubishi built and
so that means that the gear wells and inside of the main doors were painted
the underside colors. This was not the case with Nakajima built planes so
save your blue-green primer for those. This is something I recently learned
so many of my earlier Zeros are incorrectly painted in these areas. It then
got a coat of what passes nowadays for Future and I started applying decals.
The kit was then brought back to the work room for attachment of the landing
gear and doors. As a quick note, all A6M3 aircraft were Mitsubishi built and
so that means that the gear wells and inside of the main doors were painted
the underside colors. This was not the case with Nakajima built planes so
save your blue-green primer for those. This is something I recently learned
so many of my earlier Zeros are incorrectly painted in these areas. It then
got a coat of what passes nowadays for Future and I started applying decals.
| CONCLUSIONS |
 I know that
a lot of people are commenting on how wonderful the recent Eduard kit is and how
it has made others obsolete, yada, yada, yada. However, the Hasegawa kits are
easy to find, are not fussy builds and are just fine for the vast majority of
modelers. To be honest, I've not built the Eduard or even the Tamiya kit
released a while back so really cannot make any sort of direct comparison. I do
have at least a half dozen Hasegawa Zeros of various types and have no plans to
toss them away just because they are 'old'. They will get built. One thing I can
tell you, is that this kit really needs to have a seat belt/harness added, but
then that is true of a lot of kits.
I know that
a lot of people are commenting on how wonderful the recent Eduard kit is and how
it has made others obsolete, yada, yada, yada. However, the Hasegawa kits are
easy to find, are not fussy builds and are just fine for the vast majority of
modelers. To be honest, I've not built the Eduard or even the Tamiya kit
released a while back so really cannot make any sort of direct comparison. I do
have at least a half dozen Hasegawa Zeros of various types and have no plans to
toss them away just because they are 'old'. They will get built. One thing I can
tell you, is that this kit really needs to have a seat belt/harness added, but
then that is true of a lot of kits.
| REFERENCES |
https://en.wikipedia.org/wiki/Mitsubishi_A6M_Zero
4 February 2022
Copyright ModelingMadness.com. All rights reserved. No reproduction in
part or in whole without express permission of the editor.
If you would like your product reviewed fairly and fairly quickly, please
contact
the editor or see other details in the
Note to
Contributors. Back to the Main Page
Back to the Review
Index Page
Back to the Previews Index Page