|
KIT # |
09626 |
|
PRICE: |
2400 yen |
|
DECALS: |
Two options |
|
REVIEWER: |
Scott Van Aken |
|
NOTES: |
2005 boxing |
|
HISTORY |
 The A6M's history mirrored that of the Empire of Japan in World War
II. When it was introduced, the Zero was the best carrier-based fighter in
the world and it was greatly feared by Allied pilots. The IJNAS also
frequently used the type as a land-based fighter. A combination of excellent
maneuverability and very long range made it one of the finest fighters of
its era. In early combat operations, the Zero gained a legendary reputation,
outclassing its contemporaries. Later, design weaknesses and the increasing
scarcity of more powerful aircraft engines meant that the Zero became less
effective against newer fighters. By 1942, new tactics and techniques
enabled Allied pilots to engage the Zero on more equal terms. By 1943,
American and British manufacturers were producing fighters with greater
firepower, armor, and speed, and approaching the Zero's maneuverability. The
Mitsubishi A6M was outdated by 1944, but remained in production. During the
final years of the War in the Pacific, the Zero was utilized in kamikaze
operations.
The A6M's history mirrored that of the Empire of Japan in World War
II. When it was introduced, the Zero was the best carrier-based fighter in
the world and it was greatly feared by Allied pilots. The IJNAS also
frequently used the type as a land-based fighter. A combination of excellent
maneuverability and very long range made it one of the finest fighters of
its era. In early combat operations, the Zero gained a legendary reputation,
outclassing its contemporaries. Later, design weaknesses and the increasing
scarcity of more powerful aircraft engines meant that the Zero became less
effective against newer fighters. By 1942, new tactics and techniques
enabled Allied pilots to engage the Zero on more equal terms. By 1943,
American and British manufacturers were producing fighters with greater
firepower, armor, and speed, and approaching the Zero's maneuverability. The
Mitsubishi A6M was outdated by 1944, but remained in production. During the
final years of the War in the Pacific, the Zero was utilized in kamikaze
operations.|
THE KIT |
Hasegawa pretty well has the field for 1/48 Zeros, though Tamiya is making inroads. They box almost every known variant, including some rather rare types, like the A6M8. All use the same basic fuselage, cockpit and tail section as that was unchanged. They simply change the wings and the engine to match whatever version is being done.
This results in several inserts and add on bits that
vary from one aircraft type to another. It also means that the main molds do
a lot of service. My kit was boxed in 2005 and is in superb shape, which tells
me that perhaps they cut another set of molds or have at least taken good
care
 of what they have. As one expects
from Hasegawa, the level of detail is quite good. There are lots of
aftermarket bits for the Zero should you wish that additional level of
detail, but most of us will be quite satisfied with what comes in the
box. I especially like that there are instrument decals provided that fit
perfectly over the various panels. Saves my having to paint these things
and looks a ton better than I could ever do myself.
of what they have. As one expects
from Hasegawa, the level of detail is quite good. There are lots of
aftermarket bits for the Zero should you wish that additional level of
detail, but most of us will be quite satisfied with what comes in the
box. I especially like that there are instrument decals provided that fit
perfectly over the various panels. Saves my having to paint these things
and looks a ton better than I could ever do myself.
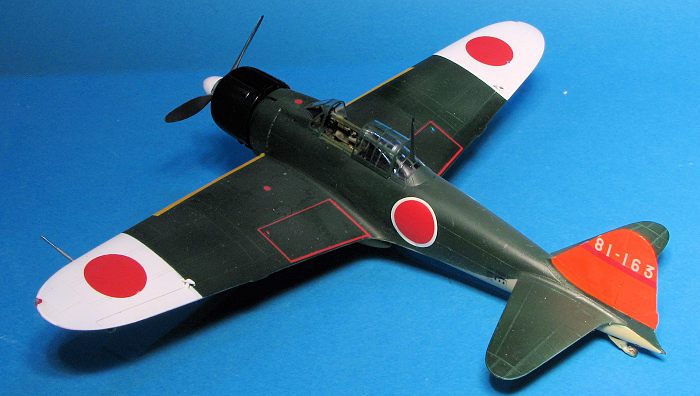
Options for the kit are quite limited. You basically have the choice of leaving the canopy open or closed. This kit has a pair of 60kg bombs and racks. To get these items, a sprue section from the A6M2-N Rufe kit is included. One does have to open the holes for these in the lower wings prior to completing the wings.
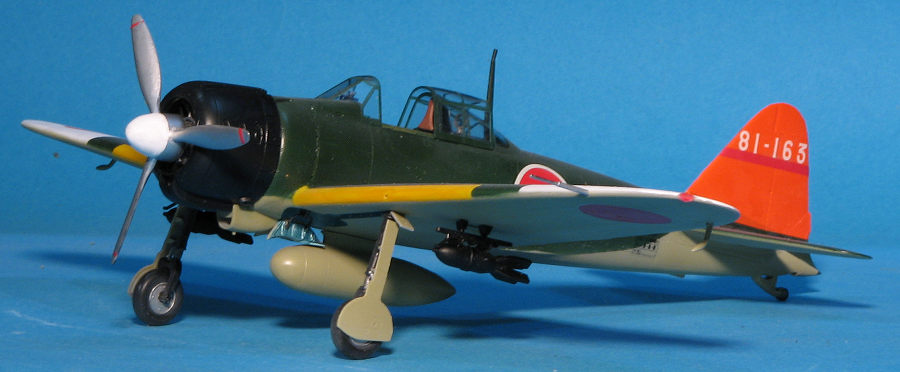
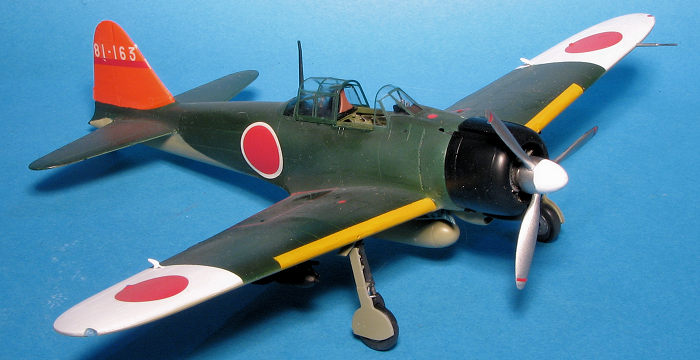
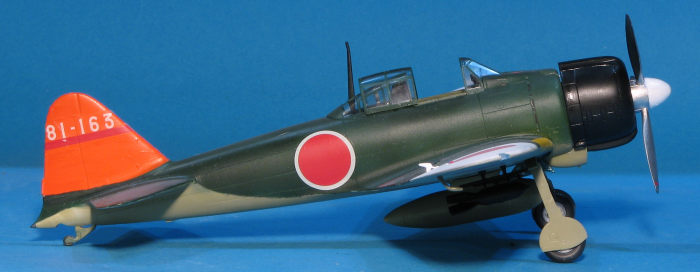
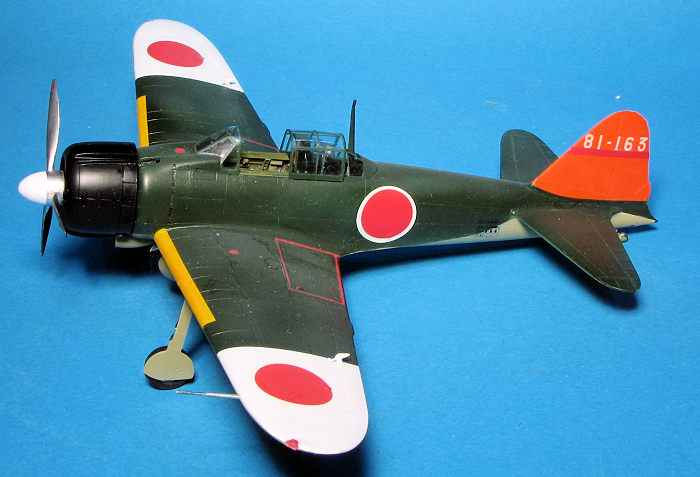
Instructions are excellent and give all colors in Gunze references. There are options for two aircraft. One is the box art plane with the orange fin from the 381st Naval Flying Group in the Philippines during 1944. The orange fin is provided as a decal, but you may wish to paint it instead. The front half of the spinner is white, as are the outer upper wings. As much as I'd liked to have the second plane on the box art as an option, it is not included. Instead a plane from the Shokaku fighter group in 1942 is included. Decals are old school so the whites are off-white. Note that you get a bunch of extra fin numbers for the first option if you wish to substitute any.
|
CONSTRUCTION |
 Surprising
as it may seem, I decided to build one of the two kit options. I already had
a Shokaku A6M2 so went with the box art plane from 381 Kokutai. I liked the
orange fin and white wing tips as IJNAF planes tend to be pretty much the
same in terms of schemes. In fact, it was the scheme that encouraged me to
buy the kit from a sales site as I do have a fair number of other Hasegawa
A6M2 kits.
Surprising
as it may seem, I decided to build one of the two kit options. I already had
a Shokaku A6M2 so went with the box art plane from 381 Kokutai. I liked the
orange fin and white wing tips as IJNAF planes tend to be pretty much the
same in terms of schemes. In fact, it was the scheme that encouraged me to
buy the kit from a sales site as I do have a fair number of other Hasegawa
A6M2 kits.
Building this one went fairly quicky (at least by my standards) and only took a couple of months from start to finish. I've built a fair share of these so there was nothing really tricky other than remembering to open the holes for the bombs. The interior was assembled and then was painted. Now a rather large number of A6M2s were built by Nakajima and the camo scheme indicated that to be the case with this, so I used Nakajima interior green for this purpose. I used AK interactive acrylics for all the major colors on this. The prop blades were glued on the backing plate and then painted with Alclad II. I painted the back of the blades black and brush painted the white on the forward spinner with Tamiya flat white.
Back at the bench, the wings were glued together after the holes were opened. I then filled in the Flettner trim tabs. The decals were applied to the instrument panel. After they'd stuck with Microsol, I plunked on some Mr Mark Softer to get them to snuggle down. A perfect fit. With all the bits glued in place for the interior, I installed seat belts from an Eduard set. Note that the IJNAF didn't use a shoulder strap until fairly late in the war.
 The
fuselage halves were mated as the interior can be installed from below. The
fuselage had the forward section with the guns glued in place. This requires
some finesse to get a good fit. While that dried, the engine was painted
aluminum and the struts/wheels with flat black.
The
fuselage halves were mated as the interior can be installed from below. The
fuselage had the forward section with the guns glued in place. This requires
some finesse to get a good fit. While that dried, the engine was painted
aluminum and the struts/wheels with flat black.
With the interior installed, it was time to attach the wings to the fuselage. Again, careful fitting will get it in place with only a bit of filler needed for the seams. At the front, there is an insert which, again, needs careful fitting.
With that part done, I painted the area that would be under the canopy with matt black. The gun sight was painted and installed and the clear bits masked. I used Dead Design canopy masks for this and it really helped to speed things up. I tacked the canopy in place after the other clear bits had been glued down. I use Cementine for clear pieces as it sticks well and dries clear. The tailplanes were attached. I painted the cowling with blue-black and attached the tiny exhaust. At this stage, it was time to paint.
|
COLORS & MARKINGS |
After spraying the model with Tamiya grey primer to
help the acrylic stick, I painted the underside grey-brown. I then masked
that and the upper side was painted in dark black-green. I did mask the
upper/lower camo line and put in the characteristic sweep that annotates a
Nakajima built plane. I then brush painted the gear wells. The wells and
inner gear doors were painted aotake while the outer gear doors had the
exterior color on the inside. Were it a Mitsubishi built plane, the wells
would be the exterior color. I then masked off and painted the wing I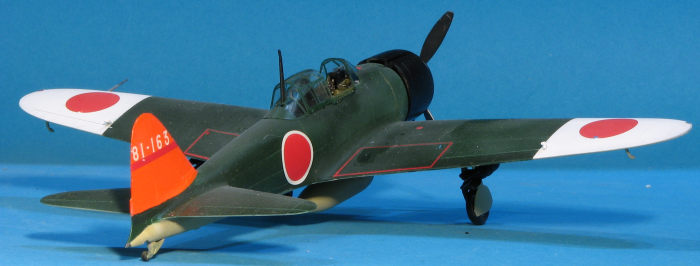 D
areas, upper wing tips and fin white. The wing ID area was then painted
yellow.
D
areas, upper wing tips and fin white. The wing ID area was then painted
yellow.
Decals worked quite well despite being nearly 20 years old. Took a few applications to get them to snuggle down over the upper wing lights. Meanwhile, I assembled the bombs and racks, which are from their Rufe kit, painting them black. Landing gear, wheels and doors were then installed along with the tail hook. I gave the model a coat of semi-matte clear and only then installed the upper wing aileron hinges, and the aileron mass balances. I'm not 100% sure if the balances would be on this one, but the instructions called for them and I did open the holes for them.
Masking was removed, canopy popped off and re-glued in the open position, engine and cowling pressed in place and finally the bombs were pressed into place along with the prop.
|
CONCLUSIONS |
Overall, it is an excellent kit and Hasegawa still sells a lot of them. I know that the Eduard kit is the current darling of modelers, but one shouldn't overlook the Hasegawa offerings. They can be picked up for a decent price nowadays and are well worth building.
8 September 2023
Copyright ModelingMadness.com. All rights reserved. No reproduction in part or in whole without express permission from the editor.
If you would like your product reviewed fairly and fairly quickly, please contact the editor or see other details in the Note to Contributors.