RS Models 1/72 Ki-94-II
| KIT #: | 92038 |
| PRICE: | $35.98 SRP |
| DECALS: | Two options |
| REVIEWER: | Scott Van Aken |
| NOTES: | Short run with etched and resin parts |
| HISTORY |
The first was a twin-boom monoplane with two 1,641 kW
(2,200 hp) Mitsubishi Ha-211 18 cylinder engines, driving two 4-blade propellors
in a push-pull configuration. The very heavy armament that should have been
mounted on the aircraft (two 37 mm/1.46 in and two 30 mm/1.18 in cannons, should
have been enough to make short work of most US heavy bombers of the era.
Notwithstanding the outstanding prospective performance, which however was
judged as "unduly optimistic" by the technical department of the Ja panese Army
Air Force, this design was judged too complex by the technical department and
the design was discarded.
panese Army
Air Force, this design was judged too complex by the technical department and
the design was discarded.
The second Ki-94 design, made by a team under Tatsuo Hasegawa, chief designer of the aircraft and responsible for the used airfoil, was a more conventional single-seat, piston-engine monoplane fighter, developed for the Imperial Japanese Army Air Force along the same requirements as the Nakajima Ki-87, which had been the Army's fall-back design for the original Ki-94. Intended to counter B-29 raids, it was optimized for high-altitude interception with a pressurized cockpit and heavy armament.
This design was approved by the Koku Hombu, and the aircraft was designated Ki-94-II (the scrapped earlier Ki-94 design was named the Ki-94-I). An order was placed for one static test airframe, three prototypes, and eighteen pre-production aircraft. Only 2 prototypes were built in the event; the first was equipped with a single Nakajima Ha-44 engine, driving a 4-blade propeller because the 6-blade one was not ready. The second prototype was to be fitted with a 6-blade propeller. The war's end however stopped the construction of the second prototype and also found the first prototype still being readied for its maiden flight; the Ki-94-II never taking to the air.
| THE KIT |
This one comes in a box that is larger than the usual from RS Models. Still an end-opening type and once open it is obvious that the kit is smaller than the size of the box. The two tan sprues must have been too long for the standard box so the next size up was used.
As is normal for RS kits, this one has superbly done exterior engraving that is quite fine compared to some other kits, and crisply molded as well. This one come with a pair of resin parts. One is the aft end of the optional oil cooler and the other is a nicely done engine. My engine had a cylinder broken off and it was not in the bag with the other part so it must have happened taking it out of the mold. Not a problem as the aircraft has a large cooling fan that will block most of the engine from view.
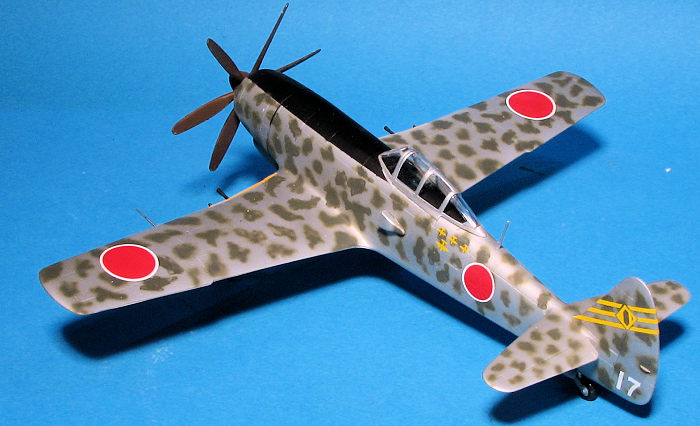 Photo etch
is used for most of the cockpit, as you might guess. This includes the seat,
seat framework, rudder pedals, instrument panel, various items that attach to
the floor and sidewalls (some of which are several layers).
P.e. is also used for intake screens for the turbocharger system. In fact, this
aircraft has quite a few of these rather large intakes on the fuselage sides and
under the wings.
Photo etch
is used for most of the cockpit, as you might guess. This includes the seat,
seat framework, rudder pedals, instrument panel, various items that attach to
the floor and sidewalls (some of which are several layers).
P.e. is also used for intake screens for the turbocharger system. In fact, this
aircraft has quite a few of these rather large intakes on the fuselage sides and
under the wings.
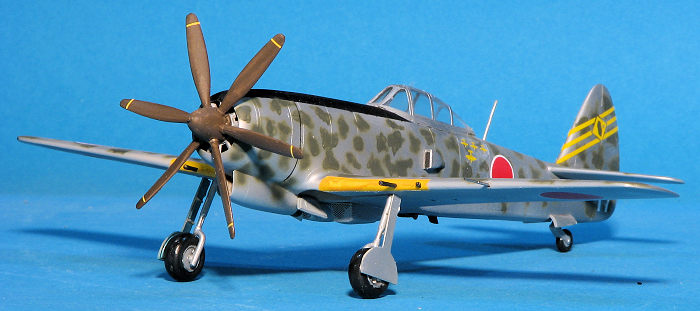
There are separate wheel wells that fit into the lower wings and the kit has two piece main wheels. A single-piece canopy fits atop the fuselage. The modeler has the option to building the aircraft in either the prototype or projected production version. The differences are in the prop, with the production variant having a six blade version, and in the lower oil cooler intake. The production version is considerably longer. The builder will have to scratch build a radio mast. You will also need to drill holes in the leading edge of the wing for the gun barrels and pitot tube.
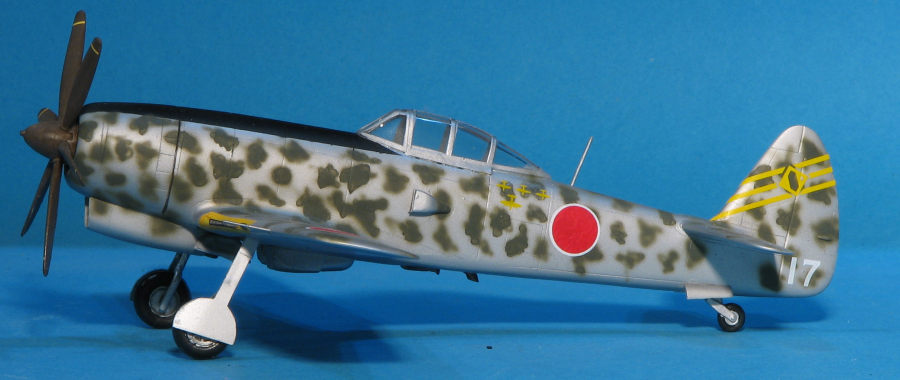
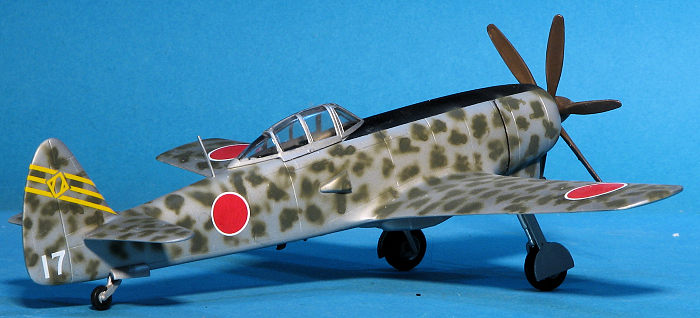
Instructions are well done with generic color information provided during the build process. Markings are provided for two whiffer schemes. One is the box art plane from the 18th Sentai in bare metal with heavy mottling and the other is from the 29th Sentail in dark green upper and bare metal undersides. Both have wing leading edge ID bands. The decal sheet is very nicely done and while the modeler will need to match the decals for the colors on the nose, it should not be an issue.
| CONSTRUCTION |
This one has been staring at me from the stacks ever since it was added there in 2013. though the plane never flew, it just looks cool so I figured I'd give it a go as it has been a while since I built a short run kit. I started by assembling the wings and main gear wells. One thing I found is that all of the parts of any size have fairly large ejector towers on them. Fortunately, most of them are easy to remove if you have some quality flush cutters such as the Meng MTS-026 or similar ones of the same design. These get things down to where sanding the remnants is a piece of cake.
 Also, pretty much all the parts need some additional clean
up of the edges, especially those where the sprue gates invade the part. I found
it interesting that the worst offenders were on the smaller parts where clean up
was somewhat difficult. Back to the gear wells; these items had to
have
the forward sections sanded down quite a bit in order to get the upper wing
halves to fit. Once done, the wing was cleaned up after some filler, and set
aside. Next was the engine. Mine was missing a cylinder on the front row, but no
worries as it will be pretty much invisible thanks to the cooling fan.
Also, the illustrations shows a prop shaft on the engine, but the engine has a
socket. Go figure.
Also, pretty much all the parts need some additional clean
up of the edges, especially those where the sprue gates invade the part. I found
it interesting that the worst offenders were on the smaller parts where clean up
was somewhat difficult. Back to the gear wells; these items had to
have
the forward sections sanded down quite a bit in order to get the upper wing
halves to fit. Once done, the wing was cleaned up after some filler, and set
aside. Next was the engine. Mine was missing a cylinder on the front row, but no
worries as it will be pretty much invisible thanks to the cooling fan.
Also, the illustrations shows a prop shaft on the engine, but the engine has a
socket. Go figure.
This was installed as best I could as the kit is lacking positive fit areas. The interior was built up as well as could be. When it came to install it, it was obvious there were going to be fit issues. The instrument panel sides interfered with some of the cockpit p.e. so those items were cut to provide room. The control column ended up behind the panel. I then glued the halves together. Placing the cooling fan was next after some considerable filler on the fuselage halves. It sort of fit; at least it was somewhat centered in the cowling.
Now for the wings. This took a LOT of cutting and sanding to get an acceptable fit. The fore and aft section where it fit into the fuselage was way too long and the somewhat thick plastic required a bunch of sanding on the underside of the roots to fit flush. The wing roots also had to be sanded back. 80 grit to the rescue. with the wings in place, the tailplanes were attached. This was followed by the tail wheel doors. The canopy was then masked and fit into place, again after some trimming. Prior to painting, I felt I should attach the main landing gear. The attachment sockets were so shallow as to be almost non-existent so I drilled them out so the gear legs would fit.
At this time, I had to decide on whether I'd do the prototype or a production plane. These have much different underfuselage intakes and equipment. First the lower fuselage twin intakes were installed. These have p.e. screens that are far too large. I cut them down and installed them. Next, I decided on the production aircraft. This required the larger chin intake with a resin exhaust. Needless to say, these parts did not fit each other, but again, I have sandpaper and know how to use it. The trough for the long intercooler pipe had to be filled as the production plane did not have this feature. I also installed the inner gear doors. Fit here was poor. The small turbo-charger exhaust was installed in the back. I left off the turbocharger housing, tail gear, wheels and prop until after painting.
| COLORS & MARKINGS |
 I first painted the yellow ID section on the forward wing and
after installing the gun barrels, masked it off. Then the airframe was primered
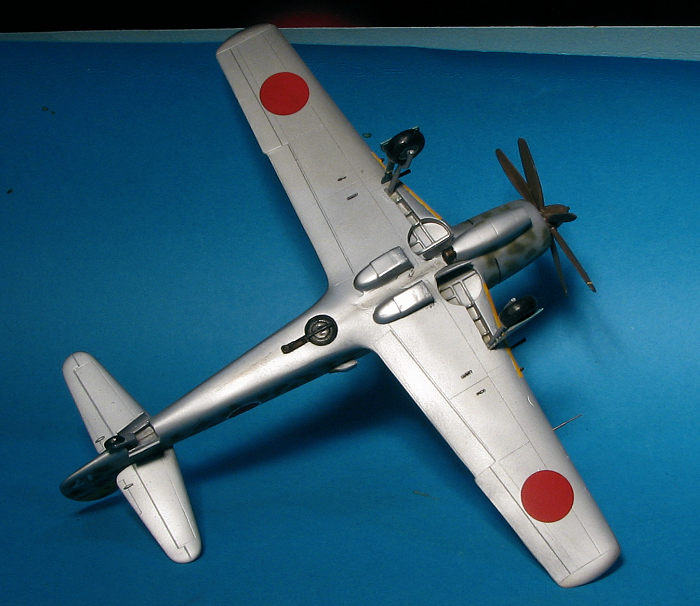
with Tamiya extra-fine and sprayed overall with Alclad II aluminum. This showed
a few areas that needed more filler so that was done and the process repeated.
The next was the camo scheme. I could have left it in aluminum as it will be a
speculative scheme as no production aircraft ever flew. However, I chose to do a
variegated upper and side surface scheme. I used Hakata RAF dark green for this
as I already had some mixed up. It is fairly close to Nakajima Army green which
would be as good as anything else for this one. It took a while to do all those
little patches. I also painted the upper nose in black.
I first painted the yellow ID section on the forward wing and
after installing the gun barrels, masked it off. Then the airframe was primered
with Tamiya extra-fine and sprayed overall with Alclad II aluminum. This showed
a few areas that needed more filler so that was done and the process repeated.
The next was the camo scheme. I could have left it in aluminum as it will be a
speculative scheme as no production aircraft ever flew. However, I chose to do a
variegated upper and side surface scheme. I used Hakata RAF dark green for this
as I already had some mixed up. It is fairly close to Nakajima Army green which
would be as good as anything else for this one. It took a while to do all those
little patches. I also painted the upper nose in black.
Once the airframe was ready for decals, I used a mixture of kit and aftermarket. I used kit decals for the underwing roundels, kill markings, and aircraft number. Microscale 72-5 was used for the rest of the roundels and despite the advanced age of the sheet, the markings did not break up. For the tail markings, I used another Microscale sheet, 72-70. The first choice did break up so I used Microscale decal film to coat the next choice, which was the fin markings for 34 Sentai, which actually flew Ki-45s.
| FINAL CONSTRUCTION |
 When done, I went to the underside to attach the tail gear,
then the wheels and main gear doors. The wheels are far too wide and as such,
the gear doors do not touch the landing gear legs as they are supposed to.
Still, they do fit once they are drilled out so they fit on the axles. I painted
the prop with 'prop color' from the Xtracolor range and cut some small yellow
stripes from a Fantasy Printshop sheet. This was then pressed on. I used a
section of stretched sprue for the radio mast which was installed after drilling
a hole for it on the spine. It was brush painted aluminum. The last was the
pitot tube and here I cheated a bit by using a metal one designed for an F-5E.
All was sprayed with some semi-matte Tamiya clear, the masking removed and that
was it.
When done, I went to the underside to attach the tail gear,
then the wheels and main gear doors. The wheels are far too wide and as such,
the gear doors do not touch the landing gear legs as they are supposed to.
Still, they do fit once they are drilled out so they fit on the axles. I painted
the prop with 'prop color' from the Xtracolor range and cut some small yellow
stripes from a Fantasy Printshop sheet. This was then pressed on. I used a
section of stretched sprue for the radio mast which was installed after drilling
a hole for it on the spine. It was brush painted aluminum. The last was the
pitot tube and here I cheated a bit by using a metal one designed for an F-5E.
All was sprayed with some semi-matte Tamiya clear, the masking removed and that
was it.
| CONCLUSIONS |
15 September 2023
Copyright ModelingMadness.com. All rights reserved. No reproduction in part or in whole without express permission from the editor.
If you would like your product reviewed fairly and fairly quickly, please contact the editor or see other details in the Note to Contributors.