
| KIT #: | 02656 |
| PRICE: | $8.98 when new |
| DECALS: | Three options |
| REVIEWER: | Scott Van Aken |
| NOTES: | 1994 release |
| HISTORY |
Design of the Ki-84 commenced in early 1942 to meet an Imperial Japanese Army Air Service requirement for a replacement for Nakajima's Ki-43 Hayabusa, just entering service. The specification recognised the need to combine the manouverability of the Ki-43 with performance to match the best western fighters and heavy firepower. The Ki-84 first flew in March 1943. Although the design itself was solid, the shortage of fuel and construction materials, poor production quality, and lack of skilled pilots prevented the fighter from reaching its potential. A total of 3,514 were produced.
 The Ki-84 addressed the most common complaints about the popular and
highly maneuverable Ki-43: insufficient firepower, poor defensive armor, and
lack of climbing power. The Ki-84 was introduced with two 12.7 mm (.50-in)
machineguns and two 20 mm cannons, a considerable improvement over the single
7.7 mm and single 12.7 mm machine guns of the
Hayabusa.
Defensive armor offered Hayate pilots
better protection than the unsealed wing tanks and light-alloy airframe of the
Ki-43. In addition, the Ki-84 used a 65 mm armor-glass canopy, 13 mm of head and
back armor, and multiple bulkheads in the fuselage, which protected both the
methanol-water tank (used to increase the effectiveness of the supercharger) and
also the centrally located fuel tank.
The Ki-84 addressed the most common complaints about the popular and
highly maneuverable Ki-43: insufficient firepower, poor defensive armor, and
lack of climbing power. The Ki-84 was introduced with two 12.7 mm (.50-in)
machineguns and two 20 mm cannons, a considerable improvement over the single
7.7 mm and single 12.7 mm machine guns of the
Hayabusa.
Defensive armor offered Hayate pilots
better protection than the unsealed wing tanks and light-alloy airframe of the
Ki-43. In addition, the Ki-84 used a 65 mm armor-glass canopy, 13 mm of head and
back armor, and multiple bulkheads in the fuselage, which protected both the
methanol-water tank (used to increase the effectiveness of the supercharger) and
also the centrally located fuel tank.
It was the powerplant that gave the
Hayate
its high speed and prowess in combat. Derived from the
Homare engine common to many Japanese aircraft, the
Hayate used a direct-injection version
of the engine, using water injection to aid the supercharger in
 giving the Ki-84
a rated 2,000 hp at takeoff. This combination—in theory, at least—gave it a
climb rate and top speed roughly competitive with the top Allied fighters of the
late Pacific theater, the P-51D Mustang and P-47D Thunderbolt (with top speeds
of 433 and 426 mph, respectively). Initial
Hayate
testing at Tachikawa in early summer 1943 saw test pilot Lt. Funabashi reach a
maximum level speed of 634 km/h (394 mph) in the second prototype, but after the
war a captured example was tested by the U.S. Army using high-octane fuel and
achieved a speed of 690 km/h (430 mph).
giving the Ki-84
a rated 2,000 hp at takeoff. This combination—in theory, at least—gave it a
climb rate and top speed roughly competitive with the top Allied fighters of the
late Pacific theater, the P-51D Mustang and P-47D Thunderbolt (with top speeds
of 433 and 426 mph, respectively). Initial
Hayate
testing at Tachikawa in early summer 1943 saw test pilot Lt. Funabashi reach a
maximum level speed of 634 km/h (394 mph) in the second prototype, but after the
war a captured example was tested by the U.S. Army using high-octane fuel and
achieved a speed of 690 km/h (430 mph).
The complicated direct-injection engine, however, required a great deal of care in construction and maintenance and, as the Allies advanced toward the Japanese homeland, it became increasingly difficult to support the type's designed performance. Compounding reliability issues was the Allied submarine blockade which prevented delivery of crucial materials for construction of components such as the landing gear. Many Hayates consequently suffered strut collapses on landing.
| THE KIT |
This is another Hasegawa kit that is approaching classic
standards. First issued in 1987, the kit has mostly raised panel line detailing,
a very basic cockpit with but a somewhat generic seat, floor control stick and a
clear plastic instrument panel. A decal is to be placed over this. Even for
1994, the mold suffers somewhat from flash on a few parts. The usual ejector pin
marks on gear struts and gear doors, a passable engine front and a one-piece
canopy section. The only options are drop tanks and those really are not options
as there are holes already
drilled in the wings for them. It is not a complex
kit.
and a one-piece
canopy section. The only options are drop tanks and those really are not options
as there are holes already
drilled in the wings for them. It is not a complex
kit.
Instructions are standard Hasegawa with Gunze and generic paint references. You'll have to mix the upper surface colors and while the underside is shown as a light grey, it may also be unpainted metal. An addendum sheet shows the new decal markings for this limited reissue. One uses most of the bits from the original decal sheet to do one of two aircraft from the third squadron of the 47th Sentai. Aside from one having command bands around the fuselage and the other having a rudder number, they are basically the same. The decals are 'old school' where the whites are off white and they will probably not like setting solutions. However, they do provide the white 'bandages' for the wings and fuselage. Leading edge ID bands will need to be painted on as with the anti-glare panel. You are provided a set of blue tail markings for the second squadron though no additional information. The original decal sheet has first squadron markings so one could really do any aircraft from the 47th if one has a reference for it.
| CONSTRUCTION |
This is a kit designed during Hasegawa's transition from raised to etched panel lines and is probably one of the last raised line kits they did. As I had a resin cockpit set for this kit, I decided to go ahead and build it. As you can imagine, the build went fairly quickly, but was not without its issues.
First step was to assemble subassemblies. In this
case it was the drop tanks and the wings. Unfortunately, you have to install the
drop tanks unless you want to fill in the pre-drilled holes. The resin cockpit
parts were painted with Aotake using ColourCoats
 enamels.
Then the detail bits were painted and after that had dried, the resin parts were
cut from their pour stubs. I also painted the engine parts, mostly using Steel
from both Alclad II and Testors Metallizer. They are actually different shades
so it worked out well.
enamels.
Then the detail bits were painted and after that had dried, the resin parts were
cut from their pour stubs. I also painted the engine parts, mostly using Steel
from both Alclad II and Testors Metallizer. They are actually different shades
so it worked out well.
The cockpit was installed and the fuselage halves mated. Then the engine was installed and for the forward cowling piece was glued on. Generally fit is pretty good. As I have mentioned in the past, I cannot build a model without filler and for the most part, that filler is super glue. Yes, it takes a few applications in places because it is so thin, but I accept that to not have to deal with the seams shrinking a bit later as happens with standard one part fillers.
I then attached the wing and as often happens, I broke off the wing guns. Kits from this era often have things like this molded in place and I often break them off, as I also did the antenna mast. The tailplanes were glued on and the canopy masked. Masking the canopy was a bit of a problem as the molds have been run so many times that the frame lines are almost invisible. This is a problem I have run into with many older Hasegawa kits. The oil coolers were glued in place as was the canopy (whose fit leaves a bit to be desired), the engine was stuffed with tissue and it was time to paint.
| COLORS & MARKINGS |
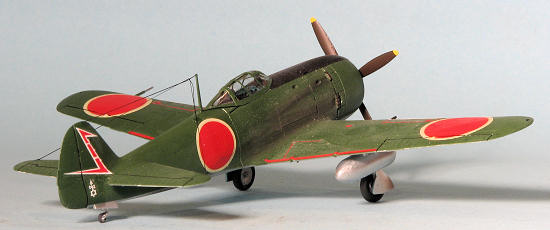
I was determined to do something a tad different. It seems that most of the markings used on this plane are 47 Sentai and I certainly did not want to do one of those. Digging into the decal pile, I found an old Microscale sheet from the 70s (72-68), that had a bunch of tail markings. One of them was from the 21st Sentai when based in the Philippines. The sheet was still sealed so I hoped for the best. But first painting.
The underside was painted with Tru-Color's very nice
Aluminum. Then it was carefully masked with low tack tape and the upper color
painted Nakajima Army Green using ColourCoats enamel. Then the leading edges
were masked around and painted white then RLM 04 yellow. The nose anti-glare panel was then painted black. I could have used blue-black, but my tinlet of it
had dried. I also painted the underside control surfaces with light grey.
panel was then painted black. I could have used blue-black, but my tinlet of it
had dried. I also painted the underside control surfaces with light grey.
A quick trip to the workbench was made where I painted the wheel wells and inside of the gear door with the Aotake and the landing gear were glued in place. Once that was done, a coat of clear gloss was applied and it was time for decals.
Since I do not have a useable stash of 1/72 Hinomarus, I had to use the kit decals. The red on these is a bit too reddish orange for my tastes, but are typical of these older decals. Though this is a special boxing, it only supplied unique markings, leaving the insignia and stencils to the original sheet. These required quite a bit of soaking to finally come free of the backing, even using hot water. I had little trouble with the kit decals. Mr. Mark Softer seemed to work quite well. Now for the tail decals. I did not trust the nearly 40 year old decals to be totally viable so tested one that was off register. It broke up. Out came the liquid decal film and the fin markings had a coat brushed on. Use a clean brush for this as the film is lacquer based and will dissolve any paint residue in your brush into the clear film. After letting it dry for about a half hour, the two fin markings were cut out and applied with no problem. You may notice that the Microscale red is red and not the same shade as the insignia.
| FINAL CONSTRUCTION |
 With the
decals in place, a coat of clear matte was then applied to seal them in. I then
attached the wheels and the gear doors. Somewhere along the way, I lost one of
the inner gear doors. It was supposedly firmly glued on but when I picked up the
model to do touch up painting, it had disappeared. No amount of hunting was
successful so I used a piece of paper cut to approximately the right shape and
glued it in place. A bit of paint and it is quite presentable.
With the
decals in place, a coat of clear matte was then applied to seal them in. I then
attached the wheels and the gear doors. Somewhere along the way, I lost one of
the inner gear doors. It was supposedly firmly glued on but when I picked up the
model to do touch up painting, it had disappeared. No amount of hunting was
successful so I used a piece of paper cut to approximately the right shape and
glued it in place. A bit of paint and it is quite presentable.
The area for the broken off wing guns was drilled out and a pair of guns from a 1/72 FW-190 that I did not need were glued in. I painted the prop spinner white then red using Tru-Color Chinese Red, and the prop using some old Aeromaster Primer Brown Acrylic. The tips were painted yellow. Now you would think I was done, however, I wanted to install a radio antenna. The one for the Ki-84 is rather involved, but nothing that EZ-Line could not tackle. The masking was taken from the clear bits, some minor touch up was done and I was finished.
| CONCLUSIONS |
This is still a very nice little kit. Though it is showing its age, and the cockpit is very basic, it can be found without too much trouble. Sword, I believe, has come out with a more modern kit that has to be more detailed, but is probably not that much easier to build. For those who have a penchant for Japanese planes and who work in this scale, this one can still be recommended.
| REFERENCES |
The Ki-84 section of Wikipedia
July 2012
Thanks to
me and my ability to buy early and build late. If you would like your product reviewed fairly and quickly, please
contact
me or see other details in the Note to
Contributors.