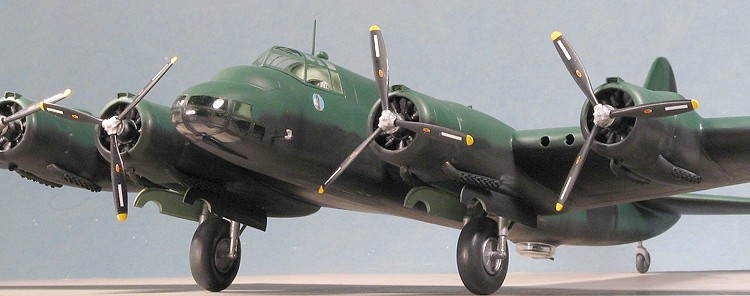
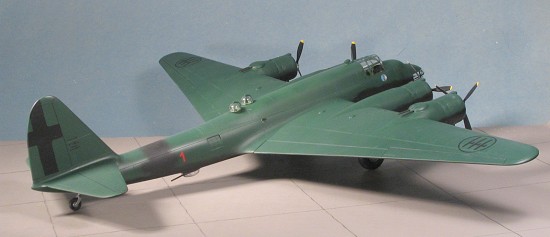
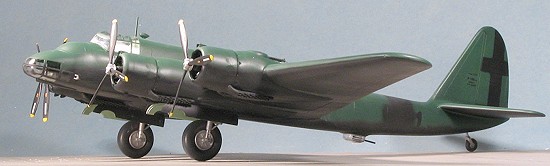
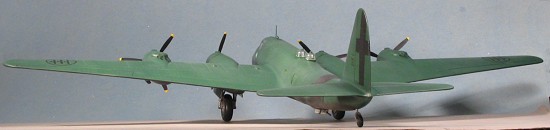
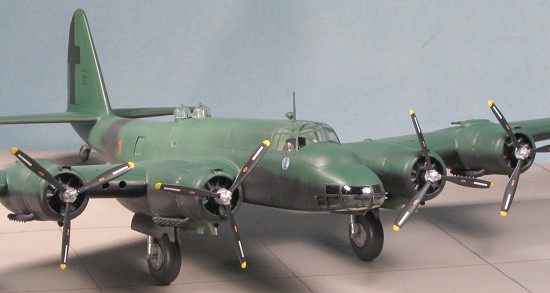
Special Hobby 1/72 Piaggio P.108B serie IIM
| KIT #: | 72035 |
| PRICE: | $57.00 MSRP |
| DECALS: | Two options |
| REVIEWER: | Scott Van Aken |
| NOTES: |
| HISTORY |
June 28, 1942 and the P.108B makes
its first long range mission against the British base at Gibraltar. This is
the first time that the Regia Aeronautica has performed a strategic bombing
strike. From their base in Decimomannu, five bombers depart
 for the long
flight. One bomber turns back with engine problems, leaving the other four
to continue. The aircraft successfully drop eight tons of bombs on the
target, surprising the British who had not expected such an attack.
However, things are not all that they seem. Excessive fuel consumption
forces three of the four aircraft to land in Spain. One crashes while
landing on the beach at Valencia. One makes a perfect landing at Los Alcazares where it was interred. The third lands at Palma De Mallorca where
it is refueled by Spanish authorities and allowed to return. Only one of
the aircraft completes the full mission and after nine hours, lands with
but 80 liters of fuel left in its tanks. The initial tour of operations
ends on October 21 after but four additional missions to Gibralter at the
cost of two other aircraft, one shot down with the loss of all hands and a
second destroyed in an emergency landing in Algeria.
for the long
flight. One bomber turns back with engine problems, leaving the other four
to continue. The aircraft successfully drop eight tons of bombs on the
target, surprising the British who had not expected such an attack.
However, things are not all that they seem. Excessive fuel consumption
forces three of the four aircraft to land in Spain. One crashes while
landing on the beach at Valencia. One makes a perfect landing at Los Alcazares where it was interred. The third lands at Palma De Mallorca where
it is refueled by Spanish authorities and allowed to return. Only one of
the aircraft completes the full mission and after nine hours, lands with
but 80 liters of fuel left in its tanks. The initial tour of operations
ends on October 21 after but four additional missions to Gibralter at the
cost of two other aircraft, one shot down with the loss of all hands and a
second destroyed in an emergency landing in Algeria.
 The inescapable conclusion was the
the P.108 had not lived up to its expectations. It needed to be light and
carry more fuel. The weight reduction program succeeded in removing almost
a ton of weight, a large part of the savings coming from deleting the
forward turret. Extra fuel tanks were fitted in the bomb bay to extend the
range of the aircraft. Thanks to constant modifications on the production
line, the output of P.108s slowed to a trickle. With the Allied invasion of
North Africa, more missions were planned with accompanying losses never
really being made up, again thanks to the painfully slow production of
aircraft. This continued until the end of the war with the P.108 never
really being produced in the numbers needed so never meeting expectations.
One wonders how the results would have differed had this been a
German-built aircraft. It would have been built in larger numbers and could
very well have prolonged the war if used as intended instead of being
frittered away in small missions that had high losses.
The inescapable conclusion was the
the P.108 had not lived up to its expectations. It needed to be light and
carry more fuel. The weight reduction program succeeded in removing almost
a ton of weight, a large part of the savings coming from deleting the
forward turret. Extra fuel tanks were fitted in the bomb bay to extend the
range of the aircraft. Thanks to constant modifications on the production
line, the output of P.108s slowed to a trickle. With the Allied invasion of
North Africa, more missions were planned with accompanying losses never
really being made up, again thanks to the painfully slow production of
aircraft. This continued until the end of the war with the P.108 never
really being produced in the numbers needed so never meeting expectations.
One wonders how the results would have differed had this been a
German-built aircraft. It would have been built in larger numbers and could
very well have prolonged the war if used as intended instead of being
frittered away in small missions that had high losses.
| THE KIT |
For a look at what comes in the box , please visit the preview.
| CONSTRUCTION |
As is my norm, after looking over the
instructions, I started doing subassemblies. Not really that many on a kit
like this. Basically, I glued the wings and tail planes together after
cutting off and sanding down the ejector stubs. You need to be careful to
glue the proper halves together on the tail planes as they are airfoil
sections with the top noticeably more curved than the bottom. With the
wings, I installed the nacelle turrets at this time. You have to be careful
when doing this not to have the turrets jut up too high. According to the
reference, the tops are near level with the front of the opening into which
they 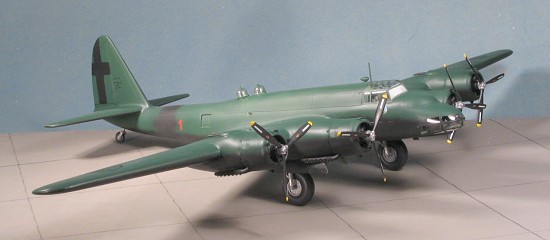 fit. While those
were drying, I went to work on the interior. There are a number of resin
bits that fit in here, including some nicely formed seats. Unfortunately,
mine had a couple of the finely formed arm rests broken off and so I had to
do some creative positioning so they wouldn't be noticed. Two control
columns with separate control wheels easily fit into slots in the floor.
One of my columns was short shot. A resin central console holds the
instrument panel. The interior is basically Italian Interior Green and with
the bulkhead glued in place, fit into a slot on the right fuselage side.
The kit includes two interior bulkheads, one that has a beefy wing spar. I
had to trim on both of these items to get them to fit into the interior. As
nice as Special Hobby kits are, they are still short run kits and so test
fitting is a requirement.
fit. While those
were drying, I went to work on the interior. There are a number of resin
bits that fit in here, including some nicely formed seats. Unfortunately,
mine had a couple of the finely formed arm rests broken off and so I had to
do some creative positioning so they wouldn't be noticed. Two control
columns with separate control wheels easily fit into slots in the floor.
One of my columns was short shot. A resin central console holds the
instrument panel. The interior is basically Italian Interior Green and with
the bulkhead glued in place, fit into a slot on the right fuselage side.
The kit includes two interior bulkheads, one that has a beefy wing spar. I
had to trim on both of these items to get them to fit into the interior. As
nice as Special Hobby kits are, they are still short run kits and so test
fitting is a requirement.
Side gun covers were then glued from the inside. These are a tad short in the vertical so there will be a teeny gap. The small cabin windows were glued in place after removing the flash from their attachment holes. The kit has a resin tail gear fork that has to be trapped in between the fuselage halves when they are glued together. I worried that I'd end up breaking this off during all the handling needed while constructing the rest of the kit, but this didn't happen. The instructions show the lower turret being installed at this time, but I found the opening way too small to do this and left it off until the end.
Back at the wings, I glued on the
outer lower nacelle pieces. Fit is really quite good. The firewall
subassemblies were glued together at this time. I left off the guns from
the turrets until near the end. Actually, this was to be a bit of a problem
for me as all of the guns had the barrels broken off their mounts during
shipment. Next, I glued the small wheel well piece to the resin
 well forward section. Be
careful to attach this section below the attachment stub (more towards the
center of the piece). This resin piece does need to have the sprue stub cut
off or it won't fit. I then glued the nacelle halves together and glued
these to the wing. You need to test fit this before applying cement as they
only fit one way. Be sure to remove all the flash from the attachment
points. I then glued the firewalls to the outer engines and then glued the
well subassemblies to the inner ones. You are basically going to have the
part with the wheel opening butt against the leading edge of the wing. I
used superglue to help hold the forward well part in the nacelles, but it
is a very loose fit so it won't be a complete seal. The firewall sections
for the inner nacelle were glued in place before the super glue dried to
make sure it would completely fit. I did have to use some filler on all
these bits to get a nice, smooth finish; especially where the top of the
nacelle meets the wing.
well forward section. Be
careful to attach this section below the attachment stub (more towards the
center of the piece). This resin piece does need to have the sprue stub cut
off or it won't fit. I then glued the nacelle halves together and glued
these to the wing. You need to test fit this before applying cement as they
only fit one way. Be sure to remove all the flash from the attachment
points. I then glued the firewalls to the outer engines and then glued the
well subassemblies to the inner ones. You are basically going to have the
part with the wheel opening butt against the leading edge of the wing. I
used superglue to help hold the forward well part in the nacelles, but it
is a very loose fit so it won't be a complete seal. The firewall sections
for the inner nacelle were glued in place before the super glue dried to
make sure it would completely fit. I did have to use some filler on all
these bits to get a nice, smooth finish; especially where the top of the
nacelle meets the wing.
Returning to the fuselage, I did the
usual filler thing on the seams and then glued the tail planes into
position. This is a butt join, but I had no problems. Having this lined up
allows another reference for keeping the wings properly aligned when they
are attached. I then glued on the main canopy after masking it. Fit is
quite good though it does stick up a bit proud of the fuselage at the top.
This was cured by fairing in filler to smooth things out. The two halves of
the forward transparency were then glued together. This isn't the easiest
thing to do as there is supposed to be a solid panel that runs full width
on the bottom. On mine, there is a frame as I just couldn't get it totally
clear. Careful use of filler and sanding will get y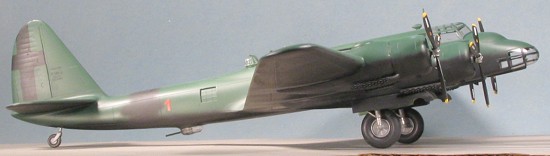 ou
a nicely done front section. I glued in the bombardier's pad then the nose
section. Again, fit isn't bad, but some filler is needed as the
transparency is just a tad oversize. Fortunately, no clear bits are right
against the join so a smooth transition is possible.
ou
a nicely done front section. I glued in the bombardier's pad then the nose
section. Again, fit isn't bad, but some filler is needed as the
transparency is just a tad oversize. Fortunately, no clear bits are right
against the join so a smooth transition is possible.
With the wings complete and dry, I glued them in place. Fit is not at all bad though you do have to move things around. I found that once I was done, there was a step on both sides of the bottom where the wing joined the fuselage. Nothing to do but break out more filler and smooth that section out. Perhaps this could have been prevented by gluing the upper wing then the bottom wing, but that would have made all the work needed on the nacelles that much more difficult.
Next it was the engines. The cowlings
are a right and left side into which are trapped the engine faces. I don't
like these kinds of things as it inevitably means that there will be little
'notches' where the nacelles join on the front. I also found that the
engine faces needed a touch of trimming to fit inside. Make sure they fit
forward of the little tab that is on one cowling side. The instructions
show that you then glue on the exhaust and the flame dampers before
attaching them to the fire walls. Do that and you'll not get them to fit as
the bits on the exhaust will get in the way. I guess you could sand down on
the inner parts of the exhaust as they are just resin, but I decided to
attach them at the very end. This also brings with it problems as I'll
relate in that section. Not gluing the exhaust does make it easier to paint
all this, however. Even then the fit o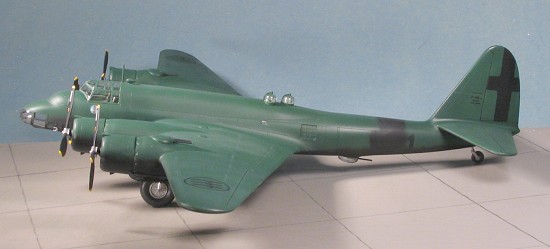 f
the engines wasn't exactly perfect as they ended up being glued by the ends
of the cowl flaps! There are small resin intakes for the carb and oil
cooler intakes. These fit fairly well. One of the lower oil cooler intakes
had disappeared and I had to make one out of scrap plastic. I left off the
upper turret sights until a bit later. The long intake housing was
glued on to the lower of the front fuselage and the forward transparency
was masked.
f
the engines wasn't exactly perfect as they ended up being glued by the ends
of the cowl flaps! There are small resin intakes for the carb and oil
cooler intakes. These fit fairly well. One of the lower oil cooler intakes
had disappeared and I had to make one out of scrap plastic. I left off the
upper turret sights until a bit later. The long intake housing was
glued on to the lower of the front fuselage and the forward transparency
was masked.
I had to deal with the broken nacelle gun barrels. First I removed the mounts from the resin and then installed these bits into the turrets. Taking several sizes of drill bits, I drilled holes into these stubs until I could fit the barrels. These were then glued in place. Naturally, I broke one of them off during handling. Fortunately, there was a spare so this was drilled out again and the replacement barrel attached. The wheel wells, which had been painted Italian Interior Green using some of my old Aeromaster acrylics, were filled with tissue. I then glued on the radio mast and the DF 'football' and headed to the paint shop.
| COLORS & MARKINGS |
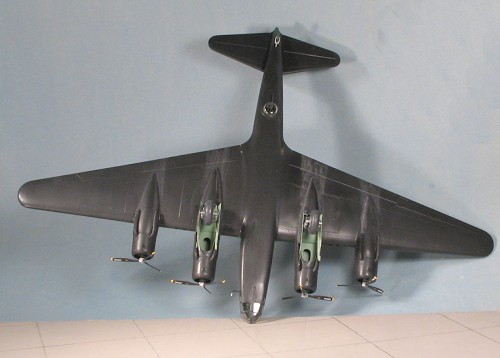
 First thing was to paint the
underside of the airframe in black as I was going to do the operational
markings. Captured aircraft are not my forte and I do wish that there was
more than one operational scheme offered. Once that had dried, the upper
surface was painted in Dark Green (Verde Mimetico 2), again, using
some of my old Aeromaster Acrylics. ColourCoats offers these colors in its
Italian line-up for those that want to use enamels. At this time, the
landing gear parts were painted aluminum with the oleos wrapped in Chrome
Bare Metal Foil.
First thing was to paint the
underside of the airframe in black as I was going to do the operational
markings. Captured aircraft are not my forte and I do wish that there was
more than one operational scheme offered. Once that had dried, the upper
surface was painted in Dark Green (Verde Mimetico 2), again, using
some of my old Aeromaster Acrylics. ColourCoats offers these colors in its
Italian line-up for those that want to use enamels. At this time, the
landing gear parts were painted aluminum with the oleos wrapped in Chrome
Bare Metal Foil.
During the time this was drying, I assembled the props. This is one of those separate hub, separate blade deals. Fortunately, the blades fit into cavities in the hub so attachment isn't a major problem. That only left alignment and pitch to worry about! The props are handed with one side turning one way and the other side in the opposite direction so don't get the blades mixed up! Once assembled the props were painted black with aluminum hubs and yellow tips. I had to drill holes in the back of the hubs so that they would fit on the little stubs that protrude from the engine crankcase.
Back at the airframe, a second application of black was applied to be sure that I got a fairly good demarcation line between the upper and lower colors. This was rather sloppily applied in the field so neatness doesn't count. Then a clear gloss coat was applied in preparation for decals.
 Before doing decals, I like
to get a kit on its wheels. Fitting the huge main wheels into the struts
was no problem as I gently squeezed on the opposing end of the strut, which
caused the other end to open up a bit and the wheels were then slid in
place. I did have to drill out where the axles fit into the hub or it would
have been way too wide. It is a bit wide as it now stands anyway.
Attachment to the wells is not positive. There are little indentations that
really have to be drilled out even more to get the gear to fit. The
retraction struts fit into indentations on the main struts and then into
the unknown in the wheel well. I then glued in the main strut and solidly
attached it with both standard glue and later super glue. Much to my
dismay, I found out later that not only were the gear struts not at the
exact same angle fore and aft, but they were also leaning outward a bit. Be
warned and trim your gear accordingly when you do get ready to glue them
in. Tail wheel fit with no trouble at all.
Before doing decals, I like
to get a kit on its wheels. Fitting the huge main wheels into the struts
was no problem as I gently squeezed on the opposing end of the strut, which
caused the other end to open up a bit and the wheels were then slid in
place. I did have to drill out where the axles fit into the hub or it would
have been way too wide. It is a bit wide as it now stands anyway.
Attachment to the wells is not positive. There are little indentations that
really have to be drilled out even more to get the gear to fit. The
retraction struts fit into indentations on the main struts and then into
the unknown in the wheel well. I then glued in the main strut and solidly
attached it with both standard glue and later super glue. Much to my
dismay, I found out later that not only were the gear struts not at the
exact same angle fore and aft, but they were also leaning outward a bit. Be
warned and trim your gear accordingly when you do get ready to glue them
in. Tail wheel fit with no trouble at all.
Decals are really superb, being thin and needing only the mildest of setting solutions. There aren't many of them for this scheme so decaling won't take an age. I had thought that the blacked out fuselage band was a decal. It isn't so I had to return to the paint shop to carefully spray black where the band would have been. No problems. On the prop blades are decals as well. In fact, Special Hobby must have thought this plane had four bladed props as there are 16 decals. Well, you now have four spares. In addition to the logo, there is a white stripe. The instructions don't say a thing about this stripe. It goes to the outside of the logo, toward the blade tip.
| FINAL CONSTRUCTION |
With the decals in place, a clear
matte was sprayed on to seal them in. Then it was time to add the final
bits. First were the exhaust. Fit here is not that great as the openings
are too small for the exhaust to fit into. These were glued as best I
could. I didn't glue on the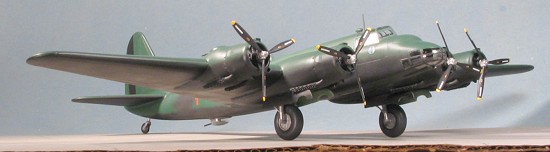 flame dampers at this time. In hindsight, I should have as it would have
been a bit easier to get things properly aligned from the start. Then the
exhaust were painted with Burnt Iron as were the dampers. The dampers were
then glued in place and while most fit well, one or two didn't. Next the
gear doors were attached. These are butt joins on a very small area and fit
isn't perfect, but I did get them to look fairly good. Moving to the nose,
the small air data probe was glued on after cutting the parts as shown in
the instructions. The lower turret had a hole drilled in it for the gun and
this was glued to the bottom of the fuselage. On the top, the sighting
blisters have small resin attachments to glue to them. I had to enlarge the
holes into which they fit. I carefully glued these little assemblies in
place.
flame dampers at this time. In hindsight, I should have as it would have
been a bit easier to get things properly aligned from the start. Then the
exhaust were painted with Burnt Iron as were the dampers. The dampers were
then glued in place and while most fit well, one or two didn't. Next the
gear doors were attached. These are butt joins on a very small area and fit
isn't perfect, but I did get them to look fairly good. Moving to the nose,
the small air data probe was glued on after cutting the parts as shown in
the instructions. The lower turret had a hole drilled in it for the gun and
this was glued to the bottom of the fuselage. On the top, the sighting
blisters have small resin attachments to glue to them. I had to enlarge the
holes into which they fit. I carefully glued these little assemblies in
place.
Last things to do were to glue on the props (making sure they were on the proper side as shown in the instructions), give the newly attached bits a coat of matte clear to hide the gloss glue marks, and remove the masking from the windows. A bit of medium grey pastel exhaust stain, and I was done.
| CONCLUSIONS |
 Once again,
Special Hobby has come up with a kit that most of us would have thought
we'd never see. This just adds to the ability of modelers to chalk up
another WW II 'heavy' to add to their collection. Overall the kit is such
that most modelers will not have any real trouble with it. There are some
areas where you have to pay careful attention while building and it is a
good idea to have a reference handy (the only one I know of is the
Ali D'Italia book). The end result is a model that, I think you'll
agree, is well done and a real eye-catcher. I'm sure that Special Hobby
will be producing the Series I aircraft at a later date if this one does
well. All the parts are in the box to do it.
Once again,
Special Hobby has come up with a kit that most of us would have thought
we'd never see. This just adds to the ability of modelers to chalk up
another WW II 'heavy' to add to their collection. Overall the kit is such
that most modelers will not have any real trouble with it. There are some
areas where you have to pay careful attention while building and it is a
good idea to have a reference handy (the only one I know of is the
Ali D'Italia book). The end result is a model that, I think you'll
agree, is well done and a real eye-catcher. I'm sure that Special Hobby
will be producing the Series I aircraft at a later date if this one does
well. All the parts are in the box to do it.
Overall, this is a kit I can recommend to those who are willing to put a bit of effort into building their kits.
May 2005
#1362 in a series
Copyright ModelingMadness.com. All rights reserved. No reproduction in part or in whole without express permission from the editor.
If you would like your product reviewed fairly and fairly quickly, please contact the editor or see other details in the Note to Contributors.