Astrokit 1/48 Macchi C.200 Saetta
|
KIT # |
48203 |
|
PRICE: |
$43.65 |
|
DECALS: |
See Review |
|
REVIEW |
|
|
NOTES: |
Kit is resin |
|
HISTORY |

In the mid-1930s, Italy initiated 'Program R'. This envisioned 3,000 new aircraft for the air force including a 'bomber destroyer' fighter monoplane with a single 12.7mm gun and one hour's endurance. Needless to say, both armament and endurance requirements were increased! To meet this requirement, Macchi developed the MC.200, which first flew on December 1937.
The high speed of the aircraft (500mph in a dive) won a production contract and the first series was for 99 aircraft. These all had full canopies and were basically disliked by pilots who were used to more nimble open-cockpit fighters. The full canopy went away after the first production batch and an open cockpit was developed.
 When Italy went to war in June 1940, 156 aircraft had been
delivered. These did not participate in the fighting with the French as the
MC.200 had been temporarily grounded due to a series of crashes. The cause was
later determined to be high speed stalls and the aircraft was modified. These
modifications resulted in an extremely maneuverable and stable aircraft.
Though slower than most of the Allied fighters of the time, it, like the A6M
Zero, could outmaneuver and outclimb almost any of them.
The aircraft fought extensively in Greece, Yugoslavia and Malta during 1940 and
went on to operate in the desert. They also operated for a time in Russia until
the spring of 1942.
When Italy went to war in June 1940, 156 aircraft had been
delivered. These did not participate in the fighting with the French as the
MC.200 had been temporarily grounded due to a series of crashes. The cause was
later determined to be high speed stalls and the aircraft was modified. These
modifications resulted in an extremely maneuverable and stable aircraft.
Though slower than most of the Allied fighters of the time, it, like the A6M
Zero, could outmaneuver and outclimb almost any of them.
The aircraft fought extensively in Greece, Yugoslavia and Malta during 1940 and
went on to operate in the desert. They also operated for a time in Russia until
the spring of 1942.
Later modifications included provisions for bomb racks or extra fuel tanks as the MC.200 made a very good fighter-bomber. The aircraft was later mated to a Daimler Benz engine and went on to be the superb MC.202 Folgore. Later MC.200s even had the same wing as was used on the MC.202 with two additional 7.7mm guns. Approximately 1,000 Saettas were built, most of them by Breda and SAI. Two examples exist. One is at the USAF Museum and the other at the Italian Air Force Museum.
|
THE KIT |
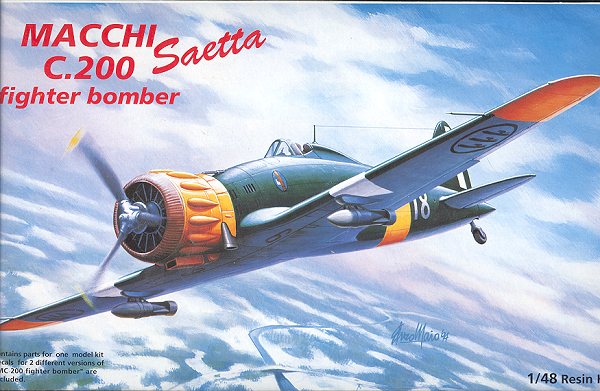
 The first thing one notices is the nice sturdy box with very nice box art on it
showing a MC.200 in eastern front markings with two bombs under the wings. Upon
opening the box, one sees that all the parts are in zip bags and there are three
compartments to keep the parts from sliding around in the box. A very nice touch
that other resin kit makers should emulate.
The first thing one notices is the nice sturdy box with very nice box art on it
showing a MC.200 in eastern front markings with two bombs under the wings. Upon
opening the box, one sees that all the parts are in zip bags and there are three
compartments to keep the parts from sliding around in the box. A very nice touch
that other resin kit makers should emulate.
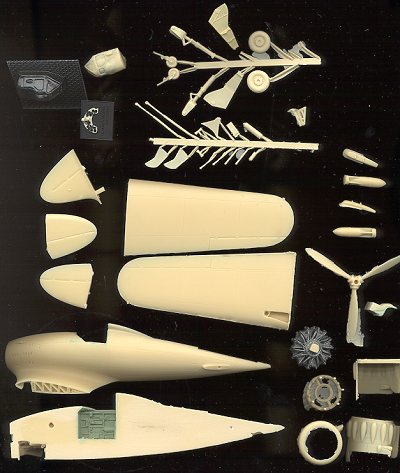
The resin itself is very well done. I noticed no pinholes on any of the parts. The detailing is really excellent with finely engraved panel lines on the exterior. The interior and wheel well detailing is exquisite and has to be seen to be appreciated. There is some flash around the edges of the parts, but that is to be expected and is the norm. I cannot tell you if there were any resin block to which the parts were attached. This kit had barely been started by another who couldn't finish it. The interior parts were painted and the engine was partially assembled and painted. There are no blocks noted on the parts listing.
You may recall reading that on the MC.202, one wing was longer than the other to compensate for the torque of the engine. This has been duplicated on the MC.200 as well. The engine cowling is in a right and left half with separate nose ring rather than the much harder to clean up fore and aft method of some other kits. Optional bits for this kit are the bomb racks, sand filter and different canopies. One is vacuformed and the other is resin in which you put clear panels (!) The clear panels are already marked on a piece of acetate so it shouldn't be too difficult to do. To assist with alignment of the heavy fuselage halves during gluing, there are pegs that fit into holes in each fuselage half. An elegantly simple way of assuring alignment!
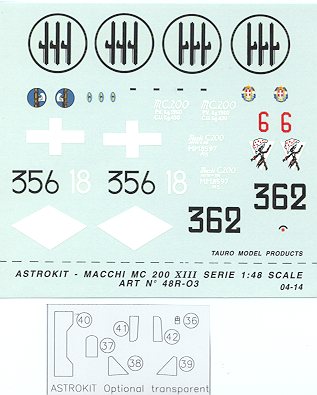 Decals are for two
aircraft on the Russian Front. One from 356 Sq/21 Gr in overall green upper with
light grey lower. The 362 Sq/22 Gr aircraft is in an interesting sand yellow
with brown and green mottling upper and grey lower. Both have Russian Front
markings of Yellow cowling, fuselage band and wing tips. In addition there are
large white triangles on the upper and lower wing leading edges. Decals are by
Tauro so you know the quality is good.
Decals are for two
aircraft on the Russian Front. One from 356 Sq/21 Gr in overall green upper with
light grey lower. The 362 Sq/22 Gr aircraft is in an interesting sand yellow
with brown and green mottling upper and grey lower. Both have Russian Front
markings of Yellow cowling, fuselage band and wing tips. In addition there are
large white triangles on the upper and lower wing leading edges. Decals are by
Tauro so you know the quality is good.
The instructions are very well done for this kit. It is a four page affair. The front page is a small primer on how to do resin kits. The back page is the paint and decal instructions. Inside there is a five step construction sequence. All the parts are numbered and matched to a parts layout. Colors for parts are also given in the instruction. A nice touch are a number of warnings and building tips so that you won't make an error while constructing the kit.
While 40 or so parts doesn't sound like a lot, when working with resin, it is. However, with the quality of the parts themselves and the logical sequence shown in the instructions, it looks like it will be a great kit!
|
CONSTRUCTION |
First off, let me start this by saying that resin kits are not always uniform from one kit to the next. Since each are basically hand made, there are a number of variables that come into play when making them that prevent total uniformity in manufacture. Last year I built a resin kit that was a dream. I compared favorably with the best injected model I have built. A friend of mine bought the exact same kit and has had a tough time with it.
Anyway, this kit was already started when I got it. The engine had been glued together (incorrectly as it turns out) and the interior painted. The interior is the first part to be constructed. It consists of a seat, armor plating, instrument panel and control column. All the detail and floor are molded into each of the fuselage halves. This makes it impossible to get the seam out of the cockpit floor, but since it is generally covered by the seat, no problem. Don't cut the resin block off the bottom of the seat, it is supposed to be there.
 Unlike
most interiors, I left off most of the parts until after the fuselage was joined
together. This can be done as it is basically an open cockpit aircraft. Once the
interior parts had been painted, the instrument panel was glued onto one side of
the fuselage and some test fitting was done to make sure it was in the right
place. It was and then it was time to glue the fuselage halves together.
Unlike
most interiors, I left off most of the parts until after the fuselage was joined
together. This can be done as it is basically an open cockpit aircraft. Once the
interior parts had been painted, the instrument panel was glued onto one side of
the fuselage and some test fitting was done to make sure it was in the right
place. It was and then it was time to glue the fuselage halves together.
First thing I did was to sand each of the halves to get any 'stuff' off the edges. There are two alignment holes in each half. On the sprue are two alignment pins. There is a larger pin for the front and a smaller one for the back. Both pins are way too long and were cut down. I test fit each pin into the holes on each half to make sure they fit. Once I was sure they fit, I then test fit the fuselage halves together. I could get one pit to fit but not both. There is about 1/16 - 1/8 inch difference between the front and rear. Mating the fuselage halves together, it seems like one is smaller than the other in all dimensions (or one is larger, take your pick).
Now to many, this would be a real disaster, but it is something that is fixable. What you do, is to pick where you would like things to match up. I chose the wheel wells. Then all that is needed is to glue the halves together, and then sand the larger half down until it meets the dimensions of the smaller half. On most other resin kits, this would be disaster as it would cause hundreds of air bubbles to appear. However, Astrokit's resin is the finest I have ever seen and there are literally NO bubbles in it. The sanding job went beautifully. Any lost panel lines were rescribed with ease.
Next it was time for the wings. Well, since one fuselage half was too large (or too small), it meant that one of the wings would not fit the wing root. In this case, the offending wing was too tall and too broad. The key to fixing this is again, a lot of sanding. But first, one needs to affix the wing. Astrokit gives just beautiful wing root detail on the fuselage. Why, I have no idea as I really cannot see too many people building this kit with the wings off! It does make it a bit more difficult to attach the wings as the attachment surface areas is small compared to what is on the wing itself.
 Here is how to take care of this situation.
First of all, using a #61 drill bit, drill a hole in about the center of the
wing root. Take a small section of paper clip and glue it in the hole you have
just made. Then line up the wing with the fuselage. You want the leading
edge to match up. With a pencil, mark on the fuselage wing root on either side
of the paper clip stub. This will give you a good idea of where to drill the
hole in the fuselage root. Then using your drill bit, drill the hole in the
fuselage. If you miss a little, no biggie, just open up the fuselage hole more.
This small paper clip is meant to be a guide for when you eventually glue the
wings to the fuselage. You want the wing to match at the leading edge and the
top. I did have to cut away some of the girder detail on one side to properly
place the hole, but since it will be invisible, no big deal. All 'fix-it'
sanding should be at the trailing edge and the bottom where it is easier to work
with.
Here is how to take care of this situation.
First of all, using a #61 drill bit, drill a hole in about the center of the
wing root. Take a small section of paper clip and glue it in the hole you have
just made. Then line up the wing with the fuselage. You want the leading
edge to match up. With a pencil, mark on the fuselage wing root on either side
of the paper clip stub. This will give you a good idea of where to drill the
hole in the fuselage root. Then using your drill bit, drill the hole in the
fuselage. If you miss a little, no biggie, just open up the fuselage hole more.
This small paper clip is meant to be a guide for when you eventually glue the
wings to the fuselage. You want the wing to match at the leading edge and the
top. I did have to cut away some of the girder detail on one side to properly
place the hole, but since it will be invisible, no big deal. All 'fix-it'
sanding should be at the trailing edge and the bottom where it is easier to work
with.
As you can imagine, one wing fit beautifully and the other had the tar sanded out of the bottom and trailing edge. I used 120 grit sandpaper as a start so it wouldn't be an ultra-long sanding session. Again, thanks to the high quality of the resin, all that was needed when done was to have the panel lines rescribed. There were a few gaps that needed filler, but that is the norm for my projects.
Once the wings were on, it was time for the tail section. Because most of the displacement caused by differing fuselage sizes was apparent here, it is where I had to be more careful when attaching parts. The fin/rudder fit very well, needing a few applications of filler to blend it in. Then the horizontal stabilizers were glued in place. You need to make sure these are even with each other.
While this was going on, I worked on the engine and cowling. The cowling is very thin and you need to take special care when removing it from its resin blocks. Once it and the front section are cleaned up, you can then install the engine in the two halves. I found this to take a lot of back and forth fiddling before I finally got thinks to line up. Even then I had to apply some pressure and hit the seam with some superglue accelerator to get the parts to hold. I think this was due to the cowlings being so thin. Then the front cowl ring was glued in place. Typical for me, the fit wasn't perfect and there were some gaps that needed filled.
|
PAINT |
 At this stage, it was time to start doing some exterior
painting. The cowling was the first to get treatment. The markings scheme I was
doing required the cowling to be yellow. This meant that first it was painted
with a gloss light grey to cover any filler. At this time, I also painted the
fuselage behind the cockpit with this grey for the same reason. Then both the
cowling and fuselage were painted with a few coats of white. Hope you remembered
to mask the engine front and cockpit with tissue to keep the paint out!!
At this stage, it was time to start doing some exterior
painting. The cowling was the first to get treatment. The markings scheme I was
doing required the cowling to be yellow. This meant that first it was painted
with a gloss light grey to cover any filler. At this time, I also painted the
fuselage behind the cockpit with this grey for the same reason. Then both the
cowling and fuselage were painted with a few coats of white. Hope you remembered
to mask the engine front and cockpit with tissue to keep the paint out!!
The cowling was then painted on the front with Burnt Iron Metallizer. That was then masked off and the overspray repainted in white. At this time there was a white band masked off on the fuselage. I hate doing fuselage bands as I generally mess them up. This was to prove to be no different. The rest of the cowling was then painted yellow and set aside to dry for a few days.
Once the white fuselage band was masked off, the underside of the wings and tailplanes was painted Grigio Mimetico (light grey). I used Aeromaster's acrylic colors for this as they do a full range of Italian camouflage paints. Frankly, I'd rather use enamels, but one must use what one can get. When the grey was dry, it was masked off. Now the fuselage underside is not painted grey but upper body colors. The upper colors also wrap around the leading edge of the wings, so that must be carefully masked as well. I used Tamiya masking tape as it covers well without leaks and it is easy to cut.
The rest of the airframe was then painted Giallo Mimentico 4 or a medium tan. When dry, the airframe was very sparsely mottled with irregular patches of Verde Mimentico 2 (a dark green) and Bruno Mimentico (a reddish brown).
|
CONSTRUCTION CONTINUES |
Now that I had the airframe pretty well painted, it was time to
continue adding some bits. This meant landing gear. The smaller resin parts are
not molded to the same standards as the fuselage/engine/cowling. These parts
look like rough cast iron and are not at all smooth. You have three choices. Do
as best you can with the kit parts, make new ones out of plastic card and
tubing, or rob the needed parts from a Hasegawa MC.202/205. Were I doing a
contest aircraft, I would choose the last option. I chose the first option and
cleaned up the parts as much as I could.
The landing gear and wheels were then glued in place. The tail
wheel is a very scale and therefore fragile part. Not sure how long it will hold
up under the weight of the kit before it warps. When it does, I'll replace the
strut with a piece of rod. Same for the main gear. The construct is quite
strong, but resin will deform in time when there is a lot of weight on it.
Then it was time to finish up the cockpit. The control stick was
glued in followed by the seat. Then the armor plating was glued in. This last
piece was slightly short shot and I trimmed it down a bit rather than make a new
one. Call me lazy. Then it was time for the canopy. The version I
was building had the more enclosed of the two varieties. Astrokit gives you a
vacuformed one as well as a resin frame in which you place the required
transparencies. Well, I don't like vacuformed canopies and have even less luck
with the 'insert the transparencies into the resin frame' variety. So, I first
masked the vacuform canopy. Then I cut it out of its backing sheet as carefully
as possible. When that was done, it was then superglued to the cockpit opening
as best as I could using non-fogging superglue and accelerator. Like I said, I
don't do well with vacuform canopies! Once the gear was on it was time to install the engine. YIKES,
it didn't fit! This is the problem with building kits that are already started.
The person who started this one glued the engine halves off kilter. That meant
that the peg was not properly aligned with the keyway in the fuselage. The
result was that I cut off the peg, sanded the area under it, and glued the
engine on the front of the fuselage the best I could. Hey, if I didn't tell you,
you wouldn't have noticed!
Once the gear was on it was time to install the engine. YIKES,
it didn't fit! This is the problem with building kits that are already started.
The person who started this one glued the engine halves off kilter. That meant
that the peg was not properly aligned with the keyway in the fuselage. The
result was that I cut off the peg, sanded the area under it, and glued the
engine on the front of the fuselage the best I could. Hey, if I didn't tell you,
you wouldn't have noticed!
|
DECALS |
I decided to use a scheme not in the kit. I received this great Sky Decals sheet and was determined to use one of the 37 different options on the sheet. I chose Del Comandante Vossilla of 150 Gruppo. This was because it had a Mediterranean scheme, was sparsely mottled, and had both yellow and white colors on it. Typical of Italian aircraft, there is a minimum of stenciling. Apparently the mechanics knew their job and didn't need all the warning and other placards!
I did use the kit decals for the tail cross and small insignia as sell as the fuselage fasces. I want to use the Sky sheet ones for another project I have in mind. The kit decals were very good as well. Both of them reacted favorably to both Microscale solution as well as Solvaset with no problems at all.
Once all the decals were on, the aircraft was oversprayed with matte clear to seal them in. Then the masking on the canopy was removed with no trauma at all. The prop was then installed, a bit of staining from the exhaust was added (this is the Commander's plane you know, so it won't be filthy!), and that was it. The last step was the installation of the venturi on the right side and the drilling out and installation of pitot tubes (I guess) near the wing tips. These were made from stretched sprue.

|
CONCLUSIONS |
Now that I have finished the kit, I am quite pleased with the outcome. While the kit was a bit more work than I had originally anticipated, it was really no more work than most resin kits and a lot less than many of them. Much of this is thanks to the superior resin casting of the large parts of the kit. Were this a 'normal' resin kit, it would have taken me months to finish it because of all the air bubbles I would have opened up during sanding.
Overall,
I can recommend this kit to anyone who has had a bit of experience working with
resin. Despite the extra work involved, this would make a good kit for someone
looking to do their first full resin aircraft. That fact that it is a Macchi 200
only adds to its desirablility.
|
REFERENCES |
Warplanes of the Second World War: Fighters Vol 2.
William Green, 1961
Air Forces International, February 1989. Richard J Caruana
If your local shop cannot obtain this kit, it can be purchased direct from the distributor at the link below. Please allow that this article is many years old and the kit may no longer be available.
Copyright ModelingMadness.com. All rights reserved. No reproduction in part or in whole without express permission from the editor.
If you would like your product reviewed fairly and quickly, please contact the editor or see other details in the Note to Contributors.
Back to Reviews Page 2024