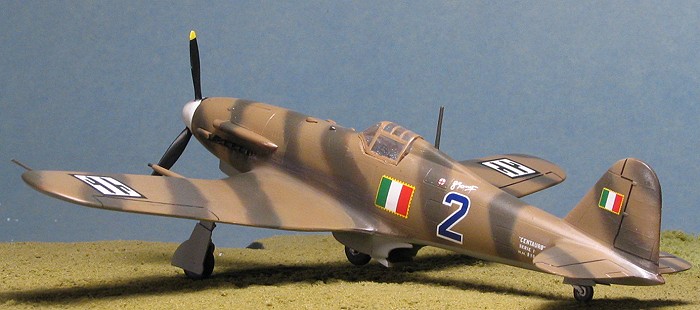
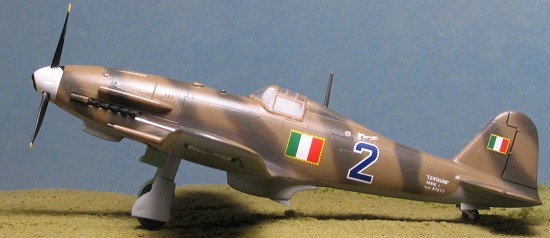
Special Hobby 1/72 Fiat G.55 Serie I
| KIT #: | 72087 |
| PRICE: | $25.50 MSRP |
| DECALS: | Three options |
| REVIEWER: | Scott Van Aken |
| NOTES: | Multimedia kit with vacuform, resin and p.e. parts |
| BACKGROUND |
Please visit the preview to read more about the G.55 and to see what comes in the kit box.
| THE KIT |
To my knowledge, this is the third
injected plastic 1/72 kit of the G.55. I've built one of them, by Frog and found
it to be a generally accurate if quite simple kit. Just the thing for my
modeling skills 35 years ago! The other is by Supermodel (which as you may
 not know, was once under the Italeri roof, but split from the company in
the 1970s to go it on their own. This is why you see Supermodel kits in
Italeri boxes way back when and even today.). I've not built that
particular kit, but if like the others I've done, it is a nice kit for its
time and offered features such as separate wing tip transparencies we don't
see in many kits even today. This is the third one and like all of MPM's
current range of short run kits, offers a great deal of detail in the way
of resin and photoetched bits. They are not simple to build, but do make
into very nice models if one takes one's time during construction. It has
the dreaded vac canopy, but does provide the prop blades as a single
construct.
not know, was once under the Italeri roof, but split from the company in
the 1970s to go it on their own. This is why you see Supermodel kits in
Italeri boxes way back when and even today.). I've not built that
particular kit, but if like the others I've done, it is a nice kit for its
time and offered features such as separate wing tip transparencies we don't
see in many kits even today. This is the third one and like all of MPM's
current range of short run kits, offers a great deal of detail in the way
of resin and photoetched bits. They are not simple to build, but do make
into very nice models if one takes one's time during construction. It has
the dreaded vac canopy, but does provide the prop blades as a single
construct.
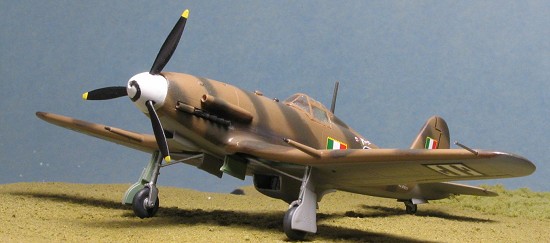
Though the kit comes with three distinct camo schemes, I really wanted this kit to do the 'herringbone' scheme of two browns on the upper surface in a 'vee' or herringbone striped pattern.
| CONSTRUCTION |
With any kit that includes resin
bits, one needs to decide if it is proper to first remove all the bits or
wait until they are needed. Sometimes I do it one way and sometimes the
other. In this case, I only removed pieces as I needed them. I started this
one off with the wheel wells. Once removed, I then placed them in the lower
wing. I found that some trimming had to be
 done as the lower wing opening
didn't match the wheel wells. Once the fit was good, I super glued it into
place. Then it was time for the upper wings. The resin wheel well was a bit
too tall for a good fit so I had to do some careful sanding on the forward
section of it to get the wings to where the leading edges would come
together. Even then I used super glue to be sure it was closed tightly.
done as the lower wing opening
didn't match the wheel wells. Once the fit was good, I super glued it into
place. Then it was time for the upper wings. The resin wheel well was a bit
too tall for a good fit so I had to do some careful sanding on the forward
section of it to get the wings to where the leading edges would come
together. Even then I used super glue to be sure it was closed tightly.
Moving to the interior, this part is pretty well a complete part with the seat, rudder pedals and control stick all molded as one piece. Unfortunately, my control stick had broken off and wasn't even in the sealed polybag so it had to have been broken before packaging. Rather shoddy quality assurance if you ask me. I'll have to hunt one up, probably from an older, broken up kit.
Before the cockpit can be completed one has to make up several photo etched bits for the seat harness. It seems the Italians used chains with leather straps on the ends of them for belts. Making these up is a rather time consuming process and I had to be quite slow and deliberate as the bits are quite small.
 In the meantime, I painted the back
of the acetate instrument sheet with white in preparation for gluing it to
the back of the instrument panel. This will be a bit of a poor fit as the
etched instrument panel is a bit larger than the opening into which it
fits. Moving to the lower part of the wing, I installed the resin block
that was to be the basis for the radiator. I then glued on the two photo
etched grille pieces. These have an additional grating that will be folded
over atop the grille when it is painted.
In the meantime, I painted the back
of the acetate instrument sheet with white in preparation for gluing it to
the back of the instrument panel. This will be a bit of a poor fit as the
etched instrument panel is a bit larger than the opening into which it
fits. Moving to the lower part of the wing, I installed the resin block
that was to be the basis for the radiator. I then glued on the two photo
etched grille pieces. These have an additional grating that will be folded
over atop the grille when it is painted.
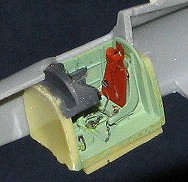 With the cockpit tub
complete, I glued on the right side panel, then glued the cockpit into
place in the right fuselage half. Then the instrument panel section was
attached. The acetate sheet was glued to the back of the photo etch panel
using clear paint and this was also used to attach it to the resin backing.
Fit was quite good and during this time I also glued in the tail wheel
housing. The exhaust are to fit from the inside on this one and so I
proceeded to test fit them. I found that unless most of the resin backing
was removed and the remainder sanded down, th
With the cockpit tub
complete, I glued on the right side panel, then glued the cockpit into
place in the right fuselage half. Then the instrument panel section was
attached. The acetate sheet was glued to the back of the photo etch panel
using clear paint and this was also used to attach it to the resin backing.
Fit was quite good and during this time I also glued in the tail wheel
housing. The exhaust are to fit from the inside on this one and so I
proceeded to test fit them. I found that unless most of the resin backing
was removed and the remainder sanded down, th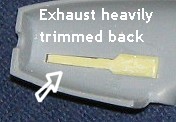 ese
would not properly fit. There is a small cooling intake at the front of the
exhaust that must protrude into the air flow. If one does not trim the
exhaust, then this feature will be hidden behind plastic. The rear portion
is not a problem and provides a spot where the exhaust can be attached.
Another alternative would be to place a piece of card stock behind the
exhaust slot, trim the exhaust completely and then install it after the
rest of the fuselage has been painted. The final interior step
ese
would not properly fit. There is a small cooling intake at the front of the
exhaust that must protrude into the air flow. If one does not trim the
exhaust, then this feature will be hidden behind plastic. The rear portion
is not a problem and provides a spot where the exhaust can be attached.
Another alternative would be to place a piece of card stock behind the
exhaust slot, trim the exhaust completely and then install it after the
rest of the fuselage has been painted. The final interior step
![]() was
to glue on the left side panel and then glue the fuselage halves together.
I suggest doing the fuselage halves almost immediately after the left side
panel so you can adjust it to keep the gap to a minimum.
was
to glue on the left side panel and then glue the fuselage halves together.
I suggest doing the fuselage halves almost immediately after the left side
panel so you can adjust it to keep the gap to a minimum.
 Naturally,
the fit was not perfect and there were plenty of seams to fill. At this
time, I also glued on the wings. Fit here was also less than perfect. It
seems that more often than not, 'short run' means 'filling seams' and this
kit was proving this to be the case. Nothing really horrid, just the sort
of thing that one expects to do on older kits. I found that the fit of the
wings left some rather considerable root gaps that were attacked with the
usual filler. Fit on the underside was less than sterling as well. How
Naturally,
the fit was not perfect and there were plenty of seams to fill. At this
time, I also glued on the wings. Fit here was also less than perfect. It
seems that more often than not, 'short run' means 'filling seams' and this
kit was proving this to be the case. Nothing really horrid, just the sort
of thing that one expects to do on older kits. I found that the fit of the
wings left some rather considerable root gaps that were attacked with the
usual filler. Fit on the underside was less than sterling as well. How ever,
I felt it to be more important to get the upper surface on properly first
so concentrated on the wing roots, eventually using super glue on the more
heinous gaps. With that area filled and receiving its first filler
application, I turned to the underside. Here the aft portion of the lower
wing section was too long and overlapped the fuselage. This was a
relatively simple matter of trimming away the overlap until it fit down
flush with the rest of the lower fuselage. Filler followed and during this
stage, I attached the horizontal stabilizers. Fit was fairly good in this
area as well. A bit of filler followed just to keep in practice.
ever,
I felt it to be more important to get the upper surface on properly first
so concentrated on the wing roots, eventually using super glue on the more
heinous gaps. With that area filled and receiving its first filler
application, I turned to the underside. Here the aft portion of the lower
wing section was too long and overlapped the fuselage. This was a
relatively simple matter of trimming away the overlap until it fit down
flush with the rest of the lower fuselage. Filler followed and during this
stage, I attached the horizontal stabilizers. Fit was fairly good in this
area as well. A bit of filler followed just to keep in practice.
 The
next step was to attach a bunch of the resin bits. The lower radiator
suffered from a broken bit on the forward section so I attached it in place
and then trimmed the other side to match. Some filler was used on the join
area to blend in. I also used some filler with the nose oil cooler section,
again, to blend it in. Fit was fairly
The
next step was to attach a bunch of the resin bits. The lower radiator
suffered from a broken bit on the forward section so I attached it in place
and then trimmed the other side to match. Some filler was used on the join
area to blend in. I also used some filler with the nose oil cooler section,
again, to blend it in. Fit was fairly
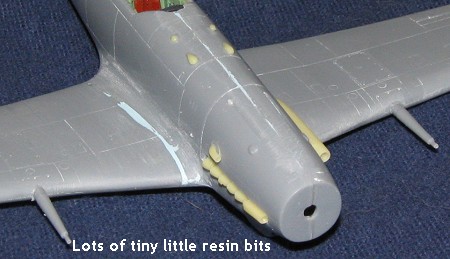
 good, but I'd sanded off the lightly
engraved placement guide marks! On the nose section there were six resin
pieces to attach. One was the supercharger intake on the left side. The
right side has a small cooling scoop and atop the nose in front of the
cockpit are four rather tiny bumps. There are holes showing where they go.
I found it quite difficult to remove and then sand or trim down the bases
on these as they really are quite small. Fortunately, I didn't lose any of
them and affixed them with superglue.
good, but I'd sanded off the lightly
engraved placement guide marks! On the nose section there were six resin
pieces to attach. One was the supercharger intake on the left side. The
right side has a small cooling scoop and atop the nose in front of the
cockpit are four rather tiny bumps. There are holes showing where they go.
I found it quite difficult to remove and then sand or trim down the bases
on these as they really are quite small. Fortunately, I didn't lose any of
them and affixed them with superglue.
Moving to the wings, I drilled out the holes for the cannon barrels and drilled out the barrels as well. These wing mounting holes are quite large so you'll need to break out the big drills for this one. I cut out the vac canopy and masked it. Then there was quite a bit of trimming before I attached it using superglue. I am never able to get these to fit just how I want them to, so I guess I'm impossible. I'd much prefer an injected canopy. With the canopy in place, I glued together the main landing gear struts. These have separate forks into which the wheels are attached before the glue dries. Makes it a bit of an effort to paint, but nothing that is really difficult. It was then time to hit the paint shop.
| COLORS & MARKINGS |
As I mentioned in the introduction, I
wanted to do the 'herringbone' camo scheme. This scheme uses the normal
light grey for the underside, while on the top are a sand and brown color.
I used some of my old Aeromaster Italian paints for this. They are acrylic,
and while I'd rather use an enamel, I figured I'd use what I had at hand.
First the underside and the outside of the gear doors were painted with the
light grey. For some reason, this didn't fully dry, even after a day. Very
odd for an acrylic. I 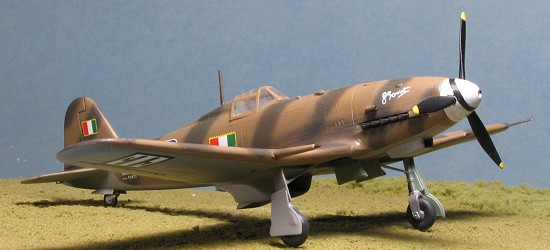 removed it by washing it off and applying Strip-A-Kit
to the bits that wouldn't come off easily. I then mixed up another batch
and sprayed it on. No problem this time, so I can only guess that the first
batch was bad in some way. After that dried, I painted the upper color tan,
followed by the brown, all Aeromaster acryilcs. The brown just didn't look
right to me. The artwork I was using showed it more of a greenish shade and
the brown was too red. I went over the brown with a green and things looked
a lot better. There was the usual back and forth painting to touch things
up, a job that took much longer than usual because I was using air
brush-clogging acrylics and had to spend a lot of time cleaning the tip.
removed it by washing it off and applying Strip-A-Kit
to the bits that wouldn't come off easily. I then mixed up another batch
and sprayed it on. No problem this time, so I can only guess that the first
batch was bad in some way. After that dried, I painted the upper color tan,
followed by the brown, all Aeromaster acryilcs. The brown just didn't look
right to me. The artwork I was using showed it more of a greenish shade and
the brown was too red. I went over the brown with a green and things looked
a lot better. There was the usual back and forth painting to touch things
up, a job that took much longer than usual because I was using air
brush-clogging acrylics and had to spend a lot of time cleaning the tip.
When the upper colors were to my liking, I masked that area off and did another round of the lower grey to take care of overspray. I then sprayed on some clear gloss acrylic to make the surface ready for decals.
During all this, I painted the undercarriage aluminum and the prop hub white as well as the usual Italian Interior Green for the inside of the gear doors. With the kit back to the work bench, the main gear were glued in place and so was the tail gear, after painting the gear wells in Italian Interior Green. I then began applying decals. The kit decals are thin and go on quite well, but there was a real problem with them.
 First of all the insignia are only
half right. The insignia are handed and the ones in the kit are not. The
'blade' portion of the fasces should be upright and facing outboard when
looking from the back. I also found the fringe around the fuselage and fin
flags to be grossly overdone. In addition, the serial block was done in a
blue color on many G.55s and only a white was was provided. Fortunately, I
have a very nicely printed Sky Decals sheet for a MC.205 that includes a
number of options in terms of insignia so robbed the wing insignia and
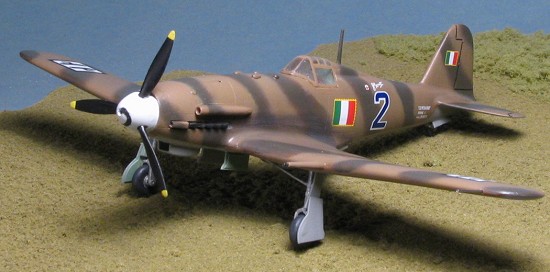
fuselage flags from that sheet. The plane I was doing, blue 21, provided
another problem. While the '2' in the kit sheet was the right size and
shade, I couldn't find a '1' in the right size and style to go along with
it. The result is that I've used what I have and left room for the blue '1'
whenever I can find a sheet that has one. After much digging around at CRM
hobbies, I was completely unable to find a proper '1'. If anyone can make a
suggestion as to where to locate one, I'd be pleased to hear from you. I
then sprayed on a semi-gloss clear as often times these planes were waxed
for additional speed.
First of all the insignia are only
half right. The insignia are handed and the ones in the kit are not. The
'blade' portion of the fasces should be upright and facing outboard when
looking from the back. I also found the fringe around the fuselage and fin
flags to be grossly overdone. In addition, the serial block was done in a
blue color on many G.55s and only a white was was provided. Fortunately, I
have a very nicely printed Sky Decals sheet for a MC.205 that includes a
number of options in terms of insignia so robbed the wing insignia and
fuselage flags from that sheet. The plane I was doing, blue 21, provided
another problem. While the '2' in the kit sheet was the right size and
shade, I couldn't find a '1' in the right size and style to go along with
it. The result is that I've used what I have and left room for the blue '1'
whenever I can find a sheet that has one. After much digging around at CRM
hobbies, I was completely unable to find a proper '1'. If anyone can make a
suggestion as to where to locate one, I'd be pleased to hear from you. I
then sprayed on a semi-gloss clear as often times these planes were waxed
for additional speed.
| FINAL CONSTRUCTION |
In this case, it was a lot of little
things. For instance, attaching the gear doors, each of which had a lump
that extended from the sprue into the door. That had to be trimmed off and
sanded down. I also attached the teeny, tiny trim tab actuator arms. Well,
about half of them, I got the ones on the elevators, but the ones for the
rudder ended up in the carpet for the gnomes to play with. I also had to
make a pitot tube, which I did out of stainless steel tubing. The very long
resin gear retraction struts 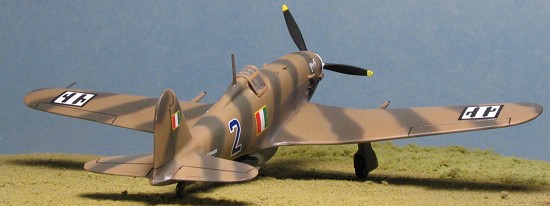 were also glued in place. I had to take a LOT
of care when cleaning these up to prevent breakage. One thing that is
completely missing from the kit but is shown on the various other books I
have on the G.55 is a sort of venturi or DF loop that fits on the underside
of the aircraft aft of the radiator. Rather than cobble together something
I wasn't sure about, I left it off.
were also glued in place. I had to take a LOT
of care when cleaning these up to prevent breakage. One thing that is
completely missing from the kit but is shown on the various other books I
have on the G.55 is a sort of venturi or DF loop that fits on the underside
of the aircraft aft of the radiator. Rather than cobble together something
I wasn't sure about, I left it off.
There was the usual touch-up painting that I always seem to have to do with these kits. I was unable to find a black spiral decal for the spinner (lots of white ones, though) so ended up doing what they did in 1944 and painted one on. Naturally, it looks terrible! Pastels were added for the exhaust and that was about it for weathering. I won't tell you that these planes were kept in immaculate condition, just that I generally don't heavily weather my airplane models. I then removed the masking from the canopy and found that what I feared had happened. You see, the back of the canopy on many Italian fighters is open as they were not ever pressurized. Well, it is also nearly impossible to mask this so one just hopes that overspray doesn't get inside. On this one it did and that is that.
| CONCLUSIONS |
I'd have to say that this is probably the best G.55 in this scale. I enjoyed the build despite making a few errors, and the end result is worth the effort put into it. I'd recommend an alternate source to the kit decals to get correct markings and suggest a bit more research on the part of MPM in this regard.
November 2005
#1386 in a series
Copyright ModelingMadness.com. All rights reserved. No reproduction in part or in whole without express permission from the editor.
If you would like your product reviewed fairly and fairly quickly, please contact the editor or see other details in the Note to Contributors.