RS Models 1/72 Avia B-135
| KIT #: | 92025 |
| PRICE: | $25.15 from www.greatmodels.com |
| DECALS: | two options |
| REVIEWER: | Scott Van Aken |
| NOTES: | Short run kit with photo etch parts by Eduard |
| HISTORY |
The
B.135/1 prototype attracted
the attention of Bulgarian Air Force officers visiting the Avia plant, and a
production contract for 12 aircraft and 62 engines was signed, as well as a
license to allow an additional 50 airframes to be constructed by DAR as the
 DAR 11
Lyastovitsa
(Bulgarian: "Лястовица"; "Swallow"). However, the DAR facilities proved to be
incapable of producing the aircraft, and only the 12 Czech-built examples were
ever made. Plans for further production were stopped by the RLM, which also
interrupted engine deliveries after 35 units, and the Bulgarian Air Force was
encouraged to purchase the Messerschmitt Bf 109 instead.
DAR 11
Lyastovitsa
(Bulgarian: "Лястовица"; "Swallow"). However, the DAR facilities proved to be
incapable of producing the aircraft, and only the 12 Czech-built examples were
ever made. Plans for further production were stopped by the RLM, which also
interrupted engine deliveries after 35 units, and the Bulgarian Air Force was
encouraged to purchase the Messerschmitt Bf 109 instead.
In service, the B-135s gave continual engine problems and were soon relegated to training roles. Four aircraft did, however, see combat on 30 March 1944 when they intercepted USAAF bomber formations encroaching on Bulgarian airspace after attacking Ploieşti. Some (Bulgarian) sources credit Lieutenant Yordan Ferdinandov with a B-24 Liberator kill that morning. According to Bílý all four Avias, led by Captain Atanasov, took part in the possible shooting down of a 4-engined bomber that day. The downed aircraft crashed in the area of Tran and Breznik according to the log of Lieutenant Yordan Ferdinandov.
| THE KIT |
Molded in tan plastic with a single piece clear canopy, the detailing on this kit is actually quite good. The surface has a somewhat rough feel to it and most of the larger parts have ejector towers that will need to be removed prior to assembly. There is framework detail on the inside of the fuselage halves and in the wheel wells.
 The kit provides several parts that are not used on
this variant. As a result, there are redundant wheels, props,
gear doors, exhaust
and lower cowling engine intakes.
The kit provides several parts that are not used on
this variant. As a result, there are redundant wheels, props,
gear doors, exhaust
and lower cowling engine intakes.
Photo etch is provided by Eduard and is in color. This includes a number of interior bits like the instrument panel and dials, seat harness and a myriad of smaller pieces. An oil cooler screen is also part of this fret.
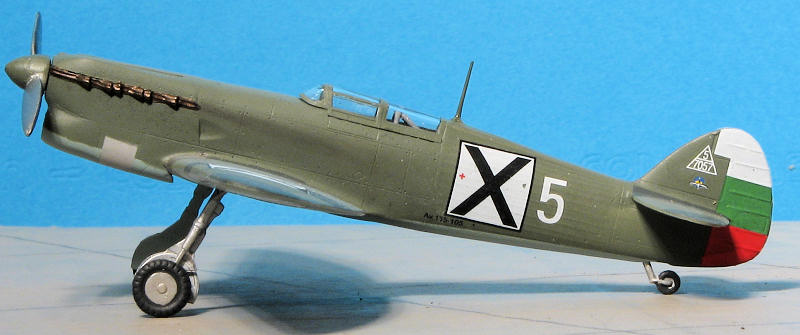
Instructions are for both kits with the parts for this and the other boxing noted, since the sprues are apparently identical. The drawings are nicely done and show where all the pieces go. They also note where there are alternate pieces. For the B-135, the cowling exhaust vents will need to be filled (unlike what is shown on the box art or profile). Decals are nicely printed by Boaagency and offer two schemes. One is the box art plane in RLM 70/71/65 with Bulgarian markings, while the other is a prototype in RLM 02/65
| CONSTRUCTION |
Step one is to remove the ejector towers from the wings and the interior halves. In the interior, the towers that are over the internal frame detail were ground away using a motor tool, leaving the raised bits of the framework intact. No need to get perfection on these as they'll be pretty far forward.
 Next, the wings were sanded and glued together. Meanwhile, the interior was
cemented together and some of the photo etch was attached to the side walls. I
have to say that the rudder pedal piece looks nothing like the drawing so that
was installed as best I could. Eventually I got all the interior bits attached
and it was all painted a grey, along with the interior sidewalls. A bit of
additional detail painting, but I didn't go nuts as the canopy is thick and only
shapes will be visible. The etched belts and other bits were glued in place and
this was set aside.
Next, the wings were sanded and glued together. Meanwhile, the interior was
cemented together and some of the photo etch was attached to the side walls. I
have to say that the rudder pedal piece looks nothing like the drawing so that
was installed as best I could. Eventually I got all the interior bits attached
and it was all painted a grey, along with the interior sidewalls. A bit of
additional detail painting, but I didn't go nuts as the canopy is thick and only
shapes will be visible. The etched belts and other bits were glued in place and
this was set aside.
Fuselage halves were cemented
together once I discovered that the interior could be inserted from below. Fit
is OK but nothing to write home about. Meanwhile, I painted a few bits like gear
legs and assembled the prop. Back at the fuselage I decided to see how the wing
fit would be. Well, if I sanded the inside of the fuselage halves a bit
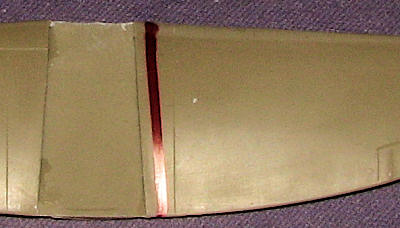 over
1/32" on each side, the fuselage would fit. As it was, the fuselage assembly is
over 1/16" wider than the opening in the wings. You can see this in the image
where I butted one side of the fuselage to the left wing opening and used a
marker to show how much too wide it is on the other. Had I glued the upper wings
to the fuselage, as many would have done, then the aileron halves would have
been grossly out of alignment and much reshaping of the upper wing would have
occurred.
over
1/32" on each side, the fuselage would fit. As it was, the fuselage assembly is
over 1/16" wider than the opening in the wings. You can see this in the image
where I butted one side of the fuselage to the left wing opening and used a
marker to show how much too wide it is on the other. Had I glued the upper wings
to the fuselage, as many would have done, then the aileron halves would have
been grossly out of alignment and much reshaping of the upper wing would have
occurred.
After non-silently cursing, the only way out of this was to start sanding on the small extended wing root. I was thinking that this is probably one reason that RS Models are not that highly sought, and also wondering if anyone actually built one of these kits once the molds were done. I think that is not the case. Eventually, enough was sanded away to where the wing fit and after cementing in the interior (which, surprise, surprise, was too wide and had to be sanded down), the wing was glued in place.
I then did the usual deal with filler at the wing roots and needed quite a bit at the lower rear. The tail planes have small tabs on them, but they do not fit the depressions in the root so those were cut away. One has to be quite careful with these as they do not fit squarely and unless more trimming is done, the elevator hinge line will not be properly lined up on both sides. The canopy was then masked and after installation of the roll over framework, it was glued in place.
| COLORS & MARKINGS |
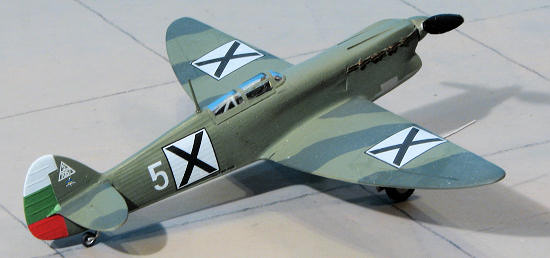
These planes were RLM 65 on the underside so that is the shade I started with. For the overall camo colors, I used Testors Model Master enamels. Upper surface was then painted RLM 71. The wings and fuselage was then masked off and the upper wings were painted with RLM 70. I chose to mask as in this scale, it often looks better and for many is a quicker way to do things.
 With the painting done, the main gear legs and tail
wheel assembly were glued in place. There are no locator holes for the main
gear, nor are there pins on the gear so one just has to eyeball it and hope for
the best. I should also point out that the main struts near the axle are very
thin. This resulted in one gear being snapped off at that location later in the
build. The small etched oleo scissors were glued in place and then the airframe
was given an overall gloss clear coat for decals.
With the painting done, the main gear legs and tail
wheel assembly were glued in place. There are no locator holes for the main
gear, nor are there pins on the gear so one just has to eyeball it and hope for
the best. I should also point out that the main struts near the axle are very
thin. This resulted in one gear being snapped off at that location later in the
build. The small etched oleo scissors were glued in place and then the airframe
was given an overall gloss clear coat for decals.
The kit decals are very thin and easily damaged so one has to use care in application. I also noticed that, according to the placement guide on the box, all of the markings save the rudder stripes were oversize. The rudder stripes were a bit small. Now, according to the MBI reference book, the markings are OK, so your choice on that. As expected and somewhat usual for thin decals, the white is not fully opaque.
| FINAL CONSTRUCTION |
 Once finally in place, I used some Mr Mark Softer to
get them to snuggle into place as Microsol seemed to do nothing. I then attached
the main wheels. The axles are far too long and the holes in the wheels far too
large. I trimmed the axles and did my best with the wheels. The proper gear
doors were then glued in place and I replaced the radio mast for the umpteenth
time as I was constantly snapping it off. The hole for the wing pitot tube was
drilled out and that item installed. The kit was then given an overall matte
clear coat and pastels were used for the exhaust staining. I then pushed on the
prop, removed the masking, replaced the radio mast yet again and the kit was
transformed into a model.
Once finally in place, I used some Mr Mark Softer to
get them to snuggle into place as Microsol seemed to do nothing. I then attached
the main wheels. The axles are far too long and the holes in the wheels far too
large. I trimmed the axles and did my best with the wheels. The proper gear
doors were then glued in place and I replaced the radio mast for the umpteenth
time as I was constantly snapping it off. The hole for the wing pitot tube was
drilled out and that item installed. The kit was then given an overall matte
clear coat and pastels were used for the exhaust staining. I then pushed on the
prop, removed the masking, replaced the radio mast yet again and the kit was
transformed into a model.
| CONCLUSIONS |
 As I'd built an RS model before, I was ready for the
poor fit and need to exercise modeling skills with this one. However, as I doubt
Hasegawa will ever kit this one, I had to go through a lot to get one on my
shelf. I should point out that putting a lot of work into the cockpit of this
one is a bit of a waste as the thick transparency will make much of your work
realistically invisible. However, the end result is pleasing as I have few
Bulgarian WWII models on my shelves and this one fits right in with the usual
109s and Mustangs.
As I'd built an RS model before, I was ready for the
poor fit and need to exercise modeling skills with this one. However, as I doubt
Hasegawa will ever kit this one, I had to go through a lot to get one on my
shelf. I should point out that putting a lot of work into the cockpit of this
one is a bit of a waste as the thick transparency will make much of your work
realistically invisible. However, the end result is pleasing as I have few
Bulgarian WWII models on my shelves and this one fits right in with the usual
109s and Mustangs.
Because of the difficulties I had building this, it is not recommended for a beginner to short run. However, if you can deal with the fit issues and have the skills, then I'd say go for it.
| REFERENCES |
 http://en.wikipedia.org/wiki/Avia_B-135
Avia B-35/B-135, MBI, 2003
You can get this and other fine kits and accessories at GreatModels
Thanks to If you would like your product reviewed fairly and quickly, please contact me or see other details in the Note to Contributors.