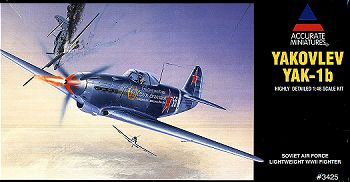
Accurate Miniatures 1/48 Yak-1b
Kit # 3425
Price: $27.98 MSRP
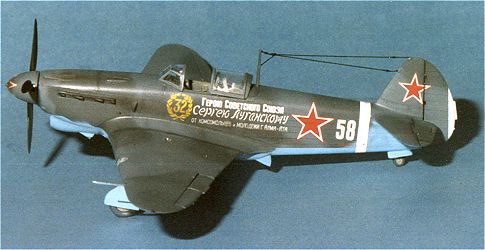
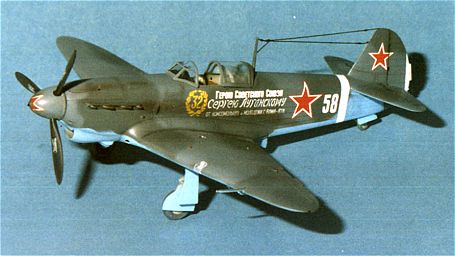
Decals: One version for the ace Sergei Luganski of the 152nd Destroyer Unit
Date of Review: 5 December 1998
Review and Photos by: Scott Van Aken
Probably the first really successful fighter aircraft produced by the Soviet Union during the Great Patriotic War, the Yak-1 was the first in a long succession of Yakovlev designed piston engined aircraft that culminated in the Yak-9 series later in the war. Built mostly of wood, as strategic metals were in short supply in the Soviet Union, Yak fighters were rugged aircraft that were easily maintained in the harsh and quickly changing weather conditions of the Russian Steppes.
 Accurate
Miniatures long awaited kit of the Yak-1 is available in both 'razorback'
and 'bubble canopy' versions. The -1b is the bubble canopy version.
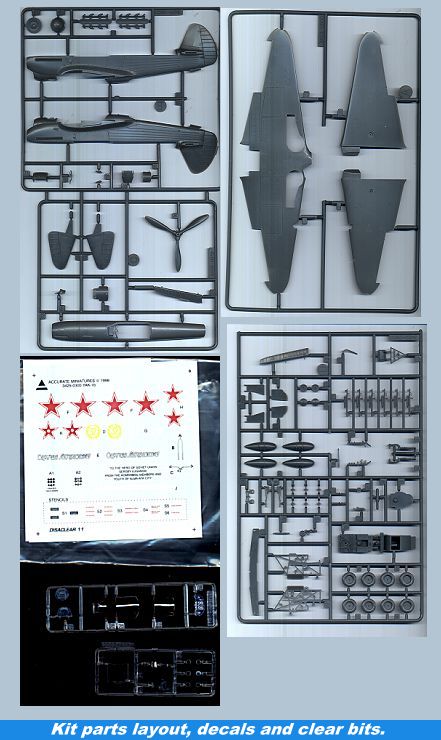
Molded in a relatively soft dark grey plastic, the detailing of the
parts is superb, as one expects from Accurate Miniatures. There was
a small amount of flash on a few parts, but otherwise the moldings were clean.
Options are very few, and include underwing fuel tanks and rockets
as well as weighted or non-weighted tires. One of the biggest surprises
to me when initially opening the kit was how few parts there are, especially
compared to the Avenger series. You'll have to justify for yourself
if it is worth the nearly $28.00 retail price.
Accurate
Miniatures long awaited kit of the Yak-1 is available in both 'razorback'
and 'bubble canopy' versions. The -1b is the bubble canopy version.
Molded in a relatively soft dark grey plastic, the detailing of the
parts is superb, as one expects from Accurate Miniatures. There was
a small amount of flash on a few parts, but otherwise the moldings were clean.
Options are very few, and include underwing fuel tanks and rockets
as well as weighted or non-weighted tires. One of the biggest surprises
to me when initially opening the kit was how few parts there are, especially
compared to the Avenger series. You'll have to justify for yourself
if it is worth the nearly $28.00 retail price.
All the parts were protected in plastic bags. The decals and clear bits were underneath the now standard false box bottom. My clear parts all have lines running through them that looks as if they were coldshot. Decals are very well done, though I wish that Accurate Miniatures would offer more than one option. The instruction sheet is also very well done and I had few problems with understanding what went where.
Naturally, the interior is the starting place. This particular one
is to be completely built and then inserted in the already glued together
fuselage. It incorporates all the required bracings and other bits.
Interestingly, there are two fold-up parts included; the seat frame
and the forward floorboard. It worked quite well. The interior
was painted RLM02 as recommended in the instructions. The only bit
that gave me problems was the handle for the cannon charger. It must have
been deformed as it was angled into the cockpit floor. AC offers seat belt
decals and I used
them.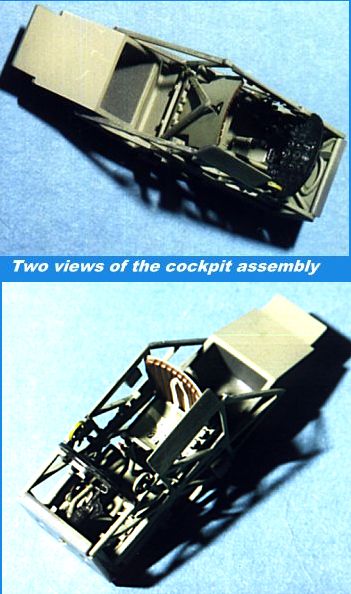
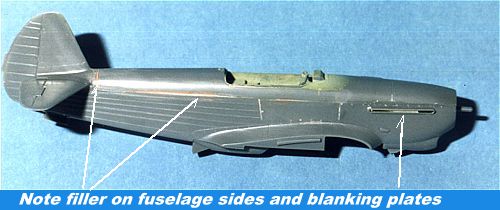
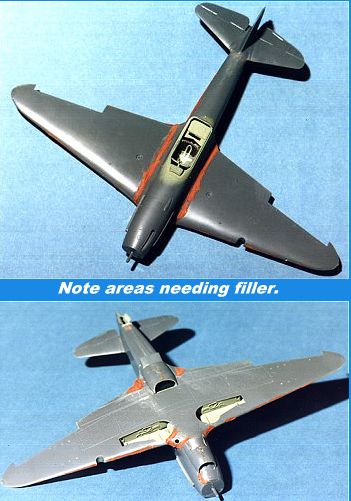
Next the fuselage was assembled. Accurate miniatures provides blanking plates for behind the exhaust, but I used strips of sheet styrene instead. The biggest problem with this section was the upper fuselage. This section is interchangeable depending on if you are doing a bubble canopy or razorback canopy version. I had terrible fit problems with this. The insert is too wide at the front and you need to put in a spacer of some sort in the front to get it to fit. It also did not fit well in other places and so I had to use filler to fix it. Maybe the experts have no problem in this area, but I did. There was also fit/mold problems with the under fuselage radiator housing. One side was a bit longer than the other and some filing was needed to get them to meet squarely in the middle.
Fitting the interior was no problem at all and was not glued in. Once slid into place, it is a firm fit. Installation of the wing will hold it snugly. The wing was another area that gave me fit problems. What one does, it to first glue a brace on the bottom wing. When that is dry, the lower wing section is fit to the underfuselage. Then the upper wings are attached and then the carb intake insert is installed. Well, I fit the lower wing, then let the glue dry before attaching the upper wings. Big mistake. The lower wing was skewed off a bit and so the upper wings had gaps that needed to be filled. The carb intake was also misaligned due to this problem so needed filler as well. On the next one, I will glue all the wing pieces at the same time before the glue fully dries. That should take care of any alignment problems. After the wing has been assembled, the wing tip lights were glued in place. I really don't see a reason for these to be a separate assembly unless other Yaks had different wing tip light configurations. They needed filler.
BTW, you need to drill out the holes for rockets or fuel tanks before
gluing the wings together. I installed the rocket rails but not the
fuel tanks. Since I was
 modeling
the aircraft after a sortie, I cut off the rockets and smoothed out the rails,
then glued them to the underwings. AC provides a template to allow you to
cut and drop the flaps if you so desire. Ailerons are separate and
mine did not fit well; there being very little gluing surface. Landing
gear and struts fit quite well and are very realistic. The tail wheel
is not to be fit until the final stages to allow for ease of painting.
This is admirable, but I found it difficult to insert the strut into
the very small hole and then to be able to glue it in place.
modeling
the aircraft after a sortie, I cut off the rockets and smoothed out the rails,
then glued them to the underwings. AC provides a template to allow you to
cut and drop the flaps if you so desire. Ailerons are separate and
mine did not fit well; there being very little gluing surface. Landing
gear and struts fit quite well and are very realistic. The tail wheel
is not to be fit until the final stages to allow for ease of painting.
This is admirable, but I found it difficult to insert the strut into
the very small hole and then to be able to glue it in place.
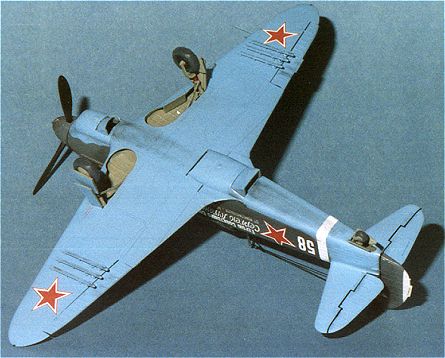
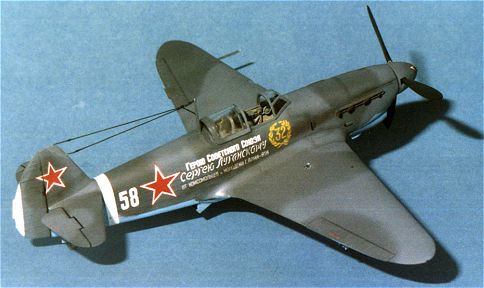
Once these bits were installed, the underside was painted. I used Gunze 323, which is a gloss blue. It went on quite well. Then the transparencies were masked with left over bits of E-Z Mask, interior bits like gunsight and head armor installed then the transparencies glued in place. The underside blue was then masked and the uppersurface sprayed with Gunze 36118 dark grey. The lighter grey was sprayed freehand using Aeromaster 9071 medium blue grey. Once that was completed, the airframe was sprayed with Future as a base for the decals, since the Aeromaster paint is very flat.
The decals went on with absolutely no problems at all. In fact, they don't need any trimming whatsoever and reacted very well to Champ decal setting solution. Once that was done, the excess setting solution was cleaned off the kit , the gear doors and prop were installed and it was oversprayed with my secret dull formula to seal the decals. A note on the spinner decal. It went on beautifully, but needs setting solution to fit properly. Accurate Miniatures gives you an extra in case you botch the first try, a nice touch.
This left just a few items to add on. One was the exhaust stubs. The base for these is actually too large to fit into the slots so needs to be trimmed down to fit. No glue needed as it was a real tight fit! The last items to be added were the clear parts over the landing light and the wing fuel gauges. The light area was treated to Bare Metal Foil and the gauge areas to a bit of drybrushing to highlight the dials. Next the radio antenna wires were added with stretched sprue and painted black. Finally the canopy was attached in the open position with white glue and the aircraft given appropriate stains with pastels.
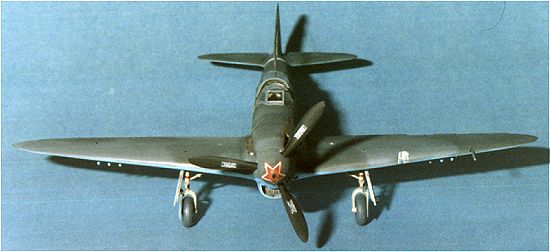
Final result is a very nice looking Yak-1. Recommended for all but the neophyte.