| KIT #: | 32090 |
| PRICE: | $54.99 plus shipping |
| DECALS: | Four options |
| REVIEWER: | Scott Van Aken |
| NOTES: | 2022 New tool kit |
| HISTORY |
 The Yakovlev Yak-9 (Russian: Яковлев
Як-9) is a single-engine,
single-seat multipurpose fighter aircraft used by the Soviet Union and its
allies during World War II and the early Cold War. It was a development of the
robust and successful Yak-7B fighter, which was based in turn on the tandem-seat
advanced trainer known as the Yak-7UTI. The Yak-9 started arriving in Soviet
fighter regiments in late 1942 and played a major role in retaking air
superiority from the Luftwaffe's new Focke-Wulf Fw
190 and Messerschmitt Bf 109G fighters during the grand Battle of Kursk in
summer 1943.
The Yakovlev Yak-9 (Russian: Яковлев
Як-9) is a single-engine,
single-seat multipurpose fighter aircraft used by the Soviet Union and its
allies during World War II and the early Cold War. It was a development of the
robust and successful Yak-7B fighter, which was based in turn on the tandem-seat
advanced trainer known as the Yak-7UTI. The Yak-9 started arriving in Soviet
fighter regiments in late 1942 and played a major role in retaking air
superiority from the Luftwaffe's new Focke-Wulf Fw
190 and Messerschmitt Bf 109G fighters during the grand Battle of Kursk in
summer 1943.
The Yak-9 had a cut down rear fuselage with an unobscured canopy. Its lighter metal structure allowed for an increased fuel load and armament over previous models built from wood. The Yak-9 was manoeuvrable at high speeds when flying at low and medium altitudes and was also easy to control, qualities that allowed it to be one of most produced Soviet fighters of World War II. It was produced in different variants including the Yak-9T with the 37 mm (1.5 in) cannon and the "large-calibre" Yak-9K with a 45 mm (1.77 in) cannon firing through propeller hub, which was used for antitank duty and as a potent aircraft destroyer, the fighter-bomber Yak-9B with an internal bomb bay behind cockpit for up to 400 kg (880 lb) worth of bombs, the long-range Yak-9D and the Yak-9DD with additional wing fuel tanks to escort bombers over Eastern Europe, and the Yak-9U with a more powerful engine and improved aerodynamics. The Yak-9 remained in production from 1942 to 1948, with 16,769 built (14,579 during the war).
The Yak-9T had the central 20mm cannon replaced with a 37mm version. It proved to be very useful as a ground attack aircraft and was especially potent when attacking shipping and tanks.
| THE KIT |
This is a 2022 release with the nearly identical Yak-9K also being released at this time. Typical of ICM kits, the molding of the parts is very good. Though some might find the fabric representation to be a bit overdone, it looks just fine to me. The kit has no photo etch and no resin, which is just fine by me. If you want that stuff, Eduard can help out.
The interior provides full framework on the side panels and there are a lot of small pieces to add to it. You'll find two side consoles to be quite detailed with lots of knobs and levers to add. Same goes for the main instrument panel. This latter item has a decal you can apply. During the build of the interior bits, the tail gear assembly and radiator can be assembled and installed along with the interior prior to gluing the fuselage halves together.
 Once that is done, the lower cowling piece is attached
and the engine assembled. You have a choice of full engine detail or just enough
to hold the exhaust and the prop. Some fuselage trimming is needed when you pick
the closed cowling option. If you pick the closed cowling option, you can skip
two pages and eleven construction steps.
Once that is done, the lower cowling piece is attached
and the engine assembled. You have a choice of full engine detail or just enough
to hold the exhaust and the prop. Some fuselage trimming is needed when you pick
the closed cowling option. If you pick the closed cowling option, you can skip
two pages and eleven construction steps.
Before moving on to the wing, the rest of the upper cockpit bits and the clear parts are attached. Instructions show the canopy closed. Next the lower wing items are added and the cockpit floor is built up. After the wing is assembled, the floor section is added and this is attached to the lower fuselage.
Horizontal stabs and rudder are then attached. All the flight control surfaces are separate, though they are to be assembled in the neutral position. With all the flight surfaces attached, construction moves on to the main landing gear. Final items to be assembled and attached are the prop, clear formation light lenses and the pitot.
Instructions are well done and provide ICM, Tamiya, and Revell paint references. Four markings options are provided. The box art plane is in olive green and black over blue-grey, the early scheme. The other three are in a later scheme where the upper surfaces are in two greys. The decals are superbly printed and should prove to be quite thin.
| CONSTRUCTION |
I don't build all that many 1/32 airplane kits as they take up a considerable amount of shelf space, but when I'd finished a recent kit and was looking for the next one, I simply grabbed this one from the shelf and dove into it. I decided to follow the instructions rather than simply start doing subassemblies because there were not many of them.
This meant building up the interior sidewalls. There are quite
a few small pieces that need to be attached to the side consoles and cleaning up
the interior framework pieces to which these attach is time consuming. Getting
the attachment nubs cleaned off without actually breaking the framework proved
to be impossible as I found out. Eventually all was done and this w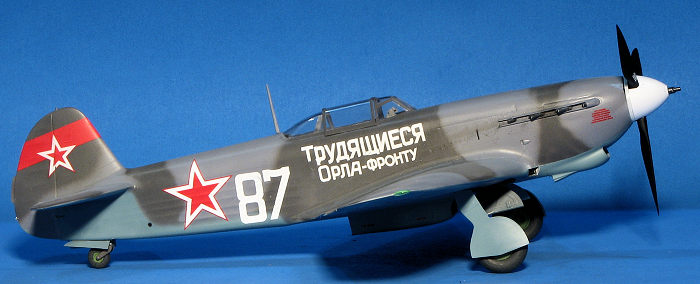 as attached
to the inner fuselage walls. All of the interior was brush painted using what
was left of my Colourcoats Soviet interior grey. I also painted everything else
that was listed as this color while I was at it. Note that the instructions
often do not indicate a color for interior bits, so you have to wing it.
as attached
to the inner fuselage walls. All of the interior was brush painted using what
was left of my Colourcoats Soviet interior grey. I also painted everything else
that was listed as this color while I was at it. Note that the instructions
often do not indicate a color for interior bits, so you have to wing it.
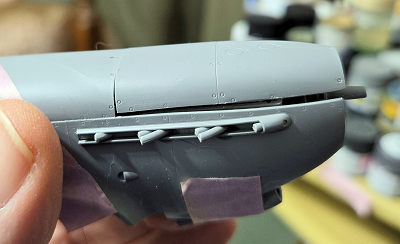
Exhaust have to be installed from the inside so that was done even though they were not painted. Construction continued with parts of the interior and the tail gear assembly. Note that you can leave off the tail wheel until later if you wish. There is a decal for the instruments and it is best to install that before attaching any of the little levers and such. When I did this, the decal fell apart and while I was able to salvage some of the instruments on it, many were lost. With all the interior bits attached, the fuselage halves were closed and seams dealt with.
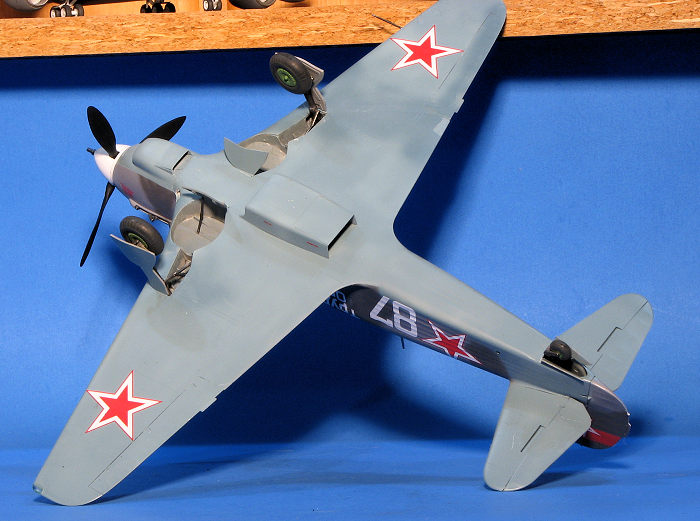
Wings were next. There is quite a bit of construction required to build up the main gear bays. It is best to do all of it at the same time so you can ensure that all the pieces are properly aligned. There are a pair of shocks to which part of the main gear legs will attach. These have rather flimsy attachment points. I ended up coating those areas with super glue once the shocks were in place to be sure they would not fall off later. I then attached the upper wing halves.
Tail planes are upper and lower pieces that will eventually
fit over very large tabs. With those done, all the flight
 control surfaces were glued in
place. Since I had chosen the engine compartment closed option, I only had to
build the basic engine to provide something for the prop to be attached. This
was glued in and the two upper cowling pieced attached. Note that I had to trim
the engine for the forward piece to fit. In hindsight, I would have glued the
forward and aft upper cowling piece together before attaching those to the
fuselage as there was a step between them.
control surfaces were glued in
place. Since I had chosen the engine compartment closed option, I only had to
build the basic engine to provide something for the prop to be attached. This
was glued in and the two upper cowling pieced attached. Note that I had to trim
the engine for the forward piece to fit. In hindsight, I would have glued the
forward and aft upper cowling piece together before attaching those to the
fuselage as there was a step between them.
The lower radiator bath was assembled and attached. Then the wings. The wings were a really good fit, which was a nice surprise. Then the gunsight assembly was glued in place. This took quite a bit of fiddling. I left off the piece that goes in front of it as installing it would have meant the windscreen wouldn't fit. The clear armored piece was glued into the inside of the windscreen and the clear head armor was attached. Then all the clear bits were masked and attached.
| COLORS & MARKINGS |
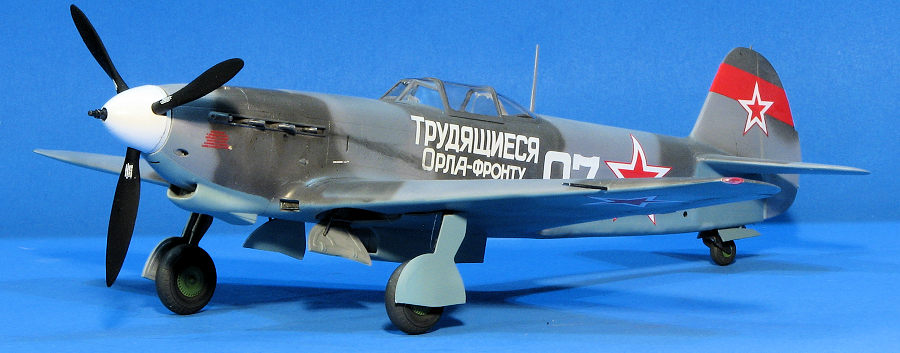
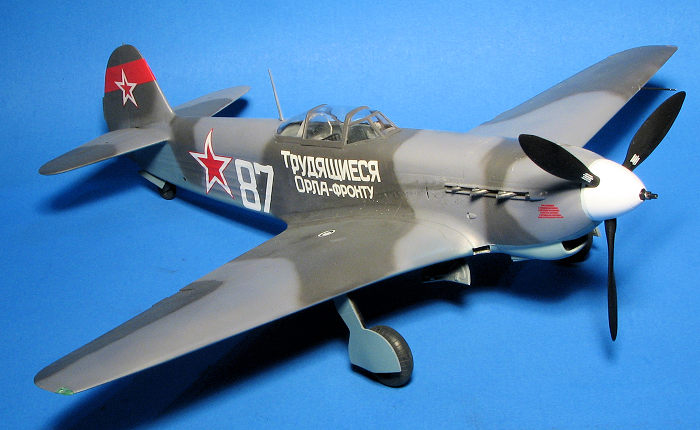
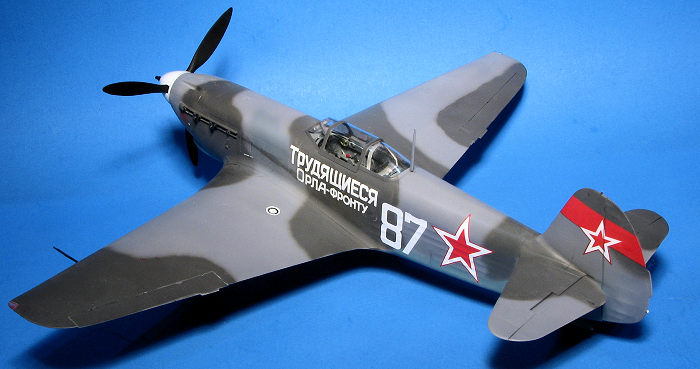
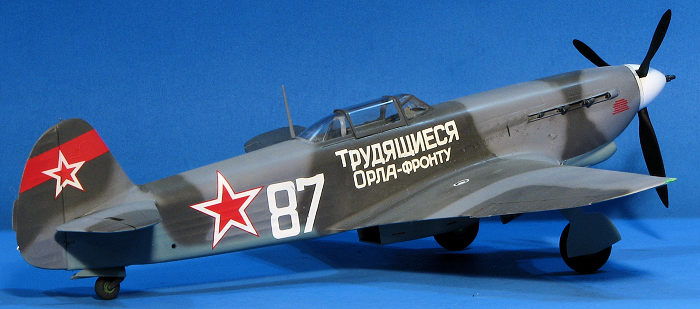 I had decided to do a late war scheme of AMT-11/12 over AMT-7.
For this I used Hataka paints. First the AMT-7, followed by a bit of masking and
the upper surface AMT-11 was sprayed on. When dry, I freehanded the AMT-12. I
did not use my detail airbrush as I figured that the painter would be in a hurry
to get the plane out the door so he could move on to the next one, production
being more important than aesthetics. At least that is my story and I'm sticking
to it.
I had decided to do a late war scheme of AMT-11/12 over AMT-7.
For this I used Hataka paints. First the AMT-7, followed by a bit of masking and
the upper surface AMT-11 was sprayed on. When dry, I freehanded the AMT-12. I
did not use my detail airbrush as I figured that the painter would be in a hurry
to get the plane out the door so he could move on to the next one, production
being more important than aesthetics. At least that is my story and I'm sticking
to it.
With that done, I gave the airframe a clear acrylic gloss in preparation for decals. Now the decals are very thin and I had issues with them tearing. This was particularly an issue with those on the fuselage, though all of them were prone to this. I did have no issues with silvering and used Microsol, which is a fairly weak solution.
| FINAL CONSTRUCTION |
 The last big
thing was to install the landing gear. I assembled the legs and installed them.
The attachment didn't work very well on either of them so I used a lot of super
glue to hold them in place. Then the wheels were attached and when I went to put
on the main gear doors, I realized that I'd put the struts on the wrong way on
the wrong sides. I had the wheels facing out when they should have been inward.
The last big
thing was to install the landing gear. I assembled the legs and installed them.
The attachment didn't work very well on either of them so I used a lot of super
glue to hold them in place. Then the wheels were attached and when I went to put
on the main gear doors, I realized that I'd put the struts on the wrong way on
the wrong sides. I had the wheels facing out when they should have been inward.
Needless to say, this put a halt to everything as I wondered how to fix it. What I did was to use super glue debonder (and a lot of it). I then wiggled the legs for quite a while until they finally broke free. Then I used a grinder bit on a motor tool to clean up all the left over glue on the gear leg and the gear well. To add to it, the debonder did a number on the paint and that was eventually sanded down and repainted.
With the gear finally in the right place the doors were attached on both the main and tail gear. I then added a coat of clear matte to seal things in. There were some other small things that had to be done which included the radio mast, the pitot tube, the prop and the wing tip lights. A bit of exhaust stain, the masking was removed and that was it.
| CONCLUSIONS |
Overall, this is really a nice kit. The fit is generally quite good and there are interesting decal options included. I do wish the decals were not so fragile, but there it is. I'm glad I finally built this one and can easily recommend it to those of you who like Soviet or large scale planes.
| REFERENCES |
https://en.wikipedia.org/wiki/Yakovlev_Yak-9
14 February 2025 Copyright ModelingMadness.com. All rights reserved. No
reproduction in part or in whole without express permission from the editor. If you would like your product reviewed fairly and fairly quickly, please
contact
the editor or see other details in the
Note to
Contributors.