KP 1/72 La-7
| KIT #: | 6 |
| PRICE: | $2.00 'used' plus shipping |
| DECALS: | Six options |
| REVIEWER: | Scott Van Aken |
| NOTES: | Not a new kit |
| HISTORY |
Developed from the highly successful La-5, the La-7 was quite similar in general appearance to the earlier fighter, using many of the same airframe components. The big difference was in engine and armament. A new 1850 hp Shvetsov radial engine and increase in armament to three nose mounted cannon made for a very potent aircraft. In tests, the La-7 was nearly 45 mph faster than its major opponent, the FW-190.
 First flying in early 1944, the La-7 was quickly deployed to the
VVS's finest fighter regiments, where many of the Soviet Union's aces
praised the aircraft for its increased speed, maneuverability and firepower
over the slightly slower La-5. In order to improve performance even more,
most La-7s returned to having only two cannon. Besides, by that time in the
war, the presence of the Luftwaffe was being felt even less and less. Of the
approximately 3300 La-7s produced the vast majority of the production run
was of the two cannon variety.
First flying in early 1944, the La-7 was quickly deployed to the
VVS's finest fighter regiments, where many of the Soviet Union's aces
praised the aircraft for its increased speed, maneuverability and firepower
over the slightly slower La-5. In order to improve performance even more,
most La-7s returned to having only two cannon. Besides, by that time in the
war, the presence of the Luftwaffe was being felt even less and less. Of the
approximately 3300 La-7s produced the vast majority of the production run
was of the two cannon variety.
The end of the war and the coming of gas turbine engines for fighters meant that the La-7 had a relatively short active service. The Soviet Union had purged them from all fighter regiments by 1947, having replaced them with La-9/11 aircraft or with the earliest Soviet jets. In those countries under Soviet influence or control, the aircraft lasted into the early 1950s.
| THE KIT |
Back in the modeling days of yore, there was a Czech modeling company named KP. This company made what were undoubtedly the best models of any Soviet bloc company. Their kits were well detailed and came with nice instructions and decals. Over the years that company morphed into KoPro, and with the advent of the fall of the Soviet Union, has continued to produce kits.
 One of their kits from the 1970s or so is the La-7. This is a nicely
molded kit in grey plastic that does not have a ton of rivets and, is
appropriate for a plane made mostly of wood, has only some finely raised panel
lines for panel detail. Those who know more about these things tell me that the
aircraft is dimensionally accurate, which is always a good thing.
One of their kits from the 1970s or so is the La-7. This is a nicely
molded kit in grey plastic that does not have a ton of rivets and, is
appropriate for a plane made mostly of wood, has only some finely raised panel
lines for panel detail. Those who know more about these things tell me that the
aircraft is dimensionally accurate, which is always a good thing.
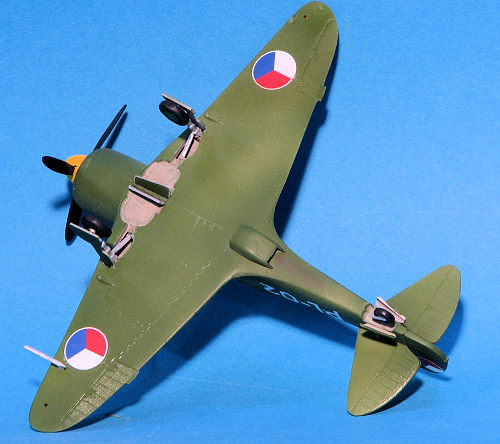
It is otherwise fairly basic. Cockpit is a seat and pilot figure that glues to the back of the 'pit. Wing has no boxed in wheel wells and is a lower piece with two upper halves. Tailplanes are a single piece as is the cockpit canopy. There are some plates to cover the exhaust on the side. The forward cowling is a single piece that accepts a prop with spinner. No spinner backing plate is provided.
Main gear has retraction struts and you are provided with inner and outer gear doors. There are two tail gear options; one fixed and one retractable with doors. The lower fuselage radiator has a separate intake piece and no radiator detail. There are two bombs to fit on the molded in wing racks. A stand is also provided, though my kit did not have this item.
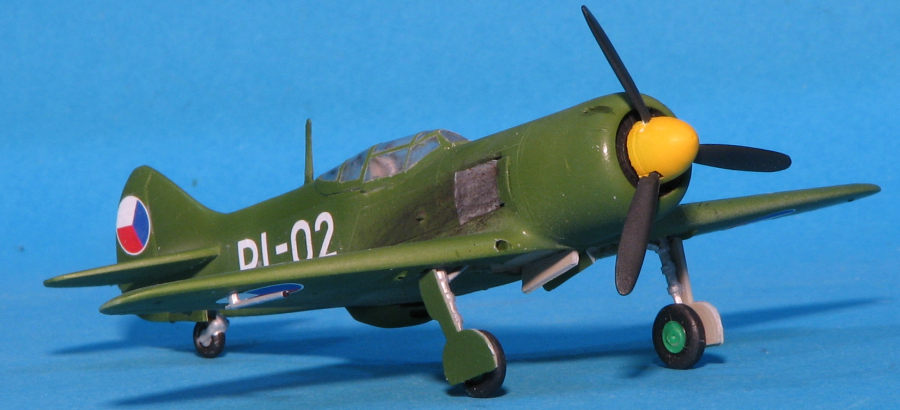
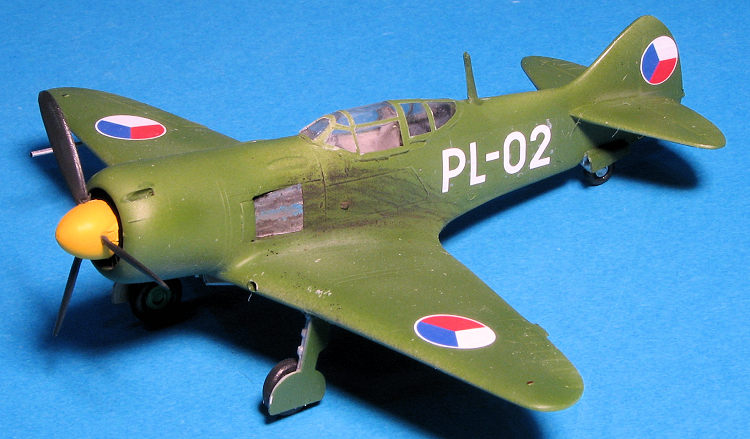
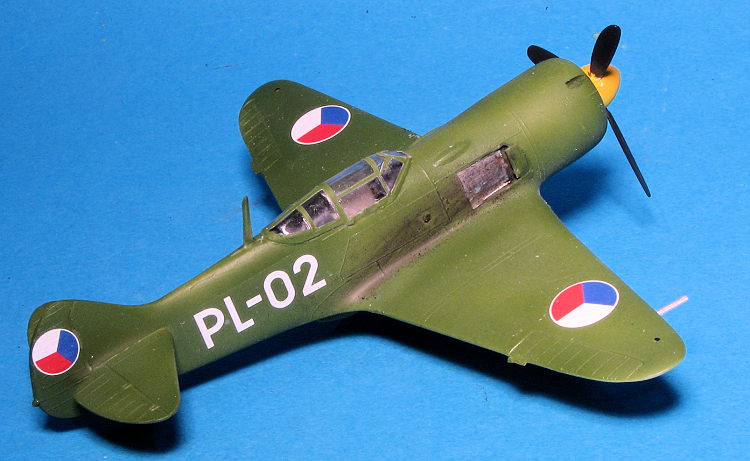
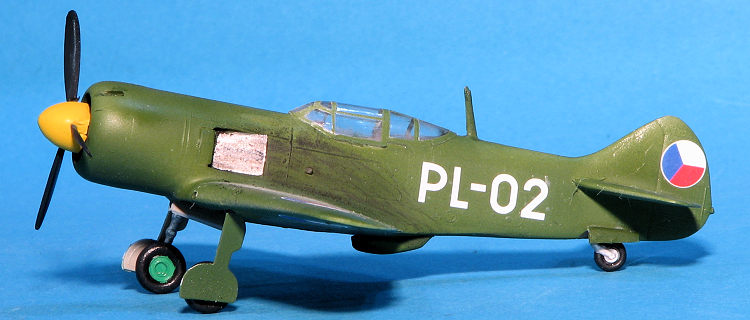
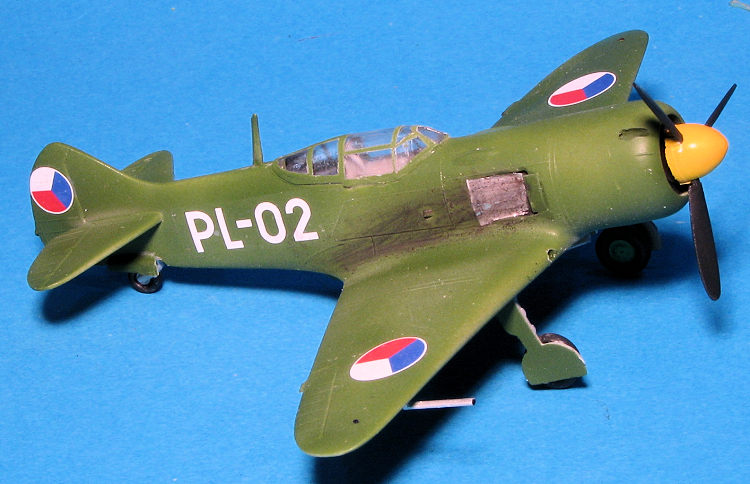
Instructions are well done with lots of information if you can read Czech. There are six markings options. Three are for various iterations of Ivan Kozedub's aircraft #27. Three others are of Czech Aircraft. One of white 17 in both Soviet and Czech insignia and another overall green plane with SU-60 fuselage codes. Decals are nicely printed but well past their 'use by' date. My experience with old KP decals is that they are fairly transparent with yellows basically disappearing as the colors are not backed up by white. Fortunately, finding La-7 decals is not difficult especially if you have the Eduard kit (you can use the spare markings).
| CONSTRUCTION |
 I got this kit and another from an on-line auction for the whopping price of
$4.00 for the two. The boxing I used for the preview was the better of the two.
This one had a lot of flash on the tail section of one half. So much that it was
as thick as the fuselage plastic. I also had this issue with the canopy and some
of the prop blades. The rest of the kit was a bit lesser so, but every part
needed cleanup. I treated this like a short run kit.
I got this kit and another from an on-line auction for the whopping price of
$4.00 for the two. The boxing I used for the preview was the better of the two.
This one had a lot of flash on the tail section of one half. So much that it was
as thick as the fuselage plastic. I also had this issue with the canopy and some
of the prop blades. The rest of the kit was a bit lesser so, but every part
needed cleanup. I treated this like a short run kit.
This started with attaching the upper wing halves. I removed all the alignment pins and sanded down both the inside surfaces to get rid of flash. The fuselage halves were next and got the same treatment, though I did not sand enough of the inside of the flashy tail half and so the trailing edge is a bit thick. The horizontal stabs suffer from mold shift and once done and the attachment holes opened up, they were glued in. There is a 1-2mm vertical height difference in the two as the attachment slots are not the same height.
 With those done, I painted the interior and seat with a light grey and then
glued in the seat. That pretty well covers the interior. The front and rear
upper interior areas were then painted dark grey as were the wheel wells. The
nose section was attached and there were steps from the larger cowling. The
wings were also not a good fit. Even with a spreader bar, there is a gap between
the wings and roots. There is a monster step between the rear wing and fuselage
that was filled with super glue and sanded. I used super glue for all areas that
needed filler. The instructions show that there is no diheadral in the wings.
With those done, I painted the interior and seat with a light grey and then
glued in the seat. That pretty well covers the interior. The front and rear
upper interior areas were then painted dark grey as were the wheel wells. The
nose section was attached and there were steps from the larger cowling. The
wings were also not a good fit. Even with a spreader bar, there is a gap between
the wings and roots. There is a monster step between the rear wing and fuselage
that was filled with super glue and sanded. I used super glue for all areas that
needed filler. The instructions show that there is no diheadral in the wings.
With the wings and tailplanes attached, I turned to the canopy. It was so flashy I didn't know where the canopy stopped and the flash began. I simply started carving/sanding/grinding on it until it fit fairly well. I then masked it with Tamiya tape and attached it using lots of clear glue. Since it is a gel, I alsos used some of that to fill in the gaps. It was then off to the paint shop.
| COLORS & MARKINGS |
 Once that was done, I painted the gear wells and inside of the gear
doors with a medium/light grey from the Vallejo line. The wheels were
painted a nice green with the tires brush painted with Tamiya tire
black. Spinner was painted with Tamiya yellow. I then attached the
landing gear to get it off its belly. The wheels were attached after
cutting a goodly portion of the too-long axles and reaming out the
attachment holes that are too small. I also had to trim the main gear
doors as they will not fit into the wells. I reattached the radio mast
after digging a small trench for it in the spine. The kit does not have
the carb intakes at the wing roots so those were first drilled and then
elongated into a small rectangle with a small file. These additional
areas were then repainted by brush.
Once that was done, I painted the gear wells and inside of the gear
doors with a medium/light grey from the Vallejo line. The wheels were
painted a nice green with the tires brush painted with Tamiya tire
black. Spinner was painted with Tamiya yellow. I then attached the
landing gear to get it off its belly. The wheels were attached after
cutting a goodly portion of the too-long axles and reaming out the
attachment holes that are too small. I also had to trim the main gear
doors as they will not fit into the wells. I reattached the radio mast
after digging a small trench for it in the spine. The kit does not have
the carb intakes at the wing roots so those were first drilled and then
elongated into a small rectangle with a small file. These additional
areas were then repainted by brush. | CONCLUSIONS |
 There have not been very many La-7s done in this
scale. The only ones from the early days I can recall are this and the Frog kit.
More recently there are kits from Hobby Boss and Eduard. Any of the other three
will probably be an easier build than this one. So why did I build it, you ask.
Well. why not. I had decals for it and I knew what I was getting into when I
started. Not easy, and not one I'd foist off on a tyro modeler, but it can be
made into something to fill space on a shelf and they can be found cheap.
There have not been very many La-7s done in this
scale. The only ones from the early days I can recall are this and the Frog kit.
More recently there are kits from Hobby Boss and Eduard. Any of the other three
will probably be an easier build than this one. So why did I build it, you ask.
Well. why not. I had decals for it and I knew what I was getting into when I
started. Not easy, and not one I'd foist off on a tyro modeler, but it can be
made into something to fill space on a shelf and they can be found cheap.
November 2019
Copyright ModelingMadness.com. All rights reserved.
If you would like your product reviewed fairly and fairly quickly, please contact the editor or see other details in the Note to Contributors.
Back to the Main Page Back to the Review Index Page Back to the Previews Index Page