| KIT #: | 4809 |
| PRICE: | $44.99 SRP |
| DECALS: | Three options |
| REVIEWER: | Scott Van Aken |
| NOTES: | 2017 boxing |
| HISTORY |
 The Petlyakov Pe-2 (Russian:
Петляков Пе-2)
was a Soviet light bomber used during World War II. It was regarded as one of
the best ground attack aircraft of the war and it was extremely successful in
the roles of heavy fighter, reconnaissance and night fighter. It was one of the
most important aircraft of World War II, similar in many respects to the British
de Havilland Mosquito. Pe-2s were manufactured in greater numbers (11,427 built)
during the war than any other twin-engined combat aircraft except for the German
Junkers Ju 88 and British Vickers Wellington. (Fourth in production numbers was
the American Lockheed P-38 Lightning with 10,037 built.) The Pe-2 was fast,
maneuverable and durable. Several Communist nations flew the type after the war,
when it became known by the NATO reporting name Buck.
Six captured Pe-2s were also transferred from the Germans to the Finnish Air
Force during the German invasion to the Soviet Union, with the serial code
PE- and the unofficial
nickname Pekka-Eemeli.
The Petlyakov Pe-2 (Russian:
Петляков Пе-2)
was a Soviet light bomber used during World War II. It was regarded as one of
the best ground attack aircraft of the war and it was extremely successful in
the roles of heavy fighter, reconnaissance and night fighter. It was one of the
most important aircraft of World War II, similar in many respects to the British
de Havilland Mosquito. Pe-2s were manufactured in greater numbers (11,427 built)
during the war than any other twin-engined combat aircraft except for the German
Junkers Ju 88 and British Vickers Wellington. (Fourth in production numbers was
the American Lockheed P-38 Lightning with 10,037 built.) The Pe-2 was fast,
maneuverable and durable. Several Communist nations flew the type after the war,
when it became known by the NATO reporting name Buck.
Six captured Pe-2s were also transferred from the Germans to the Finnish Air
Force during the German invasion to the Soviet Union, with the serial code
PE- and the unofficial
nickname Pekka-Eemeli.
The aircraft was widely used post war by Soviet 'client' states and many survive as museum examples.
| THE KIT |
 As
important an aircraft as was the Pe-2, it has been rather poorly represented by
model kits. Aside from perhaps a vacuform, this is, to my knowledge, the first
time it has been kitted by a mainstream manufacturer in this scale. Zvezd
continues to package their large kits with a flimsy mail box type outer wrapper
covering a cardboard 'lunch box' type inner section that holds the kit bits. My
inner box had pretty well delaminated for whatever reason, but still held the
several bags of nicely molded parts.
As
important an aircraft as was the Pe-2, it has been rather poorly represented by
model kits. Aside from perhaps a vacuform, this is, to my knowledge, the first
time it has been kitted by a mainstream manufacturer in this scale. Zvezd
continues to package their large kits with a flimsy mail box type outer wrapper
covering a cardboard 'lunch box' type inner section that holds the kit bits. My
inner box had pretty well delaminated for whatever reason, but still held the
several bags of nicely molded parts.
In line with pretty much all of Zvezda's 1/48 scale kits, it can be built with all sorts of panels open and that includes one of the engines. The kit also offers an 'in flight' option where there are not a lot of panels open. Many of us who do not like having all the panels open will build this one with many of the 'in flight' options so we can have a relatively closed up airframe.
In addition to an exposed engine, the bomb bay can be displayed open to show a pair of bombs and a long range fuel tank. Holes in the lower wing will need to be opened for the dive brakes and a bomb rack. Those building the kit on the ground but with the engine covers closed will need to remember to switch between the build options so that things like wheel well detail and engine accessory section will be visible.
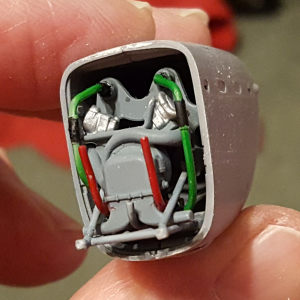
A reasonably well done cockpit and gunner's position are provided with quite a bit of internal detail. Separate control levers are provided for the pilot's side console. You also get pilot and gunner figures if you so wish to include those. To say that there is a lot of interior detail would be a bit of an understatement, but as is often the case, you won't see it all once the fuselage is closed without a strong flashlight.
 Flight control surfaces are separate and this kit introduces
an interesting bit of engineering for the wing where the outer leading edges are
separate pieces. It will be interesting to see how that works out. The kit has
separate exhaust stacks, which I wish they wouldn't do, but apparently there is
some value in the minds of designers for things like this. I find them a bit of
a pain. As expected, the prop has separate blades that fit onto
a backing plate over which a spinner is attached. There are also bombs for the
external racks and optional closed gear doors for those doing an in-flight
display. The display stand will have to be obtained separately, similar to the
way Airfix does it.
Flight control surfaces are separate and this kit introduces
an interesting bit of engineering for the wing where the outer leading edges are
separate pieces. It will be interesting to see how that works out. The kit has
separate exhaust stacks, which I wish they wouldn't do, but apparently there is
some value in the minds of designers for things like this. I find them a bit of
a pain. As expected, the prop has separate blades that fit onto
a backing plate over which a spinner is attached. There are also bombs for the
external racks and optional closed gear doors for those doing an in-flight
display. The display stand will have to be obtained separately, similar to the
way Airfix does it.
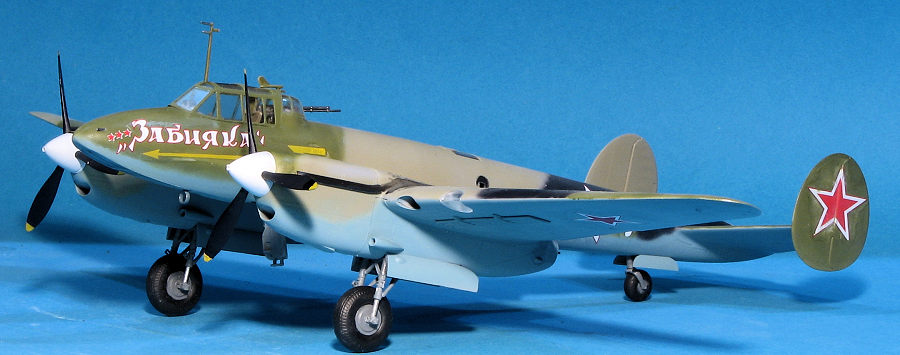
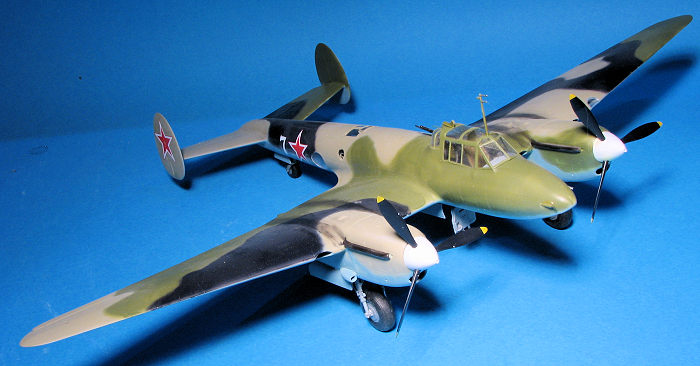
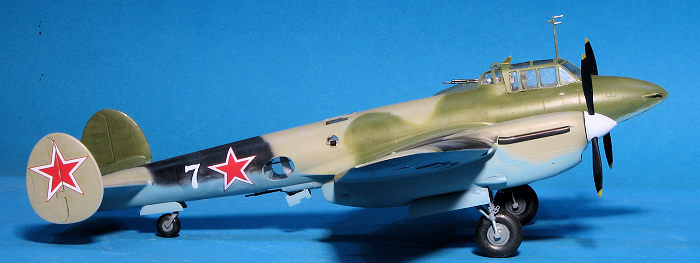
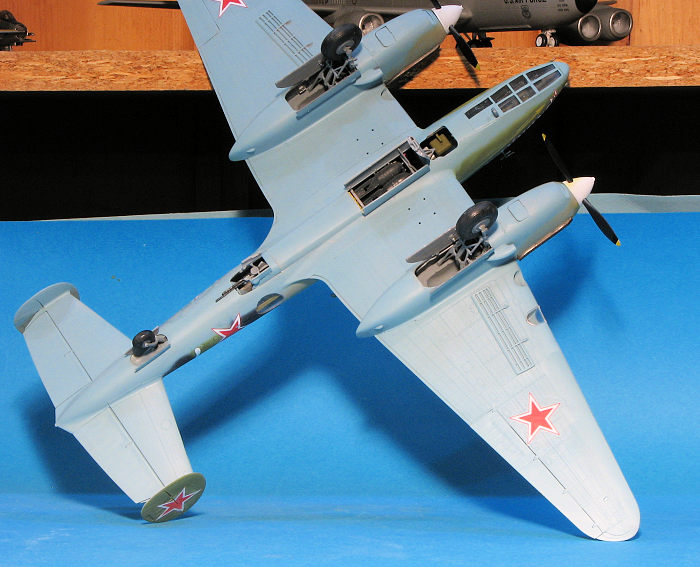
Instructions are well done with Humbrol paint references, this time providing an actual color name on the color chart. All the options are from 1944/45 and are painted in dark green/tan/'tank grey' over aircraft blue. The camouflage pattern is different in two of the three options. Two of the three options also have patriotic slogans painted on the airframe in white. The decal sheet is nicely done and provides instrument decals as well as a very few stencils. The white for the tail tips of one option are included as decals but I'd paint those.
| CONSTRUCTION |
I recently finished reading a book on the history of the Pe-2/3 and that inspired me to give this kit a go. Generally, I find 1/48 Zvezda kits to have far too many small parts and subassemblies for comfort, but since this one can be built without having to assemble the complete engines I thought I'd give it a go.
I was able to skip the entire first page of construction as
that deals with buildin up the engines. As such, the wings were next. These have
some separate intakes and a landing light housing that have to be built up and
then installed in the wing. After opening the holes for the dive brakes and bomb
racks, the wings were joined. The way this is done is interesting as the lower
wing, while large, is treated as an insert. This leaves a seam that most will
want to fill. I did notice that any sanding will remove the fine panel line
detail. With the wings together, the leading edge insert was installed. Fit is
fair as I found it difficult to get in place without a small step.
Next comes the landing gear. This is really something you cannot install later. The room in the well is tight and there are too many items to get all aligned. Much easier to do as shown in the instructions. One thing I can tell you is that you need to install all of the gear parts before the cement dries on any of the parts to get the proper alignment. It was after it was all assembled that I gave it all along with the already assembled nacelles a spray with Soviet grey primer from the Colourcoats line.
Even though I wasn't using the engines, I felt I had to at least build the accessory section as I thought it would be visible from inside the gear wells. Each section has a lot of very small pieces and somewhat minimal attachment areas. The parts also get painted various colors prior to assembly. While building these, I glued the engine cowlings together and test fit them on the nacelles. Fit is pretty good. With the accessory sections finished, I glued them into the cowlings. Again, the attachment areas are little more than slight depressions so I basically got them both about the same distance inside. I then glued the cowlings in place. As I'd feared, little will be seen so unless your aircraft will succumb to the IPMS laser probe, you could easily save yourself a few days work and leave these off. That pretty well completed the wings and they were set aside once the dive brakes were attached. The wheels and doors were left off until after overall painting.
Now for the interior. There are a lot of parts that fit inside and I'm sure that many of them will not be seen in any sort of detail so it is up to you to decide what to install and what to leave off. I put everything in there as I was (fortunately) not in any great hurry to finish it. There is a lot of pre-painting that has to be done and some color guessing as well unless you routinely use Humbrol paint (which I do not). One thing I could not figure out was how to install all the fuselage guns and still get everything masked and painted. These had to fit through clear bits and while you can install the rear cockpit guns after painting, that isn't the case with the rest so I left them off.
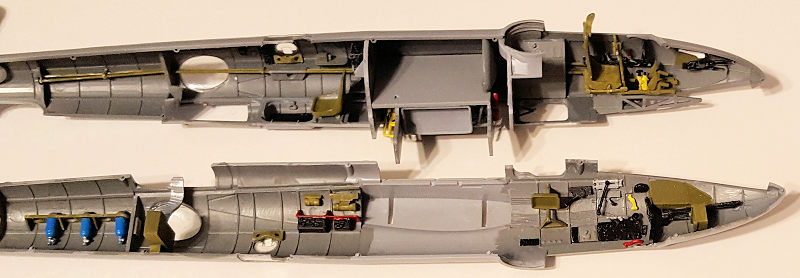 After
several weeks, I got all the interior pieces in place and then masked off the
clear bits. I then said goodbye to much of that work as I closed the fuselage
halves. Despite all the pieces in there, the fuselage fit fairly well. Biggest
'trouble' spot was the upper gunner's hatch that I cemented closed. The three
pieces that go in there did not want to fit all that well, even after a bit of
sanding. Result is they are not flush. I'd recommend not gluing those in early,
as I did, but wait until you are just ready to close the fuselage. That way the
glue will still have not set and you can adjust things a bit.
After
several weeks, I got all the interior pieces in place and then masked off the
clear bits. I then said goodbye to much of that work as I closed the fuselage
halves. Despite all the pieces in there, the fuselage fit fairly well. Biggest
'trouble' spot was the upper gunner's hatch that I cemented closed. The three
pieces that go in there did not want to fit all that well, even after a bit of
sanding. Result is they are not flush. I'd recommend not gluing those in early,
as I did, but wait until you are just ready to close the fuselage. That way the
glue will still have not set and you can adjust things a bit.
Once the seams were taken care of, the tailplanes were built up. The elevators are hinged in case you want to droop them a bit. It is difficult to tell from period photos, but is seems they were locked in the neutral position when on the ground. The fit of the horizontal stabs to the fuselage is superb. I next attached the wings and here again, the fit is very good. Next in line were the clear bits. These were masked then installed. Fit is good, though the lower glazing did cause some issues. The canopy sections were simply tacked in place as I'd need to remove them to install guns at a later time. I then stuffed the various openings with tissue and headed for the paint shop.
| COLORS & MARKINGS |
The Pe-2 was painted in various schemes depending on when during the war it was built. I chose what was listed as a 1944 scheme in black, tan, and green with large black areas. The spinners were painted white. I used Hataka lacquers for these shades and the paint went on very well. Then I lost insterest in the kit and it sat for about a year and a half.
 Blowing off
the dust and cobwebs, I decided to finish it. This meant building up the upper
and lower gun assemblies. These are fairly fiddly with a lot of parts but
eventually, I got them done and installed. On the underside, the entry door was
built up and installed along with the bomb bay doors, and rear gun doors (which
I knocked off about a half dozen times). During that pause, I lost one of the
lower wing bomb racks so did not install the one I had. The tail gear had broken
so that had to be repaired with a section of wire to hold it in place. The tail
gear doors were then installed. On the wings the landing light was glued on. I
then applied some 'Future' to where the decals would be applied and proceeded to
do that. The kit decals worked very well and I used some Mr Mark Softer on them.
When dry a coat of Tamiya matte clear was sprayed on.
Blowing off
the dust and cobwebs, I decided to finish it. This meant building up the upper
and lower gun assemblies. These are fairly fiddly with a lot of parts but
eventually, I got them done and installed. On the underside, the entry door was
built up and installed along with the bomb bay doors, and rear gun doors (which
I knocked off about a half dozen times). During that pause, I lost one of the
lower wing bomb racks so did not install the one I had. The tail gear had broken
so that had to be repaired with a section of wire to hold it in place. The tail
gear doors were then installed. On the wings the landing light was glued on. I
then applied some 'Future' to where the decals would be applied and proceeded to
do that. The kit decals worked very well and I used some Mr Mark Softer on them.
When dry a coat of Tamiya matte clear was sprayed on.
I then built up the propellers and installed them. While removing the masking, I found I'd forgotten the little DF loop antenna on the underside of the nose so that was attached and painted. Some exhaust stain was put on the upper wing. I'm not really good at this so should stop doing it. Finally, the mast pitot was glued on and I was done
| CONCLUSIONS |
It is nice to see a 'shelf of doom' kit finished. The Zvezda kit has a lot of detail to it and can be fussy at times. However, the overall finished produce looks very nice.
| REFERENCES |
https://en.wikipedia.org/wiki/Petlyakov_Pe-2
2 September 2022 Copyright ModelingMadness.com.
All rights reserved. No reproduction in part or in whole without express permission from the editor. Thanks to your editor's screaming wallet
for the preview kit. If you would like your product reviewed fairly and fairly quickly, please
contact
the editor or see other details in the
Note to
Contributors.