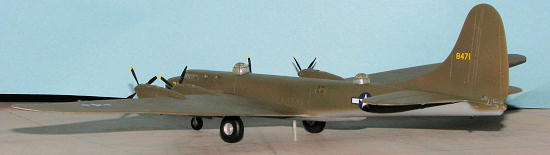
Anigrand 1/144 XB-19A 'Hemisphere Defender'
| KIT #: | AA-4021 |
| PRICE: | $136.00 MSRP |
| DECALS: | Two options |
| REVIEWER: | Scott Van Aken |
| NOTES: | Resin kit. Includes XP-60C, XP-57, and XP-59A kits |
| HISTORY |
In 1935, the USAAC
launched a top secret project for a super long-range "Project-D" bomber. The
Army issued contracts for preliminary design to two aircraft companies, which
were designated as Douglas XBLR-2 and Sikorsky XBLR-3. In 1936, the
 mockups of
two designs were inspected. The Douglas proposal was chosen, and the Sikorsky
contract was cancelled. As the designation BLR (Bomber, Long Range) was
abolished, the XBLR-2 was redesignated XB-19. The progress of the prototype was
slow due to the shortage of funds from the USAAC. The Douglas recommended
cancelling the project. In 1940, the Army removed the XB-19 from secret project
list and announced it to the public that it was a new bomber for American
defense. The XB-19 was finally completed and made its first flight in 1941.
After the Pearl harbor attack, the XB-19 was painted in camouflage and moved to
Wright field for avoiding any Japanese raid. Due to engine problems with the
Wright radials (they not only were underpowered but suffered from overheating),
the XB-19 was modified with four Allison engines, and was redesignated XB-19A.
It began carrying cargo during war time.
By the end of war, further development of XB-19 was
deemed uneconomical and it was scrapped in 1949. About the only item left of
this gigantic aircraft is one of the huge main wheels and tire.
mockups of
two designs were inspected. The Douglas proposal was chosen, and the Sikorsky
contract was cancelled. As the designation BLR (Bomber, Long Range) was
abolished, the XBLR-2 was redesignated XB-19. The progress of the prototype was
slow due to the shortage of funds from the USAAC. The Douglas recommended
cancelling the project. In 1940, the Army removed the XB-19 from secret project
list and announced it to the public that it was a new bomber for American
defense. The XB-19 was finally completed and made its first flight in 1941.
After the Pearl harbor attack, the XB-19 was painted in camouflage and moved to
Wright field for avoiding any Japanese raid. Due to engine problems with the
Wright radials (they not only were underpowered but suffered from overheating),
the XB-19 was modified with four Allison engines, and was redesignated XB-19A.
It began carrying cargo during war time.
By the end of war, further development of XB-19 was
deemed uneconomical and it was scrapped in 1949. About the only item left of
this gigantic aircraft is one of the huge main wheels and tire.
| THE KIT |
Truth is that 1/144 is a much better scale for large aircraft than just about any other. This provides a good size model and yet isn't something that overwhelms the available display space. Such is the case with a large plane like the XB-19. To my knowledge, this is the first time this has been kitted outside, perhaps a vacuform kit, and to Anigrand's credit, they have supplied the alternate engines this airplane used during most of its flying life.
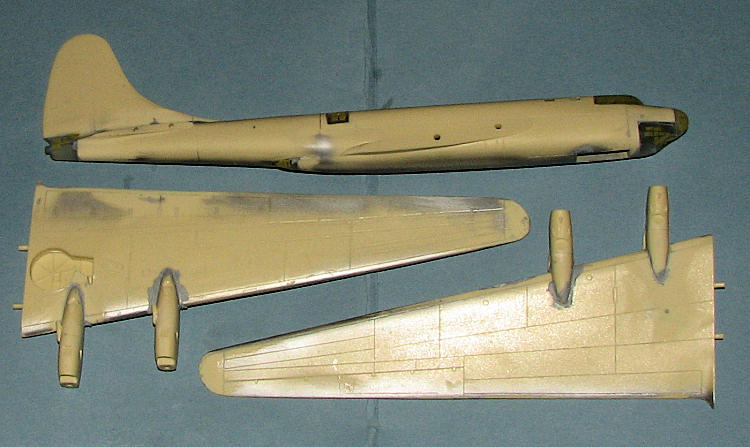
The
fuselage is divided into a fore and aft section with a solid interlock feature
that worked so well with their
XF-12 'Rainbow' kit
and several other larger aircraft.
It makes for a very sturdy structure.
There are structural reinforcements in the fuselage halves
as well. The wings are upper and lower halves and in spite of their length, my samples had no warping at all.
Most of the larger castings show air bubbles to some degree.
These are generally in the tips of the fin, horizontal stabilizers and wings. I
also found a number of pinholes alon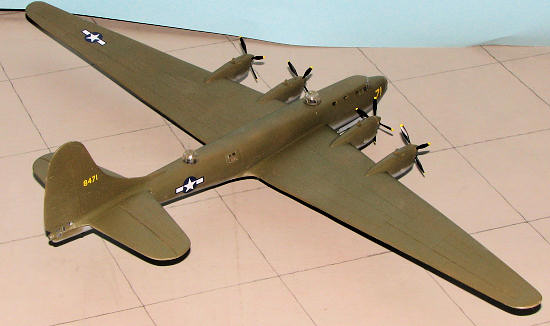 gside the engraved detail on the fuselage
parts. The fuselage also has a few areas where there are small blobs of resin.
These are easily sanded off.
gside the engraved detail on the fuselage
parts. The fuselage also has a few areas where there are small blobs of resin.
These are easily sanded off.
None of these will be difficult to repair and anyone who has done Anigrand kits or those from other makers will have run into these and know how to fix them. It is a bit time consuming but not at all hard to do. The large ones can be dealt with using superglue followed by accelerator and then sanding before the superglue fully cures. Smaller ones can be filled with paint or Mr Surfacer 1000/500 then gently sanded. If you have read the XP-60 article, then you will see that this can be easily fixed. A set of clear bits are provided for the cockpit area and for the turrets and tail gunner's position. The clear resin is well molded and while a bit thicker than injected plastic, can be cleared up even more after installation by coating them with gloss clear paint.
In line with other Anigrand 1/144 kits, there are three additional kits of other aircraft. In this case, there is a Curtiss XP-60C, Tucker XP-57 (this was a plane that never made it beyond the 'paper' design, and a Bell XP-59A, America's first jet. The instructions are a set of nicely done and easy to read photo-representations showing where all the bits are to fit. A couple of detail drawings are also included. Differences between the XB-19 and XB-19A (basically engines and props) are provided for. Decals are well printed and should provide no problems. Those that are into bare metal finishes and red/white/blue rudder stripes will want to do the XB-19 while those who like their planes camouflaged will prefer the XB-19A.
| CONSTRUCTION |
 For
this kit, the first thing I did was to cement the forward and aft fuselage sides
together. This was done on a flat surface to be sure there were no real
alignment problems. Thankfully, the forward and aft fuselage halves fit together
very well indeed. I then sanded the mating surfaces to be sure there would be a
good join. While this was drying, I took care of round one of filler and sanding
to get rid of as many of the pinholes that these kits have on the tips of wings,
stabs and rudder.
For
this kit, the first thing I did was to cement the forward and aft fuselage sides
together. This was done on a flat surface to be sure there were no real
alignment problems. Thankfully, the forward and aft fuselage halves fit together
very well indeed. I then sanded the mating surfaces to be sure there would be a
good join. While this was drying, I took care of round one of filler and sanding
to get rid of as many of the pinholes that these kits have on the tips of wings,
stabs and rudder.
I also checked the mating surfaces of the wings, stabs and fin. In all cases, I had to enlarge the holes there and/or trim the pins to get them to fit properly. Some of the fuselage attachment holes had to be made into an oval shape to ensure a good fit. Better to have some slop to play with than to have to fill in large steps later.
![]() Weight
was put into the nose section behind the cockpit, but I knew it would not be
enough. This aircraft has a great deal of the airframe behind the main wheels
and the only real cure is to either attach the finished model to a base or
devise some sort of prop to hold up the rear. But that would be later. When
gluing the wing halves together, I did it in sections so that I could hopefully
remove any warp from what are very thin resin constructs towards the tip. I was
partially successful in that only one side needed to have the near-boiling water
treatment to remove the warp. This caused a few unglued sections of the trailing
edge of the wig to curl up and so more repair work was needed to fix that.
Weight
was put into the nose section behind the cockpit, but I knew it would not be
enough. This aircraft has a great deal of the airframe behind the main wheels
and the only real cure is to either attach the finished model to a base or
devise some sort of prop to hold up the rear. But that would be later. When
gluing the wing halves together, I did it in sections so that I could hopefully
remove any warp from what are very thin resin constructs towards the tip. I was
partially successful in that only one side needed to have the near-boiling water
treatment to remove the warp. This caused a few unglued sections of the trailing
edge of the wig to curl up and so more repair work was needed to fix that.
I then moved back to the fuselage while this was going on, and glued
the halves together. During this time, I also glued on the rear clear piece and
the fin. Both of these items needed filler to blend in properly. I took a lot of
care trying not to get filler on the 'window' sections of the tail cone and was
mostly successful in this. Several rounds of filler/sanding were needed to get
it all to blend in. I also installed the interior pieces at this time. You'll
need to do some trimming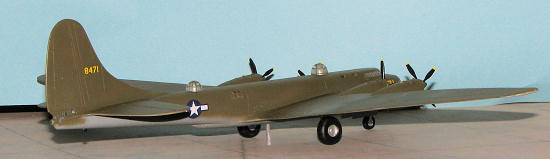 of the underside of the seats to get the tabs there small enough to fit in
place. The aft seats will need to have those tabs removed as the consoles will
interfere with the fit. Those that want to add detail to the interior pieces
will have a nearly clean slate to work with, but you won't really see much once
the canopy is in place.
of the underside of the seats to get the tabs there small enough to fit in
place. The aft seats will need to have those tabs removed as the consoles will
interfere with the fit. Those that want to add detail to the interior pieces
will have a nearly clean slate to work with, but you won't really see much once
the canopy is in place.
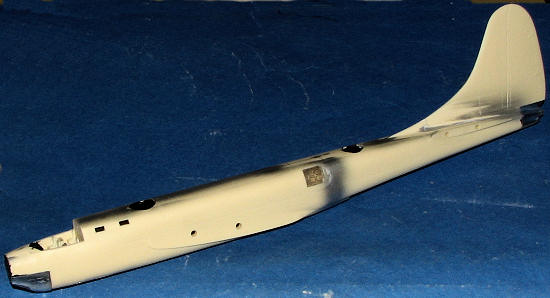 I
attached the rest of the clear bits to the fuselage, leaving off four small
rectangular windows as I'd forgotten to install them from the inside. Generally
speaking the fit was quite good. I had sanded the mating surfaces as much as I
could to be sure they dry fit well before cementing in place. You'll see from
the photo that I used silver paint to show up any areas that needed additional
attention when it came to the various seams.
I
attached the rest of the clear bits to the fuselage, leaving off four small
rectangular windows as I'd forgotten to install them from the inside. Generally
speaking the fit was quite good. I had sanded the mating surfaces as much as I
could to be sure they dry fit well before cementing in place. You'll see from
the photo that I used silver paint to show up any areas that needed additional
attention when it came to the various seams.
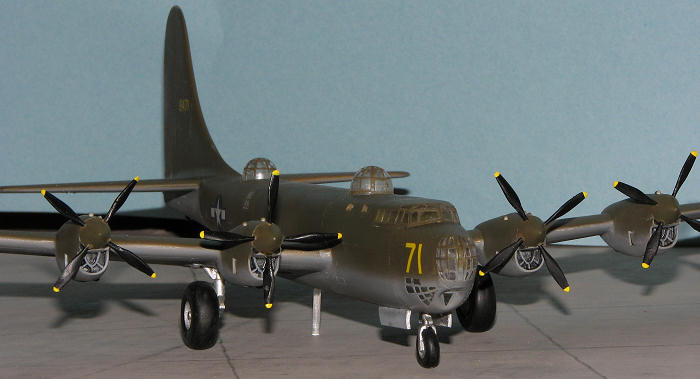
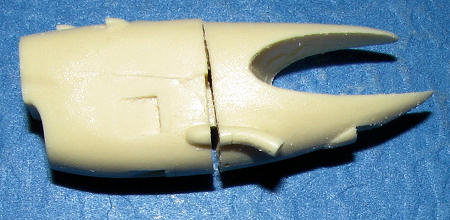 While
all the filler work was being done to the fuselage, I went to work on the
engines. I decided on the later XB-19A with the liquid cooled Allisons. This was
as much because I thought it was a neater looking plane as it was because I
could paint it in OD and Neutral Grey. Assembling the engines took more work as
the forward half suffered from some mold misalignment and needed considerable
shaping and filling to fit. Eventually I got all the nacelles to looking pretty
good. Doing work on these only highlighted the need for a good set of small
files and a slow speed motor tool with a variety of attachments. Were I only to
have sandpaper at my disposal, I'd have given up a long time ago.
While
all the filler work was being done to the fuselage, I went to work on the
engines. I decided on the later XB-19A with the liquid cooled Allisons. This was
as much because I thought it was a neater looking plane as it was because I
could paint it in OD and Neutral Grey. Assembling the engines took more work as
the forward half suffered from some mold misalignment and needed considerable
shaping and filling to fit. Eventually I got all the nacelles to looking pretty
good. Doing work on these only highlighted the need for a good set of small
files and a slow speed motor tool with a variety of attachments. Were I only to
have sandpaper at my disposal, I'd have given up a long time ago.
 Engine
nacelles are designed for each side, and there are small line indicators to help
in setting things in the proper place. However, the large opening on the back of
each nacelle does not match the contour of the wing. It provides not only some
large gaps, but puts the nacelles at a very odd angle pointing up rather than
straight. More sanding and shaping with motor tools got things pretty close, but
I fear that even with some additional work with boiling water to reshape the
wing, I was not totally successful. However, I eventually had both wings with
engines installed and ready to attach to the fuselage.
Engine
nacelles are designed for each side, and there are small line indicators to help
in setting things in the proper place. However, the large opening on the back of
each nacelle does not match the contour of the wing. It provides not only some
large gaps, but puts the nacelles at a very odd angle pointing up rather than
straight. More sanding and shaping with motor tools got things pretty close, but
I fear that even with some additional work with boiling water to reshape the
wing, I was not totally successful. However, I eventually had both wings with
engines installed and ready to attach to the fuselage.
 But
before that, I felt I should mask the clear bits. Now in 1/144, this may well be
a very challenging task. Much to my delight, I found that Anigrand had engraved
the areas around the various windows. This made things very easy in that I just
used a very sharp scalpel blade and cut into the channels. Even the tiniest bits
were not a major problem. It was only when I had to mask the turrets that I ran
into difficulty, and that was with how to properly hold them. It was such a
tedious job, that it added nearly 3 weeks to the build time as I did a tiny bit,
then procrastinated and so on.
But
before that, I felt I should mask the clear bits. Now in 1/144, this may well be
a very challenging task. Much to my delight, I found that Anigrand had engraved
the areas around the various windows. This made things very easy in that I just
used a very sharp scalpel blade and cut into the channels. Even the tiniest bits
were not a major problem. It was only when I had to mask the turrets that I ran
into difficulty, and that was with how to properly hold them. It was such a
tedious job, that it added nearly 3 weeks to the build time as I did a tiny bit,
then procrastinated and so on.
Back to when things were going smoothly, I next attached the wings. Fit here was better than I'd expected. Sure, I needed the usual filler, but it wasn't such an onerous task. With those in place, I next attached the horizontal stabs, again with great success. I had, at this point, a pretty complete airframe that was ready for paint.
| COLORS & MARKINGS |
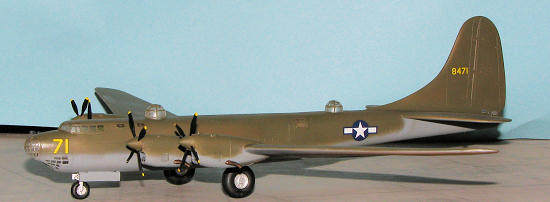
As mentioned, I chose the camouflaged version and for
paints, used Model Master enamel for the Neutral Grey and Polly Scale acrylic
for the Olive Drab. The demarcation line was painted freehand, though I suppose
at this scale, masking would be a viable option. I used the Aztec 480 for all of
this as Testors had been kind enough to suppl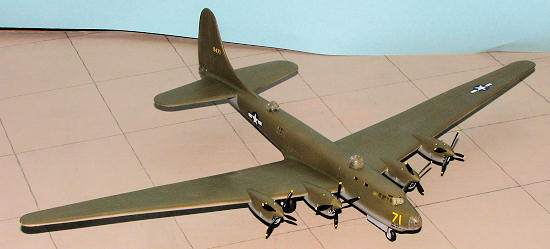 y
one. I've heard mixed reviews on this airbrush and felt I should try it out for
myself. Generally, I am pleased with the way it works. Two things I'd improve
upon. One is that even the finest setting won't provide the sort of fine line I
can get with my detail airbrush. Second is that the plunger mechanism seems a
bit more 'mushy' than what I'm used to with other airbrushes. I do like how easy
it is to clean and in all other regards feel that it is a good, quality option
for those seeking to upgrade. Thanks to its interchangeable tips, I was able to
use a rather wide spray pattern to apply the colors. On a model of this size,
that is a plus.
y
one. I've heard mixed reviews on this airbrush and felt I should try it out for
myself. Generally, I am pleased with the way it works. Two things I'd improve
upon. One is that even the finest setting won't provide the sort of fine line I
can get with my detail airbrush. Second is that the plunger mechanism seems a
bit more 'mushy' than what I'm used to with other airbrushes. I do like how easy
it is to clean and in all other regards feel that it is a good, quality option
for those seeking to upgrade. Thanks to its interchangeable tips, I was able to
use a rather wide spray pattern to apply the colors. On a model of this size,
that is a plus.
Once the paint was on, I applied a couple of coats of
clear gloss acrylic and then set about applying the few decals this aircraft
has. Following the side view slavishly, I applied the lower wing decal to the
wrong wing. Yup. Anigran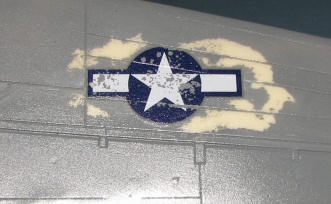 d
does not show an upper/lower plan view, only a side view and it shows the left
underside wing getting an insignia. WRONG!
d
does not show an upper/lower plan view, only a side view and it shows the left
underside wing getting an insignia. WRONG!
Well, having sheets of every US insignia style except standard late WWII, I hunted through the old decal sheets for something that might work. I finally stumbled across one of the original Hasegawa P-40N sheets and that had an insignia that was almost perfect. I then put masking tape over the misplaced Anigrand decal to pull it up. That rascal just did not want to come free. I pulled up more paint than decal and even tried duct tape with no success. I eventually just sanded it all down and repainted it. The rest of the decals went on without any problems. They are opaque and stuck well.
| FINAL CONSTRUCTION |
Next it was time to tackle the landing gear. I had to deepen a few
attachment holes and trim some pegs to get them to fit, but fit they did. I also
had to enlarge the holes in the wheels and sand down the diameter of the axles
for the main wheels. As expected, it is a major tail sitter. I'd forgotten the
small tail bumper/wheel so drilled a hole and glued that in place. There was no
information on the color of the wheel wells so I assumed they would not repaint
those and so used Citadel Mithril Silver to paint those areas. T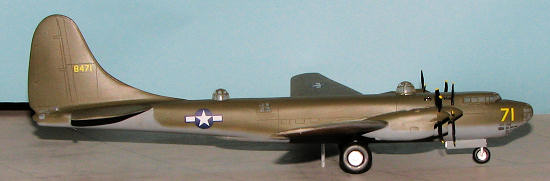 he
nose gear doors were cut and attached. The main gear doors did not seem to want
to fit anywhere. Looking at photos of the plane from various internet sites, I
came to the conclusion that this plane didn't use the main gear doors as no
photos seemed to show them. Problem solved.
he
nose gear doors were cut and attached. The main gear doors did not seem to want
to fit anywhere. Looking at photos of the plane from various internet sites, I
came to the conclusion that this plane didn't use the main gear doors as no
photos seemed to show them. Problem solved.
Then it was off to masking the turrets that I mentioned earlier. During this time, I assembled the props. Anigrand gives you a few extra blades and that is good as I used them all and needed more. Some were short shot or had chunks missing from the tips. I broke two of them trying to heat them and straighten out the warps in them. Eventually all the blades were installed. Then I painted the airframe in clear acrylic matte (Future with Tamiya flat base mixed in), and when dry, removed all the little window masks. I used Vallejo clear gloss paint to make new windows where I'd forgotten to install them. Some matte clear was used to touch up the edges. That same clear paint was used to attach the props to the nacelles and the turrets to their openings.
Last thing was a bit of touch up painting. I used Vallejo's Tinny Tin acrylic for the exhaust and I must say it looks quite good. A bit of pastel exhaust and that was pretty much it for paint. The last thing to be added was a small, clear prop to keep the aircraft from tail sitting. A section of clear sprue was used for this. I placed it as close to the main gear as was feasible.
| CONCLUSIONS |
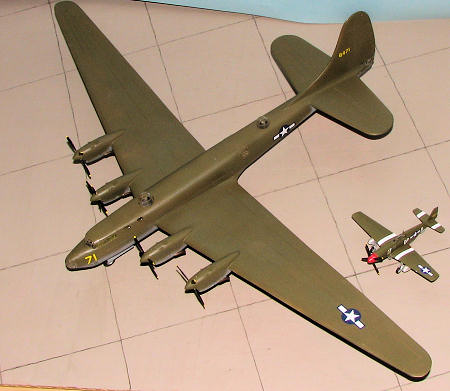
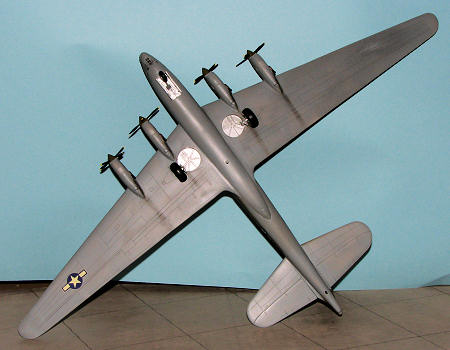
 As
I mentioned in the opening, I'm very pleased to see these aircraft being
released and doing them in 1/144 means that you'll not have to build an addition
to your home to display them. They are still big models (as you can judge from
the image showing the Sweet P-51), but they will take up little more room than
you'd have to provide for something like a 1/48 Spitfire, for example. If you
have some experience building resin short run kits, then this one will be right
up your alley.
As
I mentioned in the opening, I'm very pleased to see these aircraft being
released and doing them in 1/144 means that you'll not have to build an addition
to your home to display them. They are still big models (as you can judge from
the image showing the Sweet P-51), but they will take up little more room than
you'd have to provide for something like a 1/48 Spitfire, for example. If you
have some experience building resin short run kits, then this one will be right
up your alley.
| REFERENCES |
Kit instructions
February 2009
Copyright ModelingMadness.com. All rights reserved.
If you would like your product reviewed fairly and fairly quickly, please
contact
the editor
or see other details in the
Note to
Contributors.