| KIT #: | 4817 |
| PRICE: | $49.95 SRP |
| DECALS: | Two options |
| REVIEWER: | Scott Van Aken |
| NOTES: | Short run with resin parts |
| HISTORY |
For more on the background of this aircraft and a look at what comes in the box, please visit the preview.
| THE KIT |
 Typical of Czech Model kits, the plastic
is well molded, but thick. Detailing is engraved and not overly so. The
plastic parts have a rather thick seam running around the edges that will
have to be sanded or scraped down prior to assembly. Resin parts are well
cast in a grey resin and give good detail. I found during the build that
these parts are also somewhat brittle so you really need to be careful. No
etched brass was provided and the canopy and windscreen are injected
plastic. They are also a bit on the thick side, but many of us prefer thick
plastic over vacuformed bits as we find the vac parts difficult to cut out
and difficult to properly blend in. There are not that many parts to the
kit, but often this is misleading as the work involved in building these
sorts of kits is greater than in a Tamiya one.
Typical of Czech Model kits, the plastic
is well molded, but thick. Detailing is engraved and not overly so. The
plastic parts have a rather thick seam running around the edges that will
have to be sanded or scraped down prior to assembly. Resin parts are well
cast in a grey resin and give good detail. I found during the build that
these parts are also somewhat brittle so you really need to be careful. No
etched brass was provided and the canopy and windscreen are injected
plastic. They are also a bit on the thick side, but many of us prefer thick
plastic over vacuformed bits as we find the vac parts difficult to cut out
and difficult to properly blend in. There are not that many parts to the
kit, but often this is misleading as the work involved in building these
sorts of kits is greater than in a Tamiya one.
| CONSTRUCTION |
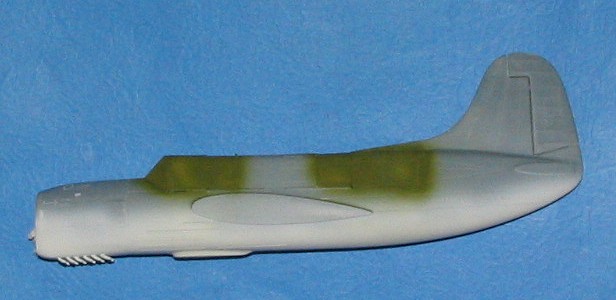
I started construction on this one by looking for sub-assemblies. I found five of them; the main float, outrigger floats and the two wing halves. While the plastic is thick, I had no trouble gluing the floats. The wings have ejector pin stubs that have to be removed and sanded down. I also found the wings to be warped so that when gluing the outer parts, the inner parts had a large (as in an inch) gap at the wing root. What I did was to glue the outer sections, and after a day's drying and clamping, glued the area near the root, also clamping those in place. This seemed to take care of the problem.
 I then moved onto the resin bits. I
test fitted each piece to see if I could get away with little or no pour
stub removal. Each bit that I tried needed to have some portion if not all
the pour stub sawed off. This took quite a bit of time. Fortunately, the
folks who designed the molds for this kit, made it such that this chore
wasn't needed on all parts. If you test fit these bits, you'll see which
ones need the help and which don't.
I then moved onto the resin bits. I
test fitted each piece to see if I could get away with little or no pour
stub removal. Each bit that I tried needed to have some portion if not all
the pour stub sawed off. This took quite a bit of time. Fortunately, the
folks who designed the molds for this kit, made it such that this chore
wasn't needed on all parts. If you test fit these bits, you'll see which
ones need the help and which don't.
Once done, I glued together several of the interior sub assemblies and painted them with Testors Model Master Interior Green enamel. One thing I found during the assembly of the cockpit is that the seat just doesn't fit as nicely as I'd like it. I had to fiddle around a bit to get things as close as I could. Once the interior paint was dry, I used the guide in the instructions to paint the radios and such with black, the head rest with brown and the gun with gunmetal. A wash was applied and the area dry brushed with aluminum. Nothing fancy, but enough to bring out some detail. At this stage, I had also painted the interior of the fuselage so started installing some of the interior bits.
Prior to putting in the cockpit
section, I installed a set of Lion's Roar etched belts. This set provides
four generic US sets for $6.95 plus a set of wide lap belts only. Not a bad
deal. The etched brass is super thin so care is needed when using it. These
were painted white, which is probably the wrong color, but it does add so
much to the interior! Before installing any of these resin bits, I scraped
at all the openings. Short run kits like this generally have some mold
lines that run along the edges of all
 the parts and these need to be
scraped or sanded down in order to get optimal fit. I then glued in the
rear section with the floor and the gun trough section. I taped together
the fuselage while these dried to be sure the fit would be good. When I
did,
the parts and these need to be
scraped or sanded down in order to get optimal fit. I then glued in the
rear section with the floor and the gun trough section. I taped together
the fuselage while these dried to be sure the fit would be good. When I
did,
 I
found that there would be quite a gap on the fin/rudder piece so did some
trimming. This reduced it but did not make it go away.
I
found that there would be quite a gap on the fin/rudder piece so did some
trimming. This reduced it but did not make it go away.
I then installed the cockpit section, right side wall, and floor, again, taping the fuselage together while it dried to ensure proper alignment.
Meanwhile, I had assembled the wings, float, tip floats and the tail planes. All of these needed sanded down on the mating surfaces before and after gluing. I found that I also needed some filler along the seams, in some cases, more than once. The wings have a rather odd seam that goes right through the aileron on the underside. During all this, I was building a Hellcat. Since I had the sea blue paint already mixed up and I wanted to do the tri-color scheme, I decided to pre-paint some of these items. During one session I painted the underside of the main float and tail-planes with Floquil Reefer White. Next one I painted the upper wings and upper tail plane with Model Master Sea Blue enamel. I also painted the engine in aluminum, though the instructions said grey. The engine mount was hand painted Interior Green and some other detailing/wash was done with black.
 During the removal of two of the
resin parts, the rear seat and the aft gun, some bits broke off. On the
seat, it was a corner section and the gun barrel broke into three small
bits. The seat was fixed by inserting a piece of plastic card and applying
filler. The gun is a real poser. At this current stage, I have nothing to
replace it with.
During the removal of two of the
resin parts, the rear seat and the aft gun, some bits broke off. On the
seat, it was a corner section and the gun barrel broke into three small
bits. The seat was fixed by inserting a piece of plastic card and applying
filler. The gun is a real poser. At this current stage, I have nothing to
replace it with.
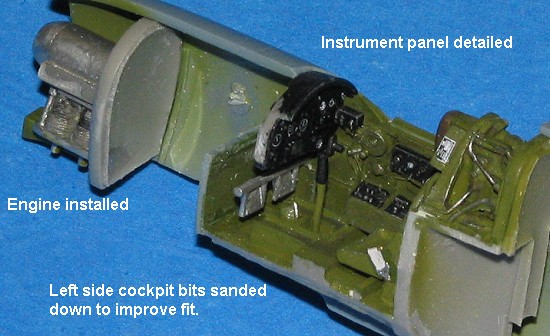
Anyway, back to working on the various bits. I finished putting on the lap belts for the rear seat and then installed the engine. Next, I glued the left side panel to the left fuselage half and test fit it to see if all would close up. Not quite. As a result, I sanded away at the left side of the parts already installed in the right side until the halves mated. Then I glued in the rudder pedal assembly. Final interior bit was the instrument panel.
For this, I used Mike Grant's excellent instrument decals from his 1/48 sheet, though in hindsight, some of his 1/72 dials would have been a better fit in some of the holes. These are superbly printed, but being ALPS, are easily damaged even by just cutting them out with scissors. I used a new scalpel blade and cut them as close to the instrument as I could. Then, using plenty of water, moved them into the appropriate hole. I wicked out the excess liquid and moved on to the next. Though suggesting no setting solutions, I did use them to hold the decals in place. Though it looks OK, I didn't hit on the best way to do these until late in the going. Next one will be better. The panel was then glued into place.
 After
the usual test fitting and having a few things pop off, I reattached the
offenders and then glued the fuselage halves together. Thanks to the rather
poor fit at the very back, I had to do a lot of carving of the fin area.
Even then, there was a substantial gap that will need filled. The fuselage
was glued and when ne
After
the usual test fitting and having a few things pop off, I reattached the
offenders and then glued the fuselage halves together. Thanks to the rather
poor fit at the very back, I had to do a lot of carving of the fin area.
Even then, there was a substantial gap that will need filled. The fuselage
was glued and when ne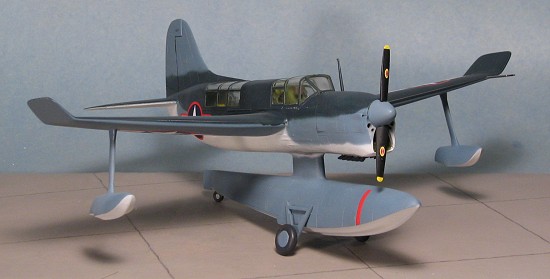 ar dry, I glued on the lower engine piece and the
front section. This latter piece is a tad smaller than the overall front,
so was attached to where I'd have minimal work to do blending it in.
ar dry, I glued on the lower engine piece and the
front section. This latter piece is a tad smaller than the overall front,
so was attached to where I'd have minimal work to do blending it in.
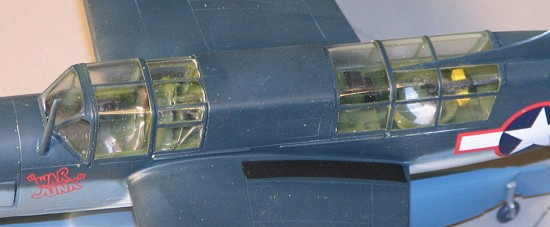
While all that was drying/curing, I worked on the transparencies. The openings are a bit on the small side so some careful sanding and scraping was needed to achieve a decent fit. It was especially needed at the back of the aft transparency. Thanks to the very thick plastic, the windscreen fit in the front was hampered by the instrument panel anti-glare panel. I eventually carved away small sections of the inside of the transparency until I got an acceptable fit. Fit is still not perfect as the fuselage is curved at the top, but the area below the windscreen is flat.
I ended up doing two filler sessions,
with the second one taking care of some smaller glitches. Every seam needed
filler. It is just the way of these things. During the drying time, I
drilled out the attachment points for the beaching gear on the hull. The
small indentations are just not large enough. I also took this time to
paint the wheels and the prop. You may recall that I was having some
difficulty regarding the rear gun. Well, I bought a set of 1/35 .30 cal
guns but the barrels on those were way too large. Remembering that I had
not used the guns in an Academy 1/48 F-86F, I dug through the mess that was
my spare bits boxes. Eventually, I found that sprue and robbed one of the
guns. Cutting off the barrel, I drilled out the body of the gun and
inserted the Sabre barrel. Still looks a tad large, but it is mostly
invisible. I then painted the gun with Gunmetal and the
 handles black with the ammo
box in yellow (that's what the instructions said). This was glued to the
gunner's seat and the seat glued into the rear cockpit.
handles black with the ammo
box in yellow (that's what the instructions said). This was glued to the
gunner's seat and the seat glued into the rear cockpit.
With the sanding out of the way, the canopy sections were masked and glued in place. Then I proceeded to fix the glitches. You see, the fin extension on the rear canopy was too wide so it had to be sanded down. I also took off a bit too much from one side of the rear so had to fill it with sprue and then apply filler and sand it down. The clear bits still do not fit that great and I have to confess that as much as I dislike vac canopies, this kit should have had them included. I seriously doubt if we'll see any aftermarket clear bits for this or any other Czech Model kit. Having said that, it might not be a bad undertaking for some enterprising company to do a single boxing of vac canopies for all the CM kits.
| COLORS & MARKINGS |
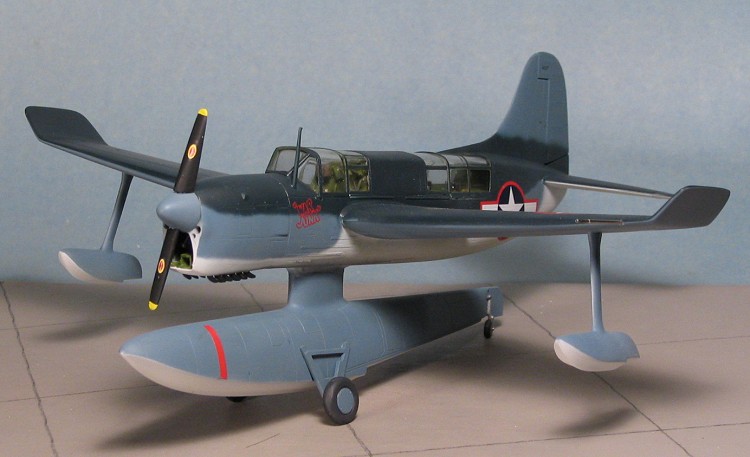
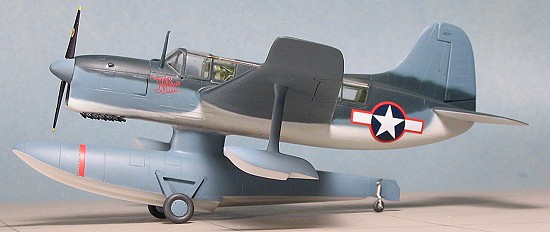
 With all the pre-painting I've been
doing, there really doesn't seem much to this section. What I did was to
paint the fuselage in the tri-color scheme of dark sea blue upper,
intermediate blue for the middle and white undersides. I started by doing
the underside in white using Floquil's Reefer White. At the same time, I
painted the outer canopies with Testors Model Master Interior Green so it
would show through. Then I painted the Sea Blue, also using Testors
enamels. The last part was the Intermediate Blue which was where I had to
be careful of overspray so this application took a bit longer. I used the
remnants of some Aeromaster
With all the pre-painting I've been
doing, there really doesn't seem much to this section. What I did was to
paint the fuselage in the tri-color scheme of dark sea blue upper,
intermediate blue for the middle and white undersides. I started by doing
the underside in white using Floquil's Reefer White. At the same time, I
painted the outer canopies with Testors Model Master Interior Green so it
would show through. Then I painted the Sea Blue, also using Testors
enamels. The last part was the Intermediate Blue which was where I had to
be careful of overspray so this application took a bit longer. I used the
remnants of some Aeromaster 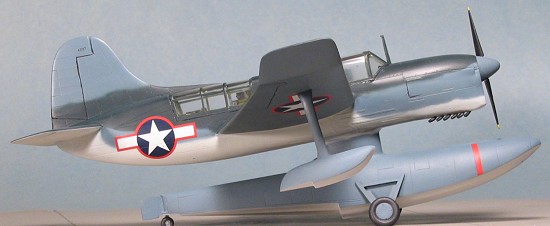 enamels for this job. Once all that was
done, I then proceeded to glue on the major bits. I have to say I was a bit
concerned about how this would all work out as I've not built a kit in this
manner before.
enamels for this job. Once all that was
done, I then proceeded to glue on the major bits. I have to say I was a bit
concerned about how this would all work out as I've not built a kit in this
manner before.
Well, the next thing to do was to
start attaching the big bits. I started with the wings after sanding down
the roots as they had way too much dihedral. They were both basically
placed into a 'bath' of Pro-Weld and I smushed them up against the roots. I
got a satisfying batch of goo from both joins. It means that I'll have to
fill them and do some touch-up painting, but I'd figured that would happen
anyway. At the same time I glued on the float so I had three of the major
bits all on at the same time and was able to wiggle things around to try to
get things properly aligned. This is probably the most difficult part of
doing these builds for me. It was not surprising when I realized I'd have
to fill the seams where all thes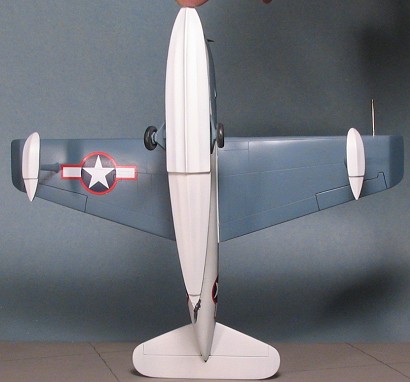 e
parts joined.
e
parts joined.
 This
took two applications as some of the areas were rather in need of it. I
also attached the tail plane piece and found the fit there to be quite
good. It didn't exactly match the root section, but considering things, for
this type of kit the fit was more than acceptable.
This
took two applications as some of the areas were rather in need of it. I
also attached the tail plane piece and found the fit there to be quite
good. It didn't exactly match the root section, but considering things, for
this type of kit the fit was more than acceptable.
After filling and sanding the affected areas I repainted the white areas and then, after sanding a clear spot and attaching the forward radio mast, I did the Sea Blue sections. I still had to attach the outer floats to the underside of the wings so figured that since I'd need to retouch the paint there as well, I'd do it all at the same time. I sanded off an area for the wing floats and glued those in place. Once dry, the Intermediate Blue and some of the white areas needed retouched. I then gave the matte sections a coat or two of clear gloss acrylic using Future floor polish.
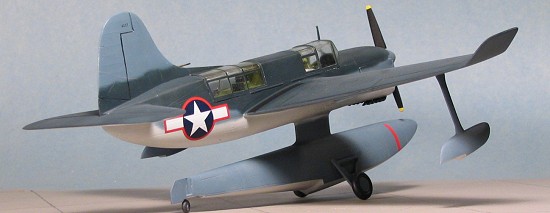
When that had dried after a few hours, I applied the decals. These went on with no trouble at all. If I had a concern, it would be that the insignia seemed a bit large to me, especially the ones on the wing. As you are aware, I generally try to build many of the supplied kits like this one right from the box. Were I to do another, I think I'd use the fuselage decals on the wings and find some slightly smaller ones for the fuselage. Of course, these could be spot on as my references for SO3Cs are almost non-existent.
| FINAL CONSTRUCTION |
 There really is darn little more to
add to this. While the decals were drying, I applied the beaching gear to
the main float. I had to drill out the attachment holes a bit more to get a
good join, but there was no problem in this area. The only thing left was
to apply a semi-gloss clear to things, do some final painting of the
formation lights and the exhaust, make a new pitot tube out of two
telescoping bits of stainless steel tubing (the
kit one is really too fat and too short).
There really is darn little more to
add to this. While the decals were drying, I applied the beaching gear to
the main float. I had to drill out the attachment holes a bit more to get a
good join, but there was no problem in this area. The only thing left was
to apply a semi-gloss clear to things, do some final painting of the
formation lights and the exhaust, make a new pitot tube out of two
telescoping bits of stainless steel tubing (the
kit one is really too fat and too short).
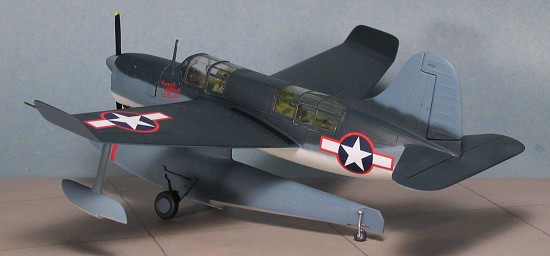
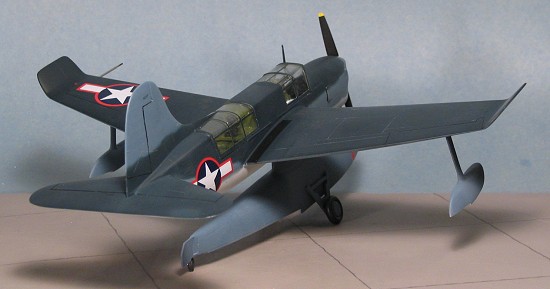
As usual, I did not run a long wire as I always break these off rather easily. I also grunged up the bottom a bit with engine exhaust and did the usual touch-up painting. Then I realized I'd missed a few things. Digging around the bench, I found the prop and glued that in place on the front. I also forgot the wing walk areas. I cut some black decal sheet, applied it and when dry, I fixed it in place with some more clear matte. The final step was to remove the masking from the clear bits. Much to my delight, no leakage and not only that, I could actually see all that work I put into the interior through the thick plastic.
| CONCLUSIONS |
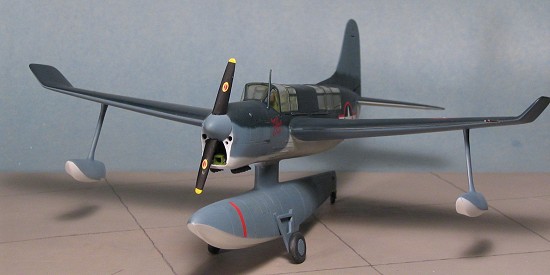 I have built
most of the various Czech Model kits that Squadron has done. They all have
several things in common; very thick plastic, excellent resin, super decals
and a generally dodgy fit. While this latter is not something that
newcomers to the genre want to hear, over time and experience, it becomes
no big deal and something one just has to work with. This kit is one of the
best fitting of the lot. Sure, I had to fill some gaps, clamp some parts
while they dried, and do some sanding and scraping to get good mating
surfaces and to get some bits to fit, but overall, I was quite pleased with
the results and have to mark this kit as a highlight in the Czech Model run
of things. I only wish that the number of options in terms of markings was
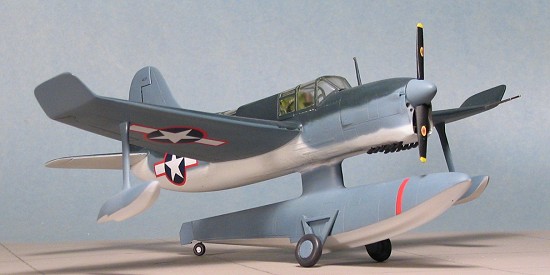
a bit more inspiring, but this was not a very inspiring aircraft. You do
have to admit it is something different and is quite a contrast when parked
next to the Monogram Kingfisher! Now perhaps Czech Model will bless us with
a 1/48 SOC Seagull.
I have built
most of the various Czech Model kits that Squadron has done. They all have
several things in common; very thick plastic, excellent resin, super decals
and a generally dodgy fit. While this latter is not something that
newcomers to the genre want to hear, over time and experience, it becomes
no big deal and something one just has to work with. This kit is one of the
best fitting of the lot. Sure, I had to fill some gaps, clamp some parts
while they dried, and do some sanding and scraping to get good mating
surfaces and to get some bits to fit, but overall, I was quite pleased with
the results and have to mark this kit as a highlight in the Czech Model run
of things. I only wish that the number of options in terms of markings was
a bit more inspiring, but this was not a very inspiring aircraft. You do
have to admit it is something different and is quite a contrast when parked
next to the Monogram Kingfisher! Now perhaps Czech Model will bless us with
a 1/48 SOC Seagull.
Oh yes, before I close, when you build yours, make sure you remove ALL of the pour stub from the lower engine cowling part. It will make it easier to coerce the carb intake into its proper place.
December 2005
#1393 in a series
Copyright ModelingMadness.com. All rights reserved.
If you would like your product reviewed fairly and fairly quickly, please contact the editor or see other details in the Note to Contributors.