| KIT #: | 048 |
| PRICE: | $6.00 'used' |
| DECALS: | Two options |
| REVIEWER: | Scott Van Aken |
| NOTES: | 1995 release |
| HISTORY |
The last production Corsair was the 'F4U-7, which was built specifically for the French naval air arm, the Aéronavale. The XF4U-7 prototype did its test flight on 2 July 1952 with a total of 94 F4U-7s built for the French Navy's Aéronavale (79 in 1952, 15 in 1953), with the last of the batch, the final Corsair built, rolled out on 31 January 1953. The F4U-7s were actually purchased by the U.S. Navy and passed on to the Aéronavale through the U.S. Military Assistance Program (MAP). The French Navy used its F4U-7s during the second half of the First Indochina War in the 1950s (12.F, 14.F, 15.F Flotillas), where they were supplemented by at least 25 ex-USMC AU-1s passed on to the French in 1954, after the end of the Korean War.
 On 15 January 1953, Flotille 14F, based at Karouba Air Base near Bizerte in
Tunisia, became the first Aéronavale unit to receive the F4U-7 Corsair. Flotille
14F pilots arrived at Da Nang on 17 April 1954, but without their aircraft. The
next day, the carrier USS Saipan delivered 25 war-weary ground attack ex-USMC
AU-1 Corsairs (flown by VMA-212 at the end of the Korean War). During three
months operating over Dien Bien Phu and Viêt-Nam, the Corsairs flew 959 combat
sorties totaling 1,335 flight hours. They dropped some 700 tons of bombs and
fired more than 300 rockets and 70,000 20 mm rounds. Six aircraft were damaged
and two shot down by Viet Minh.
On 15 January 1953, Flotille 14F, based at Karouba Air Base near Bizerte in
Tunisia, became the first Aéronavale unit to receive the F4U-7 Corsair. Flotille
14F pilots arrived at Da Nang on 17 April 1954, but without their aircraft. The
next day, the carrier USS Saipan delivered 25 war-weary ground attack ex-USMC
AU-1 Corsairs (flown by VMA-212 at the end of the Korean War). During three
months operating over Dien Bien Phu and Viêt-Nam, the Corsairs flew 959 combat
sorties totaling 1,335 flight hours. They dropped some 700 tons of bombs and
fired more than 300 rockets and 70,000 20 mm rounds. Six aircraft were damaged
and two shot down by Viet Minh.
In September 1954, F4U-7 Corsairs were loaded aboard Dixmude and brought back to France in November. The surviving Ex-USMC AU-1s were taken to the Philippines and returned to the U.S. Navy. In 1956, Flotille 15F returned to South Vietnam, equipped with F4U-7 Corsairs. French Corsairs were also used during the Suez Crisis, the Algerian War and in Tunisia. The Aéronavale used 163 Corsairs (94 F4U-7s and 69 AU-1s), the last of them used by the Cuers-based 14.F Flotilla were out of service by September 1964, with some surviving for museum display or as civilian warbirds.
| THE KIT |
Prior to this kit, the only late Corsair in 1/72 was the Matchbox F4U-4. This particular kit cannot be built as the -4 as the -7 had a taller area right behind the cockpit to raise the canopy so that the pilot could have better view beyond that huge forward fuselage. The kit also comes armed with canon.
You get a fair cockpit with seat, stick, and instrument panel. No decals for
the panel so you will have to paint them. The kit does provide separate forward
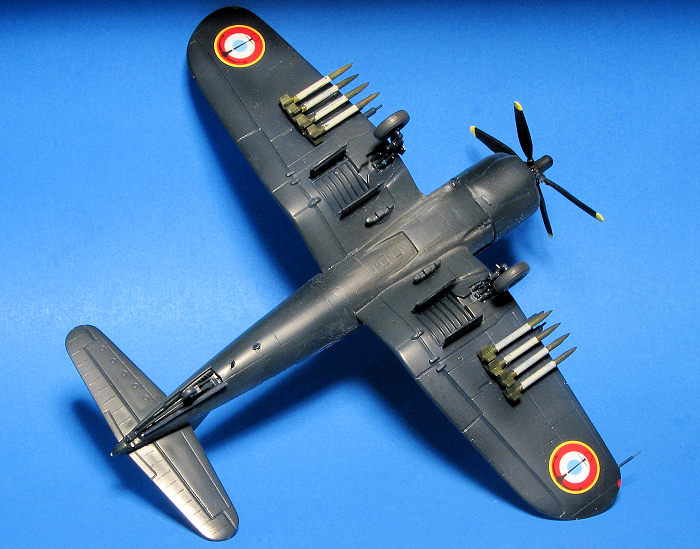
cowlings for either the F4U-7, F4U-5, and the AU-1. If you want to install rockets and
tanks you need to open holes in the lower wing. Typical of Corsair kit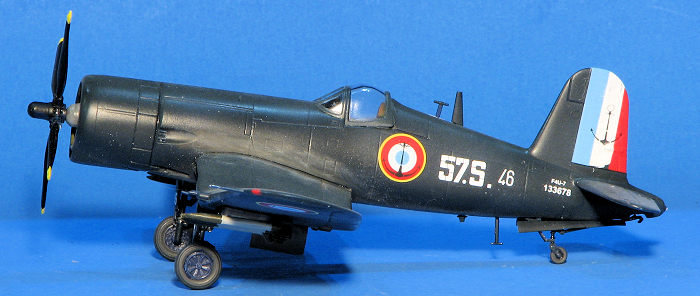 s in this
scale, you have separate wing radiators. The pitot is molded into one of the
upper wing halves.
s in this
scale, you have separate wing radiators. The pitot is molded into one of the
upper wing halves.
When building up the landing gear, the builder will need to cut the main gear doors as they are molded in one piece. Wheels are in halves and look OK, but it would not hurt to use resin replacements. Tail gear has the wheel and arrestor hook molded as one piece. It would be useful to attach the antennas as late in the build as you can to keep them from being knocked off. While the canopy is separate from the windscreen, it doesn't appear it can be posed open. Wing guns and exhaust are separate bits, which adds a bit of fiddle factor to the kit. The fuel tank and rocket pylons are separate.
Instructions are well done and use Model Master paint references. Two decal options are provided, both in overall sea blue. My kit had suffered through a flood or something as the box and instructions are badly wrinkled and I got no decals. Not an issue as there are aftermarket options. If you got a good kit, you'll have markings for the box art plane and an AU-1 of VMA-323 in mid 1953.
| CONSTRUCTION |
 Some filler and sanding was needed and I had to open some holes for
antennas. Then I installed the tailplanes. These fit fairly well, but I did
have to open the slots a bit. Wings were next and these required some work.
First I opened the holes for the rocket stubs. Were I to build this kit
again, I'd remove the pins on the wing halves as using them caused some
minor misalignment which was dealt with by sanding and filler. The wings
were then fit onto the fuselage. Again, fit was just OK and needed some
filler and sanding. The fuel tank pylons were then attached.
Some filler and sanding was needed and I had to open some holes for
antennas. Then I installed the tailplanes. These fit fairly well, but I did
have to open the slots a bit. Wings were next and these required some work.
First I opened the holes for the rocket stubs. Were I to build this kit
again, I'd remove the pins on the wing halves as using them caused some
minor misalignment which was dealt with by sanding and filler. The wings
were then fit onto the fuselage. Again, fit was just OK and needed some
filler and sanding. The fuel tank pylons were then attached. | COLORS & MARKINGS |
I filled the cowling opening with Silly Putty and headed for the paint shop. I used some Model Master dark sea blue enamel on this one in several painting sessions. The paint dries quite quickly and is gloss so is ready for decals once dry. I made sure that I also painted the gear doors and the rocket stubs at this time. Fuel tanks were also painted. When everything was dry (and I waited a few days), I started with the decals.
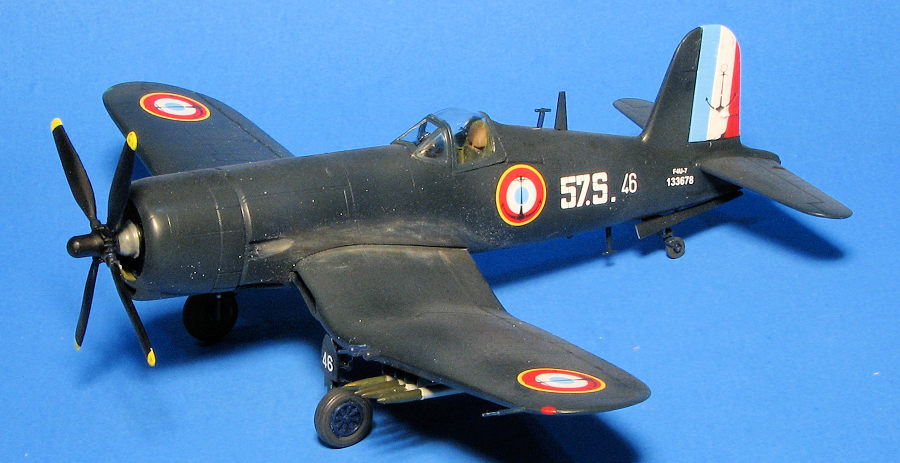
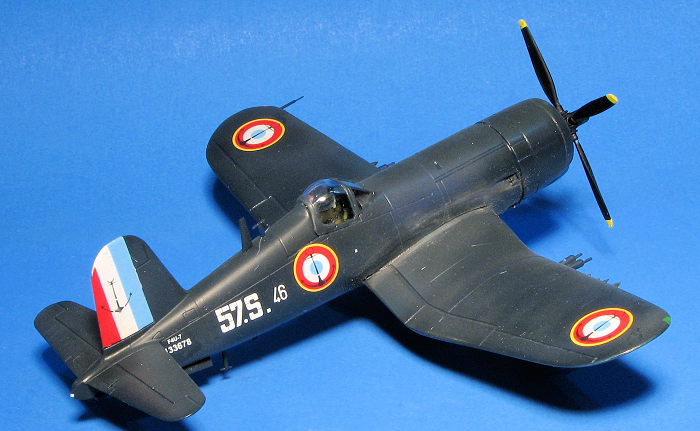
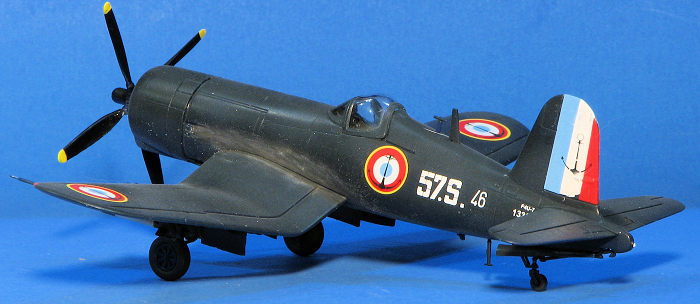 For this kit, I chose a recently previewed sheet, ModelArt
72/080, which has a half dozen Corsairs as well as even more Meteor T.7s. The
latter will be used at a later date, but for this one, I chose a 57S plane as
used in Algeria during 1960. The decals went on without any issues. They are
fairly thin, yet did not have the folding issue one sees with a lot of thin
decals. The whites are also nice and opaque. The sheet does not provide the
white area of the rudder stripes, which I found to be a bit odd, so that needs
to be painted.
For this kit, I chose a recently previewed sheet, ModelArt
72/080, which has a half dozen Corsairs as well as even more Meteor T.7s. The
latter will be used at a later date, but for this one, I chose a 57S plane as
used in Algeria during 1960. The decals went on without any issues. They are
fairly thin, yet did not have the folding issue one sees with a lot of thin
decals. The whites are also nice and opaque. The sheet does not provide the
white area of the rudder stripes, which I found to be a bit odd, so that needs
to be painted.
With the decals in place, I added on the final pieces. This included the gear doors. The ones for the tail wheel were particular difficult to keep in place. The rocket rails were then glued on. After painting the rockets, I tried to get them attached. This proved to be quite difficult as the spaces between the rails were smaller than what would allow the rockets to be properly attached. This is as much as anything due to the fins being too large. I was constantly knocking off one rocket as I tried to place the one next to it. I would highly recommend gluing the rockets on the rails first before attaching the rails to the wings. Final items were the guns, the various antennas, and the prop. The airframe was then given an overall clear matte to seal in the markings as these planes were only glossy right after they were built or overhauled. A bit of exhaust staining with pastels and that was it.
| CONCLUSIONS |
This is a better kit than the venerable Matchbox F4U-4 offering. It has the expected engraved panel lines and generally has a greater level of detail. I like that you can also do an AU-1 as this type was only kitted by Hawk back in the Pleistocene. It is not a perfect kit as it has some difficult areas, but it is still well worth picking up until someone does something better.
| REFERENCES |
https://en.wikipedia.org/wiki/Vought_F4U_Corsair
29 May 2026 Copyright ModelingMadness.com. All rights reserved.
No reproduction in part or in whole without express permission. If you would like your product reviewed fairly and fairly quickly, please
contact
the editor or see other details in the
Note to
Contributors.