
| KIT #: | 01998 |
| PRICE: | 3000 yen SRP |
| DECALS: | One option |
| REVIEWER: | Scott Van Aken |
| NOTES: | 2012 Limited Edition |
| HISTORY |
 The Avenger entered U.S. service in 1942, and first saw action
during the Battle of Midway. Despite losing five of the six Avengers on its
combat debut, it survived in service to become one of the outstanding torpedo
bombers of World War II. Greatly modified after the war, it remained in use
until the 1960s. As an interesting note, actor Paul Newman was an Avenger
gunner, having failed his pilot's entrance test due to being color blind.
The Avenger entered U.S. service in 1942, and first saw action
during the Battle of Midway. Despite losing five of the six Avengers on its
combat debut, it survived in service to become one of the outstanding torpedo
bombers of World War II. Greatly modified after the war, it remained in use
until the 1960s. As an interesting note, actor Paul Newman was an Avenger
gunner, having failed his pilot's entrance test due to being color blind.
The TBF-1C differed from the standard TBF-1 by having wing fuel tanks and the ability to carry external tanks as well. This effectively doubled the aircraft's range. The -1C was the last version built by Grumman. General Motors had been building Avengers concurrently with Grumman and took over Avenger production to let Grumman concentrate on fighters.
| THE KIT |
This is one of two kits that were found in Hasegawa's 'Escort Carrier Combo'. This kit allows you to build a TBF-1C and a TBM-3. I wish they'd have included the fuselages to do two of each, but they did not. This is the TBF-1C option.
The kit itself is standard Hasegawa 1/72 with very nicely done
crisp external engraving and a rather basic cockpit. This area has a one piece
lower floor, two seats, a control stick and an instrument panel. There are
decals for instruments. The kit has the ability to have the bomb bay built open,
but one only has the option of
 a torpedo as the weapon. The Avenger more often
carried bombs in the Pacific and depth charges in the Atlantic. Not sure just
where you can find depth bombs though standard 500 lb bombs can be located in
aftermarket or from other kits. The kit also comes with under wing rockets which
the kit instructions show as being for the TBF-1C. I'm pretty sure the others
could carry them as well, though they may not be germane to the other markings
options.
a torpedo as the weapon. The Avenger more often
carried bombs in the Pacific and depth charges in the Atlantic. Not sure just
where you can find depth bombs though standard 500 lb bombs can be located in
aftermarket or from other kits. The kit also comes with under wing rockets which
the kit instructions show as being for the TBF-1C. I'm pretty sure the others
could carry them as well, though they may not be germane to the other markings
options.
Clear parts are well done and all of the bits aside from the upper canopy and lower gun opening are installed prior to or during fuselage assembly. The turret is a single piece and the turret interior is adequate though not really that well detailed. One thing for sure, masking will be time consuming, especially the one-piece upper greenhouse canopy. Stabs are a single piece on either side and the wings are a left and right upper and lower half. Wheel well detail is adequate and the gear/wheels are well done.
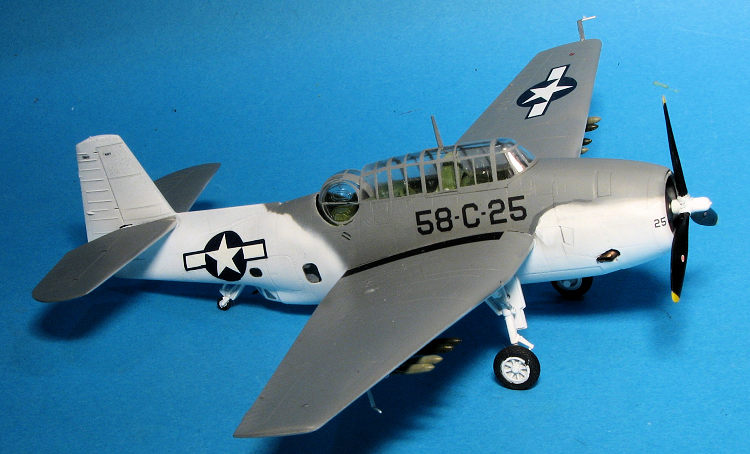
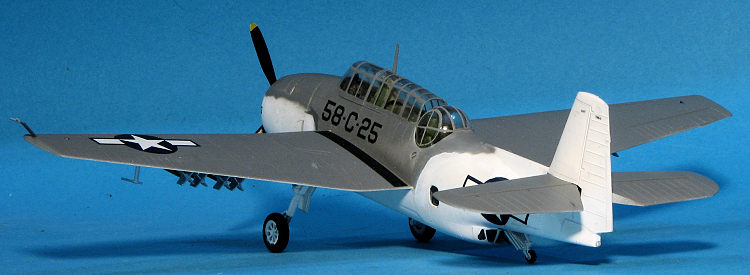
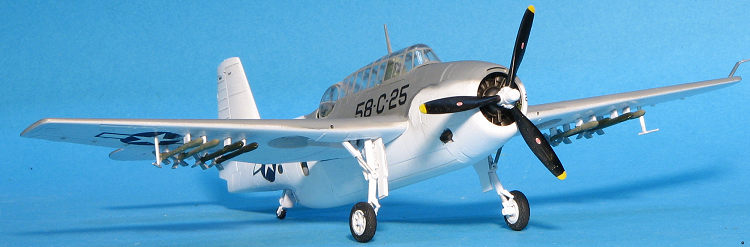
Instructions are typical for Hasegawa. They offer two TBF-1C options. One is in the tri-color paint scheme with VC-10 aboard the USS Gambier Bay in October of 1944. The other is in the dark gull grey over white 'Atlantic' scheme with VC-58 aboard the USS Block Island in January 1944. Decals are old school with off white white markings.
| CONSTRUCTION |
After allowing the kit to marinate on the shelves for several
years, I was motivated to build this one by a new MYK decal sheet on sea blue
Avengers. Since the kit had two aircraft in it, I decided to do them both at
about the same time. The first thing I did was paint as much of the kit while still on
the sprue as I could. Th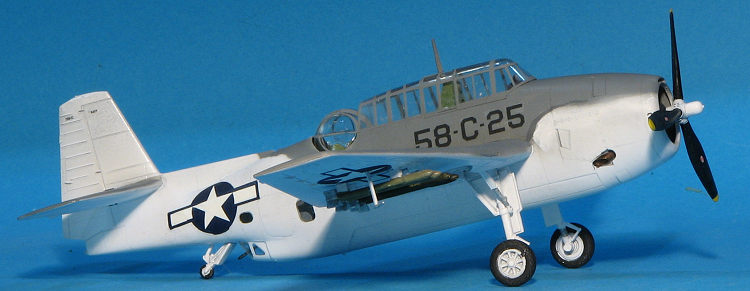 is mainly covered the interior bits and the engine. With
that done, I attached the decals to the instrument panel and side consoles. Then
all the inside pieces (which is mainly seats, front control stick and instrument
panel) were glued in place. This was then glued to one side of the fuselage. The
next step was to install the small side windows. Naturally, I got glue on them,
but what are you going to do. No contest winner here. The engine was installed
and the fuselage halves closed.
is mainly covered the interior bits and the engine. With
that done, I attached the decals to the instrument panel and side consoles. Then
all the inside pieces (which is mainly seats, front control stick and instrument
panel) were glued in place. This was then glued to one side of the fuselage. The
next step was to install the small side windows. Naturally, I got glue on them,
but what are you going to do. No contest winner here. The engine was installed
and the fuselage halves closed.
Once that was done, the base of the turret was glued in, followed by the front cowling and the closed bomb bay. While dealing with the usual seams, I drilled the holes in the lower wings for the rockets and assembled the wings. Once the fuselage had been dealt with, I used Eduard mask set CX046 to cover the fuselage side windows. I then attached the tailplanes and the wings. Fit is actually very good.
While that was drying, I starting masking the clear bits. This is a fairly long and somewhat tedious task. Note that the -1 has a different lower gunner's position and the masks cover that well. Doing the turret was the most challenging as the right side flat parts were the most difficult. Eventually all was done and it was time to think of painting.
| COLORS & MARKINGS |
 I decided to
choose the Atlantic scheme using the kit markings. This scheme is white on the
underside and dark gull grey on the top. I first painted the airframe white
using rattle can Tamiya gloss white. A mistake as it doesn't cover quite as well
as perhaps a matte white would have. Putting on multiple coats would have just
made the finish too thick. The upper surface was painted using Model Master
enamels.
I decided to
choose the Atlantic scheme using the kit markings. This scheme is white on the
underside and dark gull grey on the top. I first painted the airframe white
using rattle can Tamiya gloss white. A mistake as it doesn't cover quite as well
as perhaps a matte white would have. Putting on multiple coats would have just
made the finish too thick. The upper surface was painted using Model Master
enamels.
Once that was done, the landing gear legs were installed, the matte dark gull grey made gloss with Future, and I started applying decals. The kit insignia are just wrong in that the white is an off white, this being quite obvious as soon as you put on the decal. Fortunately I had replacements using a Fantasy Printshop sheet. There are not a lot of markings and the fuselage codes silvered to some extent. Using a strong setting solution to let the decals snuggle in was an error and caused the colors to run. I replaced the ones on the fuselage.
With the markings in place, the rockets, gear doors, wheels and prop were attached. I managed to spill some cement on the underwing insignia where I can't get to it so that is rather smudged. The various antennas were attached and the airframe given a matte clear using Tamiya's paint. I then removed the masking from the clear bits. Installing the turret was a pain and I had to remove the main greenhouse to get it installed. I had lost the rear gun somewhere so this doesn't have one. The last steps were the usual detail painting and that was it.
| CONCLUSIONS |
 The kit turned
out OK. Not great, but OK. I'm not at all pleased at the errors I made during
decal application and the overall paint scheme could probably have looked
better. However, it is now done and that is what matters. It looks fairly nice
from the usual distance and aside from masking the clear parts, was not a fussy
build at all.
The kit turned
out OK. Not great, but OK. I'm not at all pleased at the errors I made during
decal application and the overall paint scheme could probably have looked
better. However, it is now done and that is what matters. It looks fairly nice
from the usual distance and aside from masking the clear parts, was not a fussy
build at all.
| REFERENCES |
http://en.wikipedia.org/wiki/TBM_Avenger
If you would like your product reviewed fairly and fairly quickly, please contact the editor or see other details in the Note to Contributors.
Back to the Main Page Back to the Review Index Page Back to the Previews Index Page