
Minicraft/Hasegawa 1/72 F4U-1 Corsair
| KIT #: | 1179 |
| PRICE: | $1.00 on the sale table |
| DECALS: | One option |
| REVIEWER: | Scott Van Aken |
| NOTES: |
| HISTORY |
During World War II, Corsair production expanded beyond Vought to include Brewster and Goodyear models. Allied forces flying the aircraft in World War II included FAA and RNZAF. Eventually, more than 12,500 F4Us would be built, comprising 16 separate variants.
The first production version of the Corsair with the
distinctive "bird cage" canopy and low seating position was the F4U-1. The
differences over the XF4U-1 were as follows: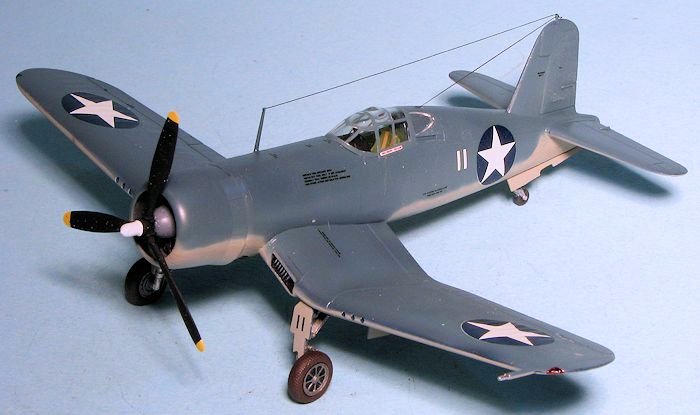
A land-based version for the USMC, without the folding wing capability, was built by Goodyear under the designation FG-1. In Fleet Air Arm service the F4U-1 was given the service name Corsair Mk I. Vought also built a single F4U-1 two-seat trainer; the Navy showed no interest.
| THE KIT |
For years the Hasegawa Corsair was the one to have. It was developed in the late 1970s or early 1980s and has raised panel lines. The cockpit is quite basic, consisting of a seat, floor, control stick and an instrument panel onto which one places a decal. The engine is a single molding that represents the front set of cylinders and slides into a single piece cowling.
 Wings have a complete lower section and two upper halves. Into
these fit radiator sections at the wing root. The wheel wells are molded into
the lower wing and aside from some horizontal lines, are pretty devoid of
detail. Same goes for the tail well. Tail gear is a single piece that includes
the tail hook and wheel. Main gear legs are separate from the main wheels and
there are no retraction struts.
Wings have a complete lower section and two upper halves. Into
these fit radiator sections at the wing root. The wheel wells are molded into
the lower wing and aside from some horizontal lines, are pretty devoid of
detail. Same goes for the tail well. Tail gear is a single piece that includes
the tail hook and wheel. Main gear legs are separate from the main wheels and
there are no retraction struts.
There are separate gear doors. Horizontal stabilizers are a single mold on each side. There is no underfuselage tank or other external ordnance as the -1 did not carry any. There is a three piece clear sprue that provides a one-piece windscreen/canopy and separate quarter windows. A one-piece non spinning prop finishes the kit bits.
Markings are for a single USMC aircraft with red surround insignia. Thankfully the red surround is separate as, typical of Scalemaster kit decals, the red has bled into the clear carrier. This allows one to model the plane prior to the painting of the red surround. The aircraft is remarkable in that it only carrier numbers, probably the last three of the serial number. My kit had no instructions.
| CONSTRUCTION |
The reason this was only a buck is that the previous
owner had painted the interior, installed it and closed up the fuselage halves.
I then installed the oil coolers and glued the wings together. I also painted
and  installed the engine in the cowling. Next the wings were attached to the
underside of the fuselage. This is probably the poorest fitting part of the
build and needed a bit of filler.
installed the engine in the cowling. Next the wings were attached to the
underside of the fuselage. This is probably the poorest fitting part of the
build and needed a bit of filler.
Next, the tailplanes were glued on, followed by the engine and cowling. For some reason, there was a tab on the upper fuselage that got in the way of the engine installation and that had to be cut off to get a good fit.
The next step was to attach the canopy. This was first masked and I had some difficulty with this as the frame lines are not easily discernible under Tamiya tape. Next time I'll use clear tape, though that has the issue of leaving behind glue that can be difficult to remove. The engine was masked and it was ready for paint.
| COLORS & MARKINGS |
These planes were painted blue-grey on the upper surfaces and a light grey
underside. Unfortunately for paint makers, there was not a strict standard as to
exactly what these shades might be, so you'll find
 many differences depending on
whose paint you use, though all are close. For this kit I used White Ensign
paints for both upper and lower shades. Research has shown the the inside of the
gear doors were often the exterior color so I painted both sides of the landing
gear door.
many differences depending on
whose paint you use, though all are close. For this kit I used White Ensign
paints for both upper and lower shades. Research has shown the the inside of the
gear doors were often the exterior color so I painted both sides of the landing
gear door.
There has been much written about a salmon shade for wheel wells and such. True, there was such a shade that seems to be a combination of standard yellow zinc chromate primer mixed with a bit of red lead primer and it was often found on airframe parts such as the framework under the canvas portion of the Corsair's wings. You will see some models with this shade painted in the wheel wells. However, the F4U-1 pulled from Lake Michigan a few years back, did not have this shade in the gear wells, but the external color instead. Whether this was a repaint or the factory shade is unknown. For a builder, this can be a quandary, but what it means to me is that you can paint it either shade. I was also not sure if the underside of the outer wings should be the upper camo color. While the Superscale instructions show the light grey underside, the next one I do (I've still got one scheme left on the sheet), I'll do with the underside of the outer wings in the blue-grey,
| FINAL CONSTRUCTION |
Once I had painted the airframe, I installed the landing gear.
The tail hook on mine had broken about half way up so that was glued back in
place prior to gluing on the tail gear assembly. I then attached the radio mast
and started on the gear doors . These are all butt fit and fit as well as you can
glue.
. These are all butt fit and fit as well as you can
glue.
For decals, I used one of the remaining two schemes on SuperScale 72-738. This sheet was reprinted without amendment later so should be relatively easy to find. Actually, I would have liked to have used something else, but figured it was a good way to help finish up a decal sheet. Despite their age, the decals went on well though the insignia are a teeny bit off register with a sliver of white showing up.
With the decals in place, there wasn't much else to add. The small quarter windows were attached, I also glued on the prop nd used EZ Line for the antenna. AK Interactive supplied the clear paint for the formation lights and the pastel soot on the underside for the exhaust. Last step was to remove the masking and that was it.
| CONCLUSIONS |
 Considering that I'm not a real fan of the F4U, I sure seem to
build quite a few. This is my third Hasegawa birdcage kit in this scale and I've built
the Tamiya 1/72 version as well. Things I did not do was to fill in the step in
the flap (this was not introduced until the F4U-4 though late production FG-1Ds
had it). I should have also installed a True Details resin cockpit, but
considering the price I paid for the kit, it would have been a bit much. While
the Tamiya kit has much nicer detail and a more complete cockpit, the Hasegawa
one can often be found really cheap, especially in Minicraft boxes and makes
into a nice model when done.
Considering that I'm not a real fan of the F4U, I sure seem to
build quite a few. This is my third Hasegawa birdcage kit in this scale and I've built
the Tamiya 1/72 version as well. Things I did not do was to fill in the step in
the flap (this was not introduced until the F4U-4 though late production FG-1Ds
had it). I should have also installed a True Details resin cockpit, but
considering the price I paid for the kit, it would have been a bit much. While
the Tamiya kit has much nicer detail and a more complete cockpit, the Hasegawa
one can often be found really cheap, especially in Minicraft boxes and makes
into a nice model when done.
| REFERENCES |
http://en.wikipedia.org/wiki/Vought_F4U_Corsair#F4U-1A
September 2014
Thanks to me for the review kit. Thanks to AK Interactive for the clear paint and pastel.
If you would like your product reviewed fairly and fairly quickly, please contact the editor or see other details in the Note to Contributors.