Anigrand 1/72 XB-28
| KIT #: | AA-2068 |
| PRICE: | $64.00 |
| DECALS: | One option |
| REVIEWER: | Scott Van Aken |
| NOTES: | Resin with vac canopy |
| HISTORY |
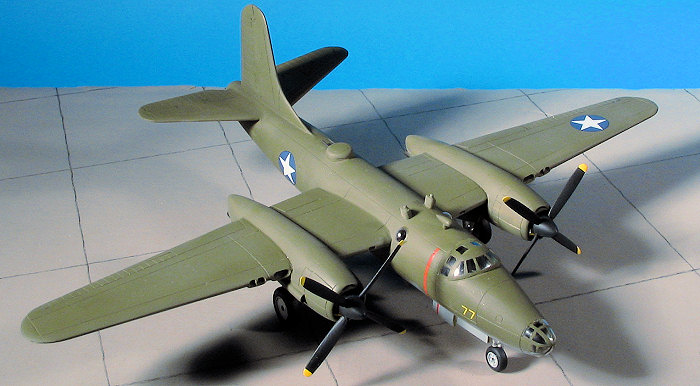
The USAAC was in need of a high altitude bomber to supplement the B-25 Mitchell and in response, North American aviation produced their model NA-63, later designated XB-28. The first of two test aircraft (40-3056) first few in April of 1942; twenty six months after the order was placed.
The XB-28 bore no similarity at all to the B-25 with a
circular fuselage and 'standard' empennage. Two P&W R-2800-27 engines
 with
superchargers, each developing 2,000 hp were installed, driving a four blade
prop. Each prop turned in opposite directions to reduce torque. Remote control
ventral and dorsal turrets were installed along with a tail turret, each
carrying twin .50 calibre machine guns. The gunners sat in the rear section of
the cockpit and sighted through periscopes.
with
superchargers, each developing 2,000 hp were installed, driving a four blade
prop. Each prop turned in opposite directions to reduce torque. Remote control
ventral and dorsal turrets were installed along with a tail turret, each
carrying twin .50 calibre machine guns. The gunners sat in the rear section of
the cockpit and sighted through periscopes.
A 4,000 pound bomb load was carried with the plane having a service ceiling of 34,600 feet. A top speed of 372 was attained, far above that of contemporary production aircraft. Normal cruise was 255 mph.
However, the USAAF had developed lower altitude bombing to such an art, that the need for a high altitude medium bomber disappeared and with it the need for the XB-28. However, high altitude reconnaissance was still needed and the second airframe (40-3058) was developed to this end. The nearing end of the war and conversion of existing types (like the B-29) made the aircraft redundant as well.
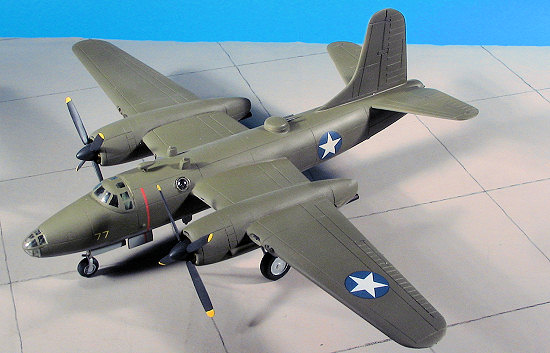
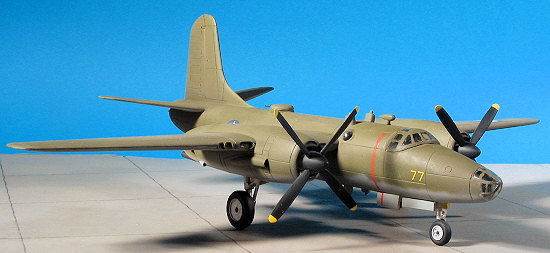
The prototype bomber was originally in unpainted metal with an OD nose anti-glare panel and red, white and blue striped rudder. Later photos show it still unpainted but with the rudder stripes removed, save for those on the trim tab. It was then painted in Olive Drab over Neutral Grey.
| THE KIT |
It
is difficult to not sound like a broken record when describing Anigrand kits,
but here goes anyway. Tan resin; nicely done but a bit large engraved detail;
Spartan cockpit with two seats, two control sticks and an instrument panel. A
bombardier's seat is also 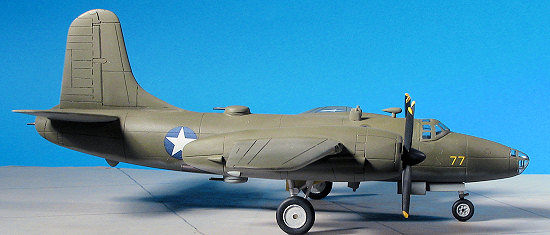 given. Care will be needed to provide enough weight
for this one to sit on all three gear. The area normally used for weights will
be visible through the nose transparency. There is space behind the cockpit, but
this locale will require more weight, putting additional strain on the resin
nose gear.
given. Care will be needed to provide enough weight
for this one to sit on all three gear. The area normally used for weights will
be visible through the nose transparency. There is space behind the cockpit, but
this locale will require more weight, putting additional strain on the resin
nose gear.
The main wheels are accurate for this aircraft as photos show a blank wheel cover. Photos show a blank wheel cover on the nose wheel, but the kit offering has circular slots. Wheel wells have the usual 'guesstimate' of what's there with a criss-cross of square braces. Engines are quite nicely done and give you a full forward bank and half rear bank. I am not sure if Anigrand took into account the opposite engine rotation with the prop blades or not as I didn't open the bag with the small bits as I inevitably lose or have broken these small bits when I do so. The markings guide shows them turning inboard so perhaps they did. Turrets are also well molded with slots for the guns. Resin blanks are provided and I suggest replacing them with tubing of some sort. The sighting periscopes are also give. All of the small parts seemed quite well molded with no molding faults. I'd again suggest that Anigrand think about doing seat harness decals and perhaps a generic instrument panel blank that we can cut to shape whatever kit we are doing. May not be accurate, but will add quite a bit to the look of the cockpit.
The major resin bits are also nicely done. In my ever
ongoing quest for glitches, I was able to find a few. Both wing tips suffer from
large air holes with a couple of smaller ones tossed in. I also found these on
the tips of the stabilizers and fin as well as at the back of the engine
nacelles. Fuselage halves were devoid of these, though the left half did have a
rather large 'pimple' of resin on the forward portion. These will all be easy to
repair. The flight surfaces are all provided with pins to fit into holes in the
fuselage. As often happens, some of these were either broken off or quite short.
Length is not a problem as long as something is there to help align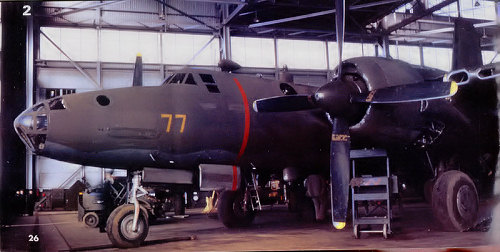 ment.
The broken ones can be replaced by drilling the area out and inserting a section
of rod.
ment.
The broken ones can be replaced by drilling the area out and inserting a section
of rod.
Instructions are the now 'new' version with the exploded view and parts listing on one side with the history and painting/decal guide on the other. A sheet of decals is provided for the insignia and the nose number (77). I could find no photos of this plane with this nose number nor with any serial number on the fin. During at least one time in its life, it carried de-icer boots on the leading edges of the flight surfaces.
Late entry: Thanks to a posting on the forum, I have a photo of the plane with the nose number and you can also tell which way the props turn. The instructions are misleading as to the direction in this regard.
| CONSTRUCTION |
On this one, I started with the engine nacelles. The
nicely detailed engines were painted aluminum and the inside of the engine
cowling and gear bays/doors were painted with yellow zinc chromate primer. I
used the small Testors enamel bottle for the latter and SnJ for the former.
Surprisingly, the fit was quite good though the large chunks taken out of the
upper cowling where the sprue gates were located meant some additional filler.
As a note, I generally use superglue to fill all the seams, followed by an
 application or two of Mr. Surfacer
500 to smooth things out. All the various air pockets that are so common in
these kits were filled with multiple applications of super glue followed
immediately by accelerator and sanding. These were generally found in the tips
of the flying surfaces and a few other places. It is pretty much standard
procedure with most resin kits.
application or two of Mr. Surfacer
500 to smooth things out. All the various air pockets that are so common in
these kits were filled with multiple applications of super glue followed
immediately by accelerator and sanding. These were generally found in the tips
of the flying surfaces and a few other places. It is pretty much standard
procedure with most resin kits.
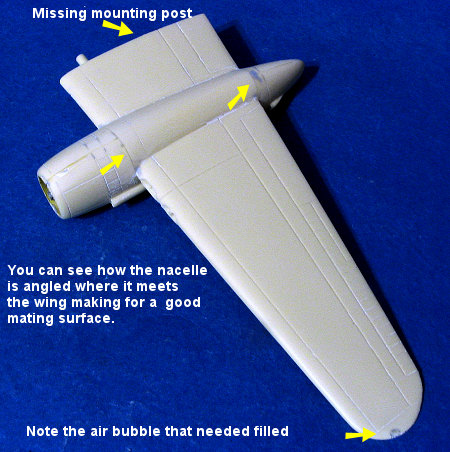 I
then cleaned up the wing and slid the engine nacelles in place. The nacelles
have an angle cut into them that allows a really good fit on the wing. Minimizes
the amount of filler and sanding needed. I should also mention that these
nacelles are handed and that feature means you can't put them on the wrong side.
I
then cleaned up the wing and slid the engine nacelles in place. The nacelles
have an angle cut into them that allows a really good fit on the wing. Minimizes
the amount of filler and sanding needed. I should also mention that these
nacelles are handed and that feature means you can't put them on the wrong side.
With the wings done, I went to work on the fuselage.
After its initial painting, I started filling the section behind the cockpit
with weight. Since there was no room in the nose for it, it took a considerable
amount more than what one would normally use. I started by first sticking in
just a few in each fuselage half. Then![]() I taped the halves together and taped on the tail planes to determine how much
weight was needed. I did that a few times to get the proper amount. I chose a
section in the middle of the wing attachment holes for my fulcrum when making
these measurements and it worked out well. I also glued in the seats and the
instrument panel at this time. I sure wish Anigrand would include at least decal
seat harnesses and some generic instruments. After scraping the paint from the
nose mating surfaces, I started to glue the fuselage halves together. I've found
it better to cement these things in sections and I start from the front. This
will allow a bit of adjustment with each section to get things as close to
properly aligned as possible. When I got to the tail, I found that one half was
a bit broader than the other so I aligned the tail gun holes and sanded down the
rest. After the fuselage was prepped, I continued on.
I taped the halves together and taped on the tail planes to determine how much
weight was needed. I did that a few times to get the proper amount. I chose a
section in the middle of the wing attachment holes for my fulcrum when making
these measurements and it worked out well. I also glued in the seats and the
instrument panel at this time. I sure wish Anigrand would include at least decal
seat harnesses and some generic instruments. After scraping the paint from the
nose mating surfaces, I started to glue the fuselage halves together. I've found
it better to cement these things in sections and I start from the front. This
will allow a bit of adjustment with each section to get things as close to
properly aligned as possible. When I got to the tail, I found that one half was
a bit broader than the other so I aligned the tail gun holes and sanded down the
rest. After the fuselage was prepped, I continued on.
 I
then glued on the fin. There is a little piece on the fuselage that I guess is
supposed to mate with the fin. It misses by about a 1/16th of an inch. Tail
planes were glued on at this time. They have about the same
I
then glued on the fin. There is a little piece on the fuselage that I guess is
supposed to mate with the fin. It misses by about a 1/16th of an inch. Tail
planes were glued on at this time. They have about the same
 dihedral as an A-20 and fit rather
well. I did use filler on these, but not that much. Then came the wings.
These fit very well and I'm finding that Anigrand seems to be taking more care
with providing alignment aids for the flying surfaces. Now, if they can only
keep the pins attached it would help. They seem to mostly be short shot rather
than broken as rarely do I find the pins adrift in the plastic bags. Either that
or they are broken when taking them out of the mold and the parts are bagged up
anyway. I now had a complete airframe and could work on the ancillary bits.
dihedral as an A-20 and fit rather
well. I did use filler on these, but not that much. Then came the wings.
These fit very well and I'm finding that Anigrand seems to be taking more care
with providing alignment aids for the flying surfaces. Now, if they can only
keep the pins attached it would help. They seem to mostly be short shot rather
than broken as rarely do I find the pins adrift in the plastic bags. Either that
or they are broken when taking them out of the mold and the parts are bagged up
anyway. I now had a complete airframe and could work on the ancillary bits.
I started with the canopy and nose transparency. To Anigrand's credit, they have now started molding small lips to the areas where the clear bits fit. This is a huge help in keeping them in place, especially for those of us who use white glue to attach them. I found this to be one of the more trouble free cutting/attaching sessions. Same cannot be said for masking them. I continue to rail against such difficult-to-see frame lines. I used clear Scotch tape on this one and still had trouble finding the frame lines. Other companies can provide either more distinct lines or those that are slightly raised. I don't know why Anigrand hasn't done so.
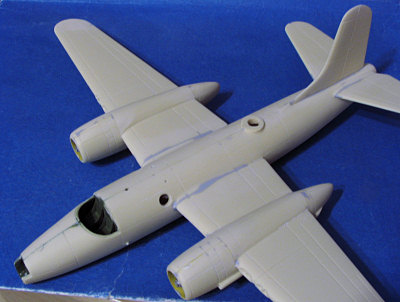
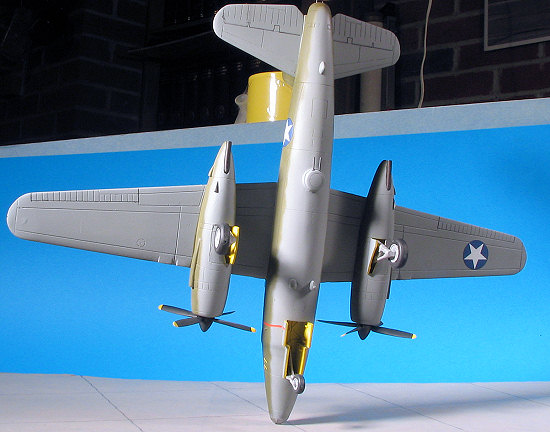
Once these were attached, I sprayed the canopies with Future (clear gloss acrylic). I did this as Scotch tape is notorious for allowing paint to leak under it. I felt that this might seal the edges, but won't know until the end of the build. I then attached the upper and lower turrets. The holes for them are drilled too far to the back of the mounts as you can see in the full airframe image, so I had to get out my grinder and start grinding away. After much dust and test fitting, the turrets, minus their gun barrels, were glued in place. I press fit the upper ADF antenna (which is too long and skinny) as well as the tail bumper. I then stuffed the engine nacelles with tissue and headed for the paint shop.
| COLORS & MARKINGS |
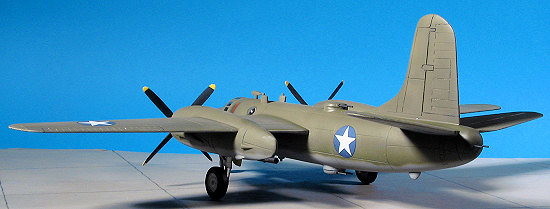
 How hard
can OD over Neutral Grey be? Not very hard, but there is masking involved as the
OD goes under the wing on the fuselage and nacelles so once the Neutral Grey was
applied and dry ( I used Testors Model Master enamels for both these colors), it
was masked and the OD sprayed. I did the detail lines with my Skybow AB 100 air
brush as it gives superbly fine lines. Since the markings are so few, I only
applied Future to the areas where the decals would be applied.
How hard
can OD over Neutral Grey be? Not very hard, but there is masking involved as the
OD goes under the wing on the fuselage and nacelles so once the Neutral Grey was
applied and dry ( I used Testors Model Master enamels for both these colors), it
was masked and the OD sprayed. I did the detail lines with my Skybow AB 100 air
brush as it gives superbly fine lines. Since the markings are so few, I only
applied Future to the areas where the decals would be applied.
Back at the bench, I glued in the landing gear. Be careful of the instructions as they show the main wheels on the inside when they should be on the outside. With the gear in place, I glued on the wheels and then applied the decals. This time, I put a puddle of Solvaset down, set the decal in it and applied another dose of Solvaset. This seemed to work a lot better than previous attempts and getting the markings to snuggle down, though they didn't go all the way.
| FINAL CONSTRUCTION |
I did the props at this time. The instructions don't take into consideration the fact that the props spin in opposite directions. Something that is obvious when looking at the photo. Neither do the parts included with the kit as all the prop blades are angled for only one direction. Though I build up my blades to spin in opposite directions, one looks decidedly odd. The instructions also don't tell you how to attach the open gear door pieces. While the nose ones are easy to decipher, this is not the case for the main gear doors, which have three sections. Looking at a number of XB-28 photos in my references, none of which clearly show the main gear doors, it was apparent that only the inner triangular door was open while the rest were closed. This made sense as it is like that on the B-25.
 Anigrand
needs to show us these things as not everyone has a reference library. It would
take only an additional drawing to show the proper disposition of the gear doors
when open. I'm thinking that this, along with the blade deal, wrong wheels and
all, may well be due to a lack of complete research. It is sincerely hoped that
this will be an area in which improvement will be shown in future projects.
Anigrand
needs to show us these things as not everyone has a reference library. It would
take only an additional drawing to show the proper disposition of the gear doors
when open. I'm thinking that this, along with the blade deal, wrong wheels and
all, may well be due to a lack of complete research. It is sincerely hoped that
this will be an area in which improvement will be shown in future projects.
For the gun barrels I passed on the resin pieces (of which there were only five instead of six) and used stainless steel tubing, which looks MUCH better. I also sanded down the small observation blisters to attach a bit later. I was still hunting for a red prop warning stripe, and thanks to my friend Drew, I was able to complete this needed bit. I have to tell you, stripe decals are not easy to find. I used Woodland Scenics dry transfers rubbed onto clear decal paper. I then coated the stripes with clear acrylic gloss paint to keep them from breaking apart. It didn't work 100% as each stripe on the model is actually about six or seven small segments.
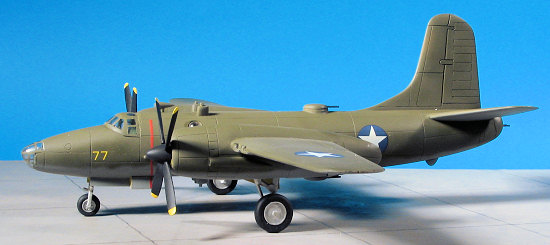 I then
glued on the props (it looks as if the blades are a bit long, but I didn't glue
them perpendicular so can't really be sure) and gave the model a couple of coats
of matte clear. The small blisters were glued in place with clear paint. I then
started to remove the canopy masking. This started a long and drawn out affair
and reinforced why I no longer use clear tape for this. The tape refused to
remove itself cleanly. It came off in chunks and left a lot of residue. It also
pulled up surrounding paint and eventually pulled the clear bits from the model
itself. After cleaning up things as much as I could, I reattached the clear bits
and then hand painted most of the frames where the paint had been removed.
Clearly, I'll not use Scotch tape again and would recommend you find something
different as well.
I then
glued on the props (it looks as if the blades are a bit long, but I didn't glue
them perpendicular so can't really be sure) and gave the model a couple of coats
of matte clear. The small blisters were glued in place with clear paint. I then
started to remove the canopy masking. This started a long and drawn out affair
and reinforced why I no longer use clear tape for this. The tape refused to
remove itself cleanly. It came off in chunks and left a lot of residue. It also
pulled up surrounding paint and eventually pulled the clear bits from the model
itself. After cleaning up things as much as I could, I reattached the clear bits
and then hand painted most of the frames where the paint had been removed.
Clearly, I'll not use Scotch tape again and would recommend you find something
different as well.
| CONCLUSIONS |
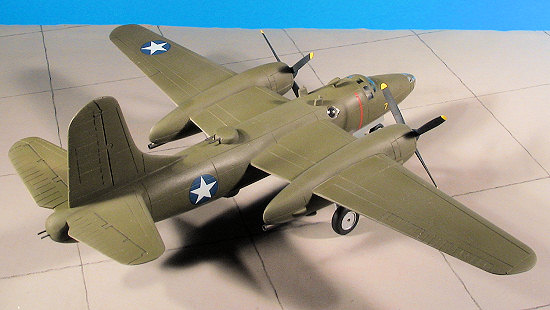
Once again, Anigrand has provided us with a superb kit of a most interesting aircraft. It wasn't a 'shake and bake' as none of these are. However, they do build into reasonable replicas of the type and will make for a superb display of interesting types on your shelf. What's more, they are all generally basic kits so are such that those without a lot of short run resin kit experience will be able to make into a very nice model.
| REFERENCES |
US Bombers: B-1 to B-70. Lloyd S. Jones, 1962, Aero Publishers
January 2007
#1449 in a series
Copyright ModelingMadness.com. All rights reserved. If you would like your product reviewed fairly and fairly quickly, please contact the editor or see other details in the
Note to
Contributors.