| KIT #: | 16 |
| PRICE: | $11.00 from a vendor at 20% off. Your price will vary |
| DECALS: | Six + options |
| REVIEWER: | Scott Van Aken |
| NOTES: | 2 kits in a box |
| HISTORY |
Have the average person on the street name WWII
fighters and if they come up with anything, odds are (at least in the US) that
it will be the Mustang. Unlike many other aircraft of that era, there are
probably more Mustangs flying than most others put together.
 They are all over
the place and you can hardly go to an air show in the US without seeing one.
They are all over
the place and you can hardly go to an air show in the US without seeing one.
The USAAF was not hot on the idea of the Mustang. For one thing, it wasn't designed for the USAAF and that alone was enough for just about all of those whose job it was to provide aircraft for the war effort to bypass. The British, however, loved the early P-51 and couldn't get enough of them. They were fast, they were well armed and as long as one stayed below 15,000 feet, it could best whatever came up against it. When the British added the Merlin to give high altitude performance, the plane was perfect. This was also noticed by many USAAF pilots who were trying to make the short ranged P-47 into a long range escort fighter.
After much politicking and going over the heads of many generals to the head honchos, the decision was finally made to start producing the Merlin Mustang for the USAAF and the rest is history.
| THE KIT |
This is Sweet's first Mustang kit. As with all their kits, the designers of the kit are rather anal about getting everything as right as they possibly can. These folks do their research and the results are always the best kits available in their scale of choice, which happens to be 1/144. Their previous kits are superlative and so is this one.
While there are not a ton of parts, you do get options.
One is the ability to have a Malcolm hood and as that part of the sprue is
marked 'Mustang III', we can pretty well be assured that these molds are only
beginning to be used. Other boxings are on the way
 for sure. The other option is
in the choice of drop tanks. Either the little 'peanut' aluminum ones or the 108
gallon paper tanks. No bombs for this one. even the drop tank racks are separate. Another option is for shrouded exhaust or not. The painting guide tells
us which one to use. The kit also includes a seat, a first for Sweet, I
believe. Like the
separate radio gear, it is a bit generic, but it is great that it is included.
Wheels, struts and doors are well done with the tail wheel doors molded in
position. Oh yes, you also have optional radio masts!
for sure. The other option is
in the choice of drop tanks. Either the little 'peanut' aluminum ones or the 108
gallon paper tanks. No bombs for this one. even the drop tank racks are separate. Another option is for shrouded exhaust or not. The painting guide tells
us which one to use. The kit also includes a seat, a first for Sweet, I
believe. Like the
separate radio gear, it is a bit generic, but it is great that it is included.
Wheels, struts and doors are well done with the tail wheel doors molded in
position. Oh yes, you also have optional radio masts!
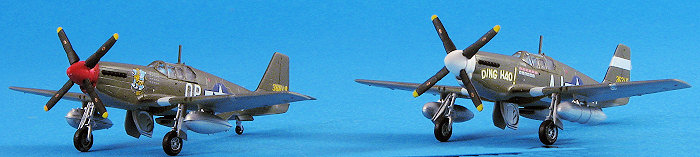
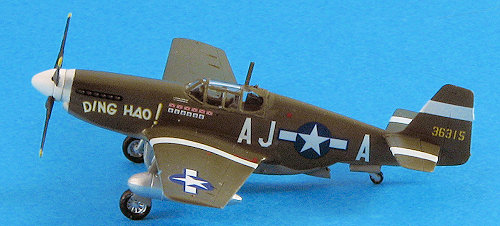
Always a highlight with Sweet are the markings provided. You get six different aircraft with some having multiple choices in how to paint the plane depending on the time frame.
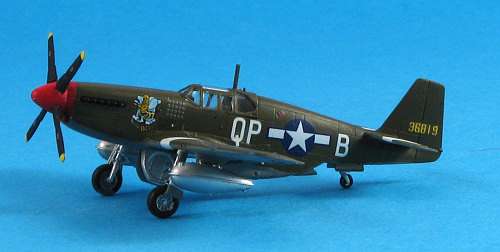
Three are with the Malcolm Hood and that includes the three aircraft from different squadrons of the 354th FG. One of these is 'Ding Hao' of the 356 FS and that aircraft has three choices of how to portray the markings. The 355 FS is represented by 'Killer' and the 353rd by what looks like 'Rosey II'. Don Gentile's plane from the 334 FS/4 FG is another featured with two ways to show that. Along with it is Duane Beeson's aircraft and finally a presentation plane from the workers at Packard.
Decals are well done and one has enough insignia, white bands and such to do any two aircraft. There are also two Malcom Hood and two standard canopies so all bases are covered.
| CONSTRUCTION |
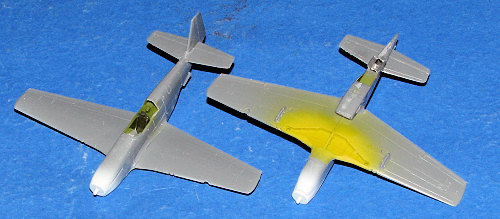
I started on this one by first spraying the interior
with US Interior Green. This included the seat. I also sprayed the bits that
were to be aluminum such as wheels, inside gear doors, and landing gear. The
wheel wells were sprayed chromate yellow and I gave
 some parts, like the
underside of much of the wing, and the outer gear doors a coat of Neutral Grey.
The radio box and props were painted matte black. I did all this painting first
as I knew it would be easier to do than to wait until the bits were off the
sprue.
some parts, like the
underside of much of the wing, and the outer gear doors a coat of Neutral Grey.
The radio box and props were painted matte black. I did all this painting first
as I knew it would be easier to do than to wait until the bits were off the
sprue.
You see, as others have mentioned, when working in 1/144, you can really only spray paint so much. There will be a time when one does have to resort to the paint brush to handle many of the small things that on a larger kit would be airbrushed.
I then started in with the cement. The fuselage halves were glued together, trapping the prop shaft between them. I glued in the seat and left the radio as it could be added in later. I am not one who has built many (if any) kits where I "did not use filler anywhere". I think those people are just fooling us. I did use filler on all the major joins. When the fuselage was dry and sanded (BTW, don't get too nuts with sanding as the plastic is a bit soft). I attached the tail planes. These fit without fuss and are keyed so you don't have to worry about getting them on the wrong side.
 I then went to attach the wing. This one-piece casting
seemed to fit fairly well, though did need some work around the front. I left it
all to dry. When I returned the next day, a step had mysteriously appeared on
the right wing/fuselage join of both kits. After severely interrogating the
usual suspects (my cats maintained their innocence even when threatened with
fish), I had no choice but to use more filler to fix what I could. While that
was drying, I sprayed the nose of each with Floquil Reefer white.
I then went to attach the wing. This one-piece casting
seemed to fit fairly well, though did need some work around the front. I left it
all to dry. When I returned the next day, a step had mysteriously appeared on
the right wing/fuselage join of both kits. After severely interrogating the
usual suspects (my cats maintained their innocence even when threatened with
fish), I had no choice but to use more filler to fix what I could. While that
was drying, I sprayed the nose of each with Floquil Reefer white.
Meanwhile, I assembled one set of each drop tank style and added the small lower scoop lip (which, like every Mustang kit I've built, fit rather poorly; as in a bit too large). Then I looked at things and made a fateful decision. I would mask one canopy and hand paint the other. I glued the canopies in place. Neither of them wanted to fit well on the bottom left rear. Even clamping did not provide the tight fit I wanted. Obviously, I needed to trim things more. I also stupidly did not mask the one canopy until it was already on the kit. Note to self: ALWAYS mask the canopy off the airframe when you can. I then slapped a properly sized piece of tape over the other canopy and headed for some major painting.
| COLORS & MARKINGS |
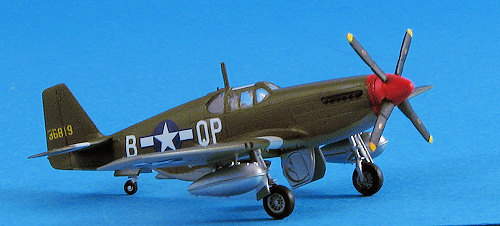 With the white nose masked as best I could. I painted
the underside with Neutral Grey, then masked the tailplanes and painted the
upper surface with Olive Drab, using Testors Model Master enamels. With that
done, I brush painted the demarcation line between the upper and lower colors.
On one of the planes, the white band was revealed, a bit more masking was done
and the nose painted red. During this, I also painted both spinner halves white
and one of them was then painted red.
With the white nose masked as best I could. I painted
the underside with Neutral Grey, then masked the tailplanes and painted the
upper surface with Olive Drab, using Testors Model Master enamels. With that
done, I brush painted the demarcation line between the upper and lower colors.
On one of the planes, the white band was revealed, a bit more masking was done
and the nose painted red. During this, I also painted both spinner halves white
and one of them was then painted red.
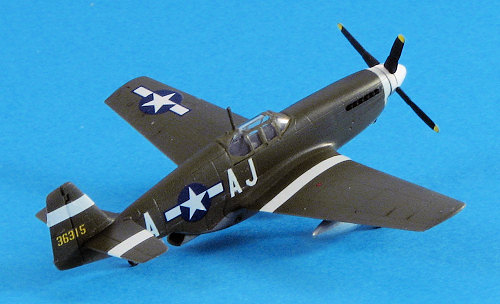
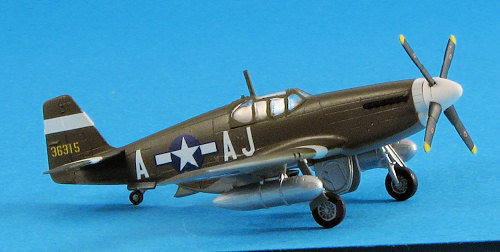
Returning to the work bench, the tires were painted black and the tail strut glued in place. Fit is a bit loose. I glued the main wheels to the landing gear and later glued those in. Again, a bit of a loose fit. Now that it was on its gear, I gave them a gloss acrylic clear coat in preparation for the decals. The decals are superbly printed by Cartograf and gave no problems in application. I did find the stripe decals to be a bit oversized, but that isn't really a concern as one simply cuts off the excess. Some of the data markings like the prop and fuel filler ones are decidedly tiny so some may not want to use them. As you can see, I used two of the more popular markings for these
| FINAL CONSTRUCTION |
With the decals in place, I attached the other bits.
First the exhaust. Nearly all the options have the unshrouded versions. Of
course, I should have drilled them out for more accuracy, but decided not to. I
also attached the inner gear doors in the down
 position. The instructions
would have you put them closed. The outer gear doors were a bit more work. You
see, they are quite thick and the lower gear mounting tab (the one closest to
the wing), makes them jut out at an unrealistic level. On one kit I used
superglue to hold them closer to the main gear, while on the other I simply cut
them off.
position. The instructions
would have you put them closed. The outer gear doors were a bit more work. You
see, they are quite thick and the lower gear mounting tab (the one closest to
the wing), makes them jut out at an unrealistic level. On one kit I used
superglue to hold them closer to the main gear, while on the other I simply cut
them off.
I removed the masking from the two canopies. The one where I had actually cut the tape to match the clear bits turned out fairly well. On the other I hand painted the frame lines and it was a mess. Took a lot of additional scraping with sharpened toothpicks to get something even remotely nice. The square tip radio mast seems to be appropriate for all the options so that is the one used.
I assembled the props and had to drill out the mounting hole and glue them in place. The blades are quite fragile and I was worried that one would break, but seem to have had some good luck for a change. The landing light lens was attached with clear paint and fits quite well. I'm also glad they provided some spares as I lost one when handling it. I then glued on the drop tanks, did a bit of touch-up painting and that was it.
| CONCLUSIONS |
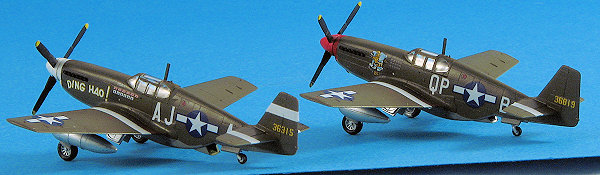 These
kits were both completed within a one week period of time, which for me is speed
building. They do require some care in construction, and not all can handle the
small parts. However, the end result is truly remarkable for such a small model.
Sweet kits are definitely addictive and if you have not tried one, you are in
for a real treat.
These
kits were both completed within a one week period of time, which for me is speed
building. They do require some care in construction, and not all can handle the
small parts. However, the end result is truly remarkable for such a small model.
Sweet kits are definitely addictive and if you have not tried one, you are in
for a real treat.
June 2007
#1473 in a series
Copyright ModelingMadness.com. All rights reserved. No reproduction in part or in whole without express permission from the editor.
If you would like your product reviewed fairly and fairly quickly, please contact the editor or see other details in the Note to Contributors.