Monogram 1/48 P-39 Airacobra
| KIT #: | 6903 |
| PRICE: | $a few dollars |
| DECALS: | One option |
| REVIEWER: | Scott Van Aken |
| NOTES: |
| HISTORY |
The
Bell P-39 Airacobra was one of the principal American fighter
aircraft in service when the United States entered World War II. The P-39 was
used with great success by the Soviet Air Force, which
 scored the highest number
of individual kills attributed to any U.S. fighter type. Other major users of
the type included the Free French, the Royal Air Force, the USAAC/F and the Italian Co-Belligerent Air Force.
scored the highest number
of individual kills attributed to any U.S. fighter type. Other major users of
the type included the Free French, the Royal Air Force, the USAAC/F and the Italian Co-Belligerent Air Force.
Designed by Bell Aircraft, it had an innovative layout, with the engine installed in the center fuselage, behind the pilot, and driving a tractor propeller via a long shaft. It was also the first fighter fitted with a tricycle undercarriage. Although its mid-engine placement was innovative, the P-39 design was handicapped by the absence of an efficient turbo-supercharger, limiting it to low-altitude work. As such it was rejected by the RAF for use over western Europe and passed over to the USSR where performance at high altitude was less important.
Together with the derivative P-63 Kingcobra, the P-39 was one of the most successful fixed-wing aircraft manufactured by Bell.
| THE KIT |
Some state that this kit was Monogram's first 'serious' kit. That means it was not full of operating features. That would make the molds from 1966 or so, the same basic time as their P-47. The kit is all raised detail aside from control surfaces and doors. It has all that nice Monogram detail that we have come to expect from their kits.
This one has a full nose armament bay for the 37mm cannon along with its ammunition. Also included are the two nose machine guns. The platform on which the gun fits is also the floor of the cockpit so one builds up the cockpit on this platform. The cockpit has an instrument panel, seat, rear framework, and armored glass. There is a control stick with the rudder pedals molded on the floor section. There is belt detail on the seat and a pilot figure is provided.
 Other optional bits are the ability to have the right side door open as it is
separate. You can also have the engine cover on that side left open as well.
Both six and twelve stack exhaust are provided for the engine. The nose gear
well is on the underside of the cockpit floor section . Landing gear is nicely
molded with two piece wheels. There is a separate right fork piece for the nose
gear.
Other optional bits are the ability to have the right side door open as it is
separate. You can also have the engine cover on that side left open as well.
Both six and twelve stack exhaust are provided for the engine. The nose gear
well is on the underside of the cockpit floor section . Landing gear is nicely
molded with two piece wheels. There is a separate right fork piece for the nose
gear.
Wings are a single lower section with two upper halves. Wing guns need to be installed prior to gluing the wings together. One piece tailplanes are provided. For tings under wings, a drop tank or bomb is in the kit. The prop snaps onto the prop shaft that is molded onto the right fuselage half and the spinner is then glued to the prop hub.
Instructions are quite nicely done and the markings are provided for a single plane in RAF equivalent camouflage. This one is from a training outfit as Identified by the large Z-38 on the nose. Decals are fairly well done and very thick. One should consider replacing them. All color information is generic.
| CONSTRUCTION |
Every once in a while I find a kit that has been started and offered for a couple of dollars. After going through it and checking to see if all the major bits are there, I take it home. This one had no box, but did have instructions and decals.
The previous owner had already glued the wings together without bothering to
install the wing gun barrels. The fuselage halves were also glued together with
most of the interior already assembled, save for the seat, control stick,
instrument panel and armored glass. Apparently he filled the nose with weight
and cemented the nose gun door in place. He also cemented on the 6
 stack exhaust
and cemented the access panels on the right side. The nose prop shaft had been
broken away and lost. Some sanding had already been done.
stack exhaust
and cemented the access panels on the right side. The nose prop shaft had been
broken away and lost. Some sanding had already been done.
I figured for $2 or so, I couldn't go wrong and there was not anything that could not be fixed. My first work was to fill seams and do more sanding. I then attached the wing and tailplanes. The aft wing-fuselage join is not all that good and needed filler. I then finished painting and installing the interior bits. I did notice that the molded on seat harness seems to be a Sutton harness, a logical inclusion for the P-400s which were destined to be sent to the UK, but probably not correct for any standard USAAC/F Airacobra.
I also added a bit more weight behind the instrument panel as it seemed to me that it was needed. Hopefully more will not be required, though I have a pretty large nose gear well to use. I then masked the clear bits. Some of the frames were rather difficult to see under the Tamiya tape. These were then attached and the separate door glued on in the closed position. At this time, it seemed like paint was in order.
| COLORS & MARKINGS |
When I started painting, I still wasn't sure what markings I'd use, but I did
know they would be standard OD over Neutral Grey so used Testors enamels for
those shades. I then installed the landing gear. I can see why the original
builder gave up on the kit as the nose gear needs to be installed before
cementing the fuselage halves together. I ended up cutting off just about all of
the mounting pegs on the nose gear, getting it in place and then flooding the
areas in the nose gear well with super glue. This provided the firm mounting
needed. I also painted the landing gear and gear wells with FS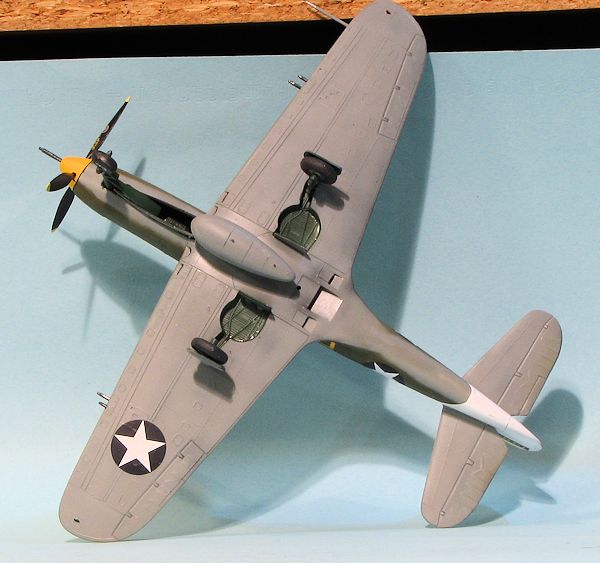 34092, a rather
darkish green in an attempt to replicate Bell's primer. You will see models with
the gear painted silver and this is apparently not correct. In fact, from what
I've read in the past year or so, many WWII US plane's landing gear was not
unpainted, with a light grey being the most popular.
34092, a rather
darkish green in an attempt to replicate Bell's primer. You will see models with
the gear painted silver and this is apparently not correct. In fact, from what
I've read in the past year or so, many WWII US plane's landing gear was not
unpainted, with a light grey being the most popular.
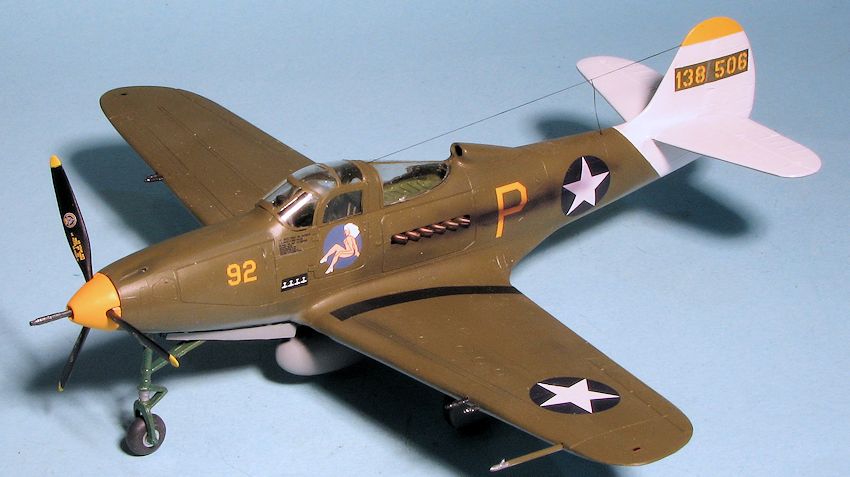
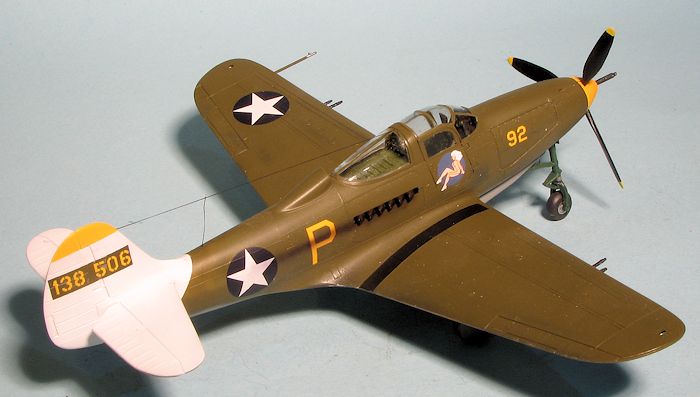
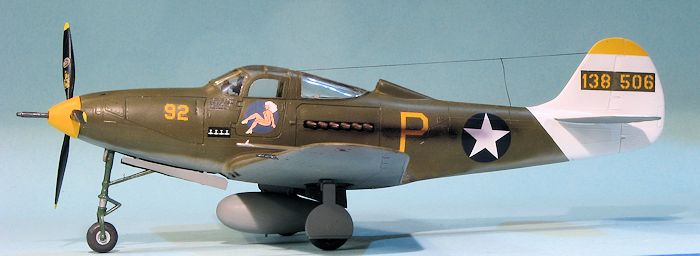
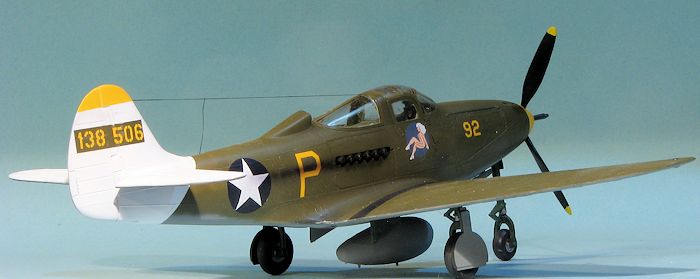
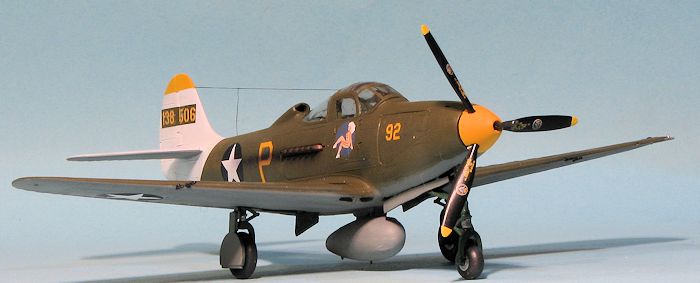
While searching for markings, I was only able to come up with one option for a P-39D out of seven decal sheets (three of which were the over-used 'Airacutie'. This was Cutting Edge 48-593 'Airacobras at War part 1' which had markings for a P-39D with the 41st FS/35th FG based at Port Moresby in early/mid 1943. This plane had the standard white tail of that theater of operations so I masked off the underside of the horizontal stabilizers and painted the fin, upper tailplanes and spinner with white. This scheme will require you to mask a section of the fin for the serial, which was not painted over in white. Doing this is actually quite simple. Take 6mm Tamiya tape, set it over the decal sheet's serial while the sheet is still in its plastic bag and then trim to size. An alternate way is to set the decal sheet under glass or clear plastic and do the same thing, the benefit of the harder material is that you can cut the tape while it is in place on the plastic/glass.
After doing the painting required, the decals were slowly applied. It generally takes me several days to apply decals, even when there are not too many. Note that the wing and fuselage insignia decals are different sizes with the smaller ones going on the fuselage. I did not apply any stencils on this one, saving those for when I do another Eduard kit. I had forgotten to paint a black rectangle for the score tally so used some black decal for that.
| FINAL BITS |
 With the decals
in place, I started adding other bits like the wheels and gear doors. I also
stuck another weight in the nose gear well as the kit was still a borderline
tail sitter and the additional weight helped. The broken off nose cannon was
reattached and I built up the prop and hub. Wing guns and cannon were painted
Tamiya's gunmetal and the pitot tube installed. I then attached the prop along
with the drop tank and painted the exhaust using Vallejo's Tinny Tin. At this
point the airframe was given a clear matte coat.
With the decals
in place, I started adding other bits like the wheels and gear doors. I also
stuck another weight in the nose gear well as the kit was still a borderline
tail sitter and the additional weight helped. The broken off nose cannon was
reattached and I built up the prop and hub. Wing guns and cannon were painted
Tamiya's gunmetal and the pitot tube installed. I then attached the prop along
with the drop tank and painted the exhaust using Vallejo's Tinny Tin. At this
point the airframe was given a clear matte coat.
I then sprayed on some exhaust staining using Alclad II's smoke. The wing tip lights were painted with AK Interactive's clear red and green. Then the masking was removed and an antenna was made using EZ-Line.
| CONCLUSIONS |
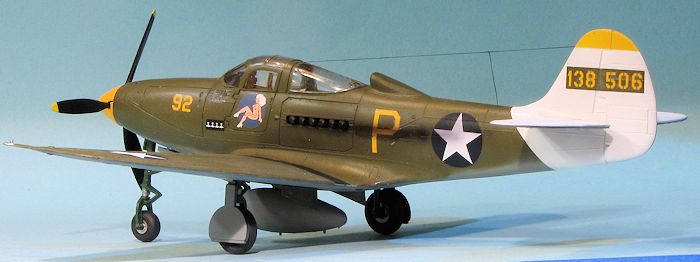 Aside from the
aftermarket decals, this one was built straight from the box. The build was not
made any easier by the previous owner's goof-ups, but the end result is
definitely pleasing. If you are looking for an inexpensive alternative to the
Eduard kit (these can frequently be found on vendor's tables at shows for very
little) and don't mind that it is pretty much a P-39D or P-400, then this is a
kit you should consider. Despite its advanced age, it looks very nice when you
finish.
Aside from the
aftermarket decals, this one was built straight from the box. The build was not
made any easier by the previous owner's goof-ups, but the end result is
definitely pleasing. If you are looking for an inexpensive alternative to the
Eduard kit (these can frequently be found on vendor's tables at shows for very
little) and don't mind that it is pretty much a P-39D or P-400, then this is a
kit you should consider. Despite its advanced age, it looks very nice when you
finish.
| REFERENCES |
http://en.wikipedia.org/wiki/Bell_P-39_Airacobra
January 2015 Thanks to me for the review kit.
Copyright ModelingMadness.com. All rights reserved. No reproduction in part or in whole without express permission from the editor. If you would like your product reviewed fairly and fairly quickly, please
contact
the editor or see other details in the
Note to
Contributors.