
| KIT #: | CP4815 |
| PRICE: | $38.00 delivered |
| DECALS: | Two options |
| REVIEWER: | Scott Van Aken |
| NOTES: |
| HISTORY |
 The XPQ-14 was first flown in 1942 and began to be received in training
units shortly after. The aircraft was flown unmanned, controlled by radio, but
was flown by a pilot for ferry flights, using a rudimentary control panel
installed for that purpose and using their parachutes as a seat. Docile and easy
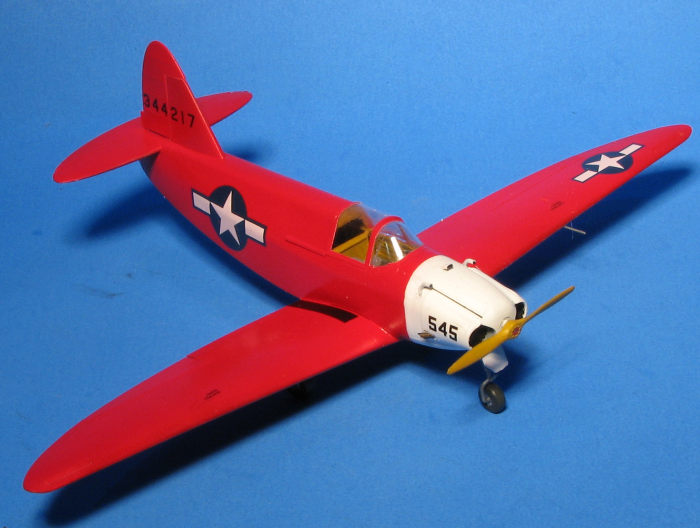
to fly, the aircraft was finished in a bright red target color scheme although
operationally, a silver or red finish was applied. Without a pilot they were
flown from a "mother ship" aircraft. The typical mother ship was a Beech C-45.
Despite their short lifespan, the aircraft performed well and the Franklin
engine was considered "trouble-free". Most of the Culver target aircraft were
"blasted out of the sky" by Army anti-aircraft gunners but a dozen or more
survived and were surplused after 1950. Flown as a recreational aircraft, their
new owners found that the aircraft had a sprightly performance. Several of the
nearly 2,000 aircraft built are still extant either in museums or flying.
The XPQ-14 was first flown in 1942 and began to be received in training
units shortly after. The aircraft was flown unmanned, controlled by radio, but
was flown by a pilot for ferry flights, using a rudimentary control panel
installed for that purpose and using their parachutes as a seat. Docile and easy
to fly, the aircraft was finished in a bright red target color scheme although
operationally, a silver or red finish was applied. Without a pilot they were
flown from a "mother ship" aircraft. The typical mother ship was a Beech C-45.
Despite their short lifespan, the aircraft performed well and the Franklin
engine was considered "trouble-free". Most of the Culver target aircraft were
"blasted out of the sky" by Army anti-aircraft gunners but a dozen or more
survived and were surplused after 1950. Flown as a recreational aircraft, their
new owners found that the aircraft had a sprightly performance. Several of the
nearly 2,000 aircraft built are still extant either in museums or flying.
| THE KIT |
 The parts count on this one is not all that high, but there are enough small
bits to satisfy detail enthusiasts. The interior is where most of the
smaller pieces are used and that includes a floor, seat control stick
assembly, rudder pedals as well as the nose gear well and the framework.
Once built up, the area forward of the cockpit seems to be large enough to
hold the 8 grams of weight needed to keep it from tail sitting. There is
sidewall detail and the kit comes with decals for the instrument panel.
The parts count on this one is not all that high, but there are enough small
bits to satisfy detail enthusiasts. The interior is where most of the
smaller pieces are used and that includes a floor, seat control stick
assembly, rudder pedals as well as the nose gear well and the framework.
Once built up, the area forward of the cockpit seems to be large enough to
hold the 8 grams of weight needed to keep it from tail sitting. There is
sidewall detail and the kit comes with decals for the instrument panel.| CONSTRUCTION |
 On this one, you pretty well have to start with the interior. Assembly of this
area isn't difficult, but one has to be very careful when removing parts from
the sprue as some of the parts are very scale and so can possibly cause you to
break them when either removing them from the sprue or removing the sprue stubs.
The delicacy of some parts makes me wonder if they will be strong enough, and by
that I mean the landing gear.
On this one, you pretty well have to start with the interior. Assembly of this
area isn't difficult, but one has to be very careful when removing parts from
the sprue as some of the parts are very scale and so can possibly cause you to
break them when either removing them from the sprue or removing the sprue stubs.
The delicacy of some parts makes me wonder if they will be strong enough, and by
that I mean the landing gear.
While constructing the cockpit went without any real issues, getting the engine bay/nose gear well was very fiddly. Eventually that was all sorted out. Then the various bits that fit into the fuselage were installed. One has to be careful not to install some of the rear shelves backwards or you'll never get the fuselage halves to join. The instructions state that 8 ounces will be needed in the nose to keep it on the nose gear. Good luck with that unless you are using something like depleted uranium.
Eventually, I was able to get all the interior bits in and get the fuselage halves closed. I packed as much lead in the area above the nose gear well as I could, but in the end it was not enough. The wings were assembled and the tailplane attached along with the lower fuselage piece. It was nice that this latter piece was separate as it provided me with the opportunity to position bits in the fuselage so that things fit well.
Then the wings were attached, followed by the cowling bits. Next I filled the gear wells with Silly Putty and attached the clear parts, which had been masked. This was a good time for the paint shop.
| COLORS & MARKINGS |
 I first sprayed everything with Tamiya flat white so I got good coverage for the
red. Next, the nose was masked off and the rest of the airframe painted using
Tamiya red. Once dry, it was clear coated and it was time to get it on its gear.
I first sprayed everything with Tamiya flat white so I got good coverage for the
red. Next, the nose was masked off and the rest of the airframe painted using
Tamiya red. Once dry, it was clear coated and it was time to get it on its gear.
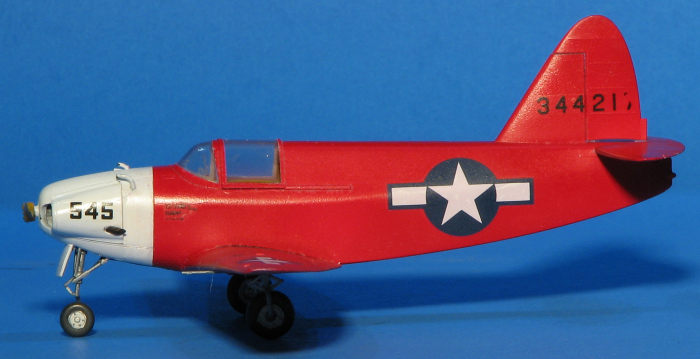
The gear legs are very scale and are really on the borderline of being able to hold up the rest of the model. In fact, the main gear deformed once the wheels were installed. This is a case where either metal gear or more robust plastic ones would be preferred even if overscale. Next were the decals. These are very thin and easily torn. Once folded over, they are very difficult to straighten out. Eventually, I got them all on.
Last items to add were the pitot tube and the prop. The clear bits were unmasked and since I was unable to get enough weight behind the engine, I filled the nose gear well and that was enough to get it to stand on its landing gear; barely.
| CONCLUSIONS |
As with other Clear Prop kits, this one needs to be treated as a short run kits in terms of fit twice, glue once. Doing so will save some headaches. The lack of really positive attachment spots for some of the parts means you have to be quite careful when building this one. However, your efforts are rewarded with an interesting subject that will look quite nice on your display shelve.
| REFERENCES |
https://en.wikipedia.org/wiki/Culver_PQ-14_Cadet
11 October 2024
Copyright ModelingMadness.com. All rights reserved. No reproduction in part or in whole without express permission from the editor.
If you would like your product reviewed fairly and quickly, please contact the editor or see other details in the Note to Contributors.