Hobby Boss 1/48 P-47D Thunderbolt
| KIT #: | 85804 |
| PRICE: | $22.99 SRP |
| DECALS: | Two Options |
| REVIEWER: | Scott Van Aken |
| NOTES: | New tool 'Easy Assembly' kit. |
| HISTORY |
 The P-47 was the most produced
American fighter of World War II. It could literally obliterate targets
with its eight .50 machine guns and, something remarkable, was the mount of the
US top scorer in Europe, the late Francis Gabreski.
The P-47 was the most produced
American fighter of World War II. It could literally obliterate targets
with its eight .50 machine guns and, something remarkable, was the mount of the
US top scorer in Europe, the late Francis Gabreski.
The Thunderbolt followed a similar route to the P-51, having first been produced with a razorback, but it acquired a bubble canopy from the block 25 of the ‘D’ version and kept it. It served in the Pacific as well, giving valuable ground support to the troops fighting in the jungle and it eventually flew right into the sixties in South America; nowadays, you can still hear its big Pratt & Whitney R-2800 growl at air shows.
| THE KIT |
Hobby Boss started in the kit business by doing easy to assemble 1/72 kits. I am sure that many of us have built and enjoyed these kits. Now it is time to look at 1/48 for these types of kits. The first one I have seen is this P-47D Thunderbolt. As you would expect, all of the mounting tabs are quite large and I am sure that most if not all the kit can be assembled with no or minimal glue.
 Starting with the cockpit,
there is a nicely done interior that has a seat, instrument panel with gunsight,
control stick and a set of head armor that fits into a tub. There is a decal to
fit over the instrument blanks on the instrument panel. A tail wheel well with
gear snaps into place and before you put together the fuselage halves, you need
to insert some exhaust flaps in the front and the turbo face in the aft
fuselage.
Starting with the cockpit,
there is a nicely done interior that has a seat, instrument panel with gunsight,
control stick and a set of head armor that fits into a tub. There is a decal to
fit over the instrument blanks on the instrument panel. A tail wheel well with
gear snaps into place and before you put together the fuselage halves, you need
to insert some exhaust flaps in the front and the turbo face in the aft
fuselage.
Wings have nicely done wheel wells with the tires trapping a plastic tubing section. This is later pressed onto the one piece main gear/lower gear piece. The inner doors and upper outer doors slot into tabs. Wheels have covers. The engine is molded into the forward cowling piece. Before attaching this, you stick another of those tubing sections to hold the asymmetrical prop. The leading edge section that has guns is separate. You have a one piece canopy and the flat looking centerline tank.
 As with any simplified kit,
things are pretty basic. The turbo outlet doors are molded in the closed
position, so no need to cut the fuselage insignia for these. The biggest thing
missing are wing pylons. This is a bit of a mystery as just about all if not all
bubble top P-47s had these on the wings. Granted, they could be removed, but the
vast majority of images show them mounted. The aircraft also does not have the
dorsal fillet carried on later war P-47Ds.
As with any simplified kit,
things are pretty basic. The turbo outlet doors are molded in the closed
position, so no need to cut the fuselage insignia for these. The biggest thing
missing are wing pylons. This is a bit of a mystery as just about all if not all
bubble top P-47s had these on the wings. Granted, they could be removed, but the
vast majority of images show them mounted. The aircraft also does not have the
dorsal fillet carried on later war P-47Ds.
Markings are for two planes. Both are shown on the box art and will require considerable masking and painting by the builder. One is the P-47D-25 of Francis Gabreski while with the 61 FS/56 FG in RAF Green/Grey over RAF Light Grey. This plane has full D-Day stripes on the wings and lower fuselage as well as the white tailplane stripes. It carries a red rudder and forward cowling. All this will need to be painted. The other is the P-47D-30 of Howard Parts with the 531 FS/405 FG. This one has the invasion stripes on the lower fuselage with black tailplane stripes. The red on the cowling will need to be painted as with the invasion stripes.
Decals are nicely printed and should work quite well. I should mention that the wheel wells are shown as painted chromate green when they should be chromate yellow. Interior is dark bronze green, I believe.
| CONSTRUCTION |
Let me preface this build by saying that I am not really a P-47 fan. It does not have the allure to me of many other types and so I have not really built all that many models of the Thunderbolt. In fact, in 1/48, I have built three. All Monogram kits. One is a bubbletop back in 1985 that I did in Peruvian AF markings that is on display in the San Diego Aerospace Museum The second is a razorback in 1989 that was based on a photo of one on the wall at HQ Iceland Air Forces which was based there in 1944. I also built the ProModeler P-47N back when it first came out. I have one Hasegawa and one Tamiya 1/48 kit in the stash.
 I decided on this one to see just how well this line
of easy assembly kits would work out. No need to be bothered with AMS or fiddly
bits. Heaven knows I have a ton of aftermarket decals for this plane so coming
up with a scheme would not be a problem. I just had to find one that fit the
bits provided by the Hobby Boss kit, though I do have a number of nice
aftermarket items that could be used. I do anticipate the need for filler as
usually these sorts of kits have rather large seams.
I decided on this one to see just how well this line
of easy assembly kits would work out. No need to be bothered with AMS or fiddly
bits. Heaven knows I have a ton of aftermarket decals for this plane so coming
up with a scheme would not be a problem. I just had to find one that fit the
bits provided by the Hobby Boss kit, though I do have a number of nice
aftermarket items that could be used. I do anticipate the need for filler as
usually these sorts of kits have rather large seams.
This all started without removing a single item from the sprues. I painted the wheel wells and inside of the gear doors with yellow zinc chromate from Testors. Using the same brand, the interior was painted with FS 34092, Euro I Green. This, according to those who know, most closely represents the shade used by Republic. I also painted the engine. Doing detail work in there requires a steady hand and a fine paint brush.
The first parts gluing brought to light that all the
seams will need to be filled. One of the reasons is that the sprue attachment
points are rather large and they attach straight on the gluing surfaces for the
most part. This frequently results in a larger than normal gap due to
oversanding when removing the sprue stubs. For the wings the seam runs right
through the flap and is wider on one side than the other. The wing tip gap is
also large. I used super glue to fill these due to the ease of reapplying lost
detail once it was all smoothed out. I would suggest trimming the little
retaining tubes that fit in the wheels as their length can keep the
 halves from
meeting all the way around.
halves from
meeting all the way around.
Next was building up the cockpit. Since the P-47 does not have an anti-glare shield for the instruments, the back of the panel also needs painted. Fit is quite good thanks to the large attachment holes. I used a set of Eduard belts to add to the seat. Cockpit detail is pretty basic stuff, but adequate for the purpose of the kit. I then built up the tail wheel assembly and trapped it and the cockpit between the fuselage halves. This is not a snap kit so you need to glue the large alignment pins or you will never get the halves together. The seam was pretty small, but still needed filler.
I then attached the wings and tailplanes. Fit is quite good. For some reason, I often have one main wing fit superbly and the other leave a gap. Happened here as well so the gap was filled and sanded down. The wing guns were then glued in place. These did not want to fit flush and are slightly proud on the upper surfaces. I filed away the leading edge overlap. The guns in this kit are properly aligned with the ground and not the wing leading edge. I did not drill them out, though that would certainly make the model look nicer. The canopy was masked and after being sure I could get it out again to paint, was pushed in place. I also masked off the engine and the wheel wells.
| COLORS & MARKINGS |
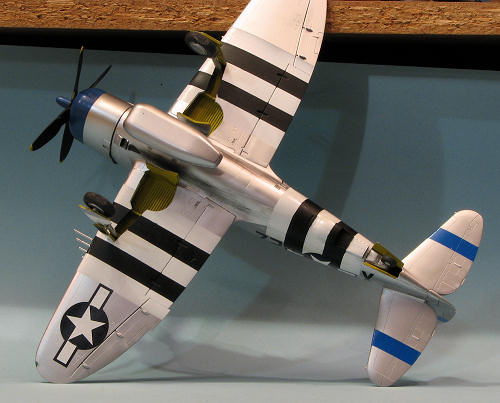
This one was painted overall with Alclad II aluminum as I would be doing quite a bit of overpainting and masking and did not want to worry about the finish pulling up. Once that was done, I sprayed the areas for the invasion stripes with white using Tru-Color gloss white. Then, taking 10mm Tamiya tape, I masked off the white areas according to the instructions with the decal sheet I was using.
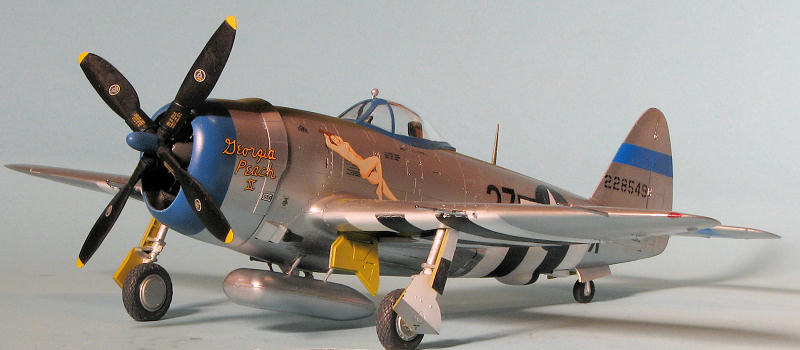
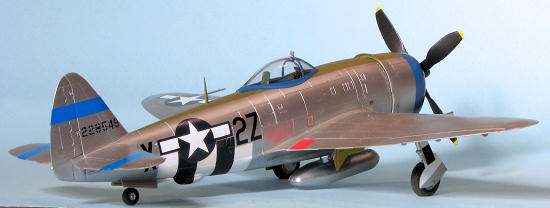
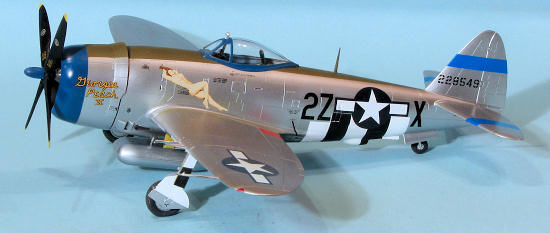
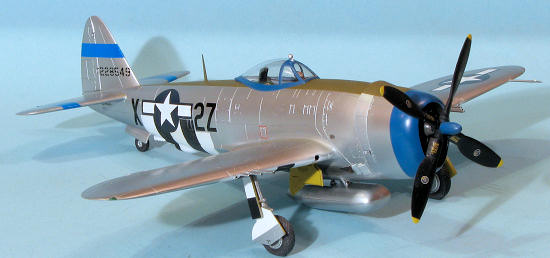
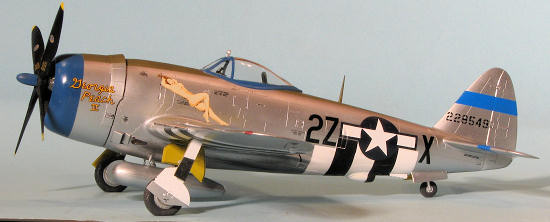
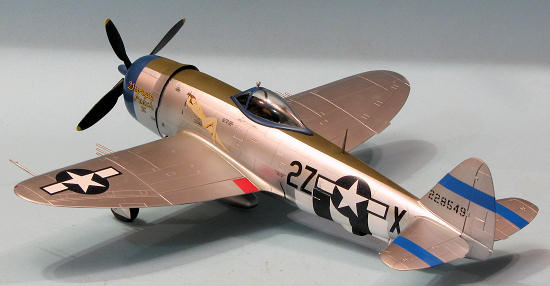
 For this kit, I decided to use one of the seemingly
hundreds of P-47 sheets I had. This one is Eagle Strike 48-097; American Jabos
pt VI. I chose "Georgia Peach II' as flown by Ed Powell with the 510 FS/405 FG
late in the war. I was somewhat limited in choices as the plane had to have no
fin fillet and a Curtis Electric asymmetrical prop. It would have been nice to
have pylons, but oh well.
For this kit, I decided to use one of the seemingly
hundreds of P-47 sheets I had. This one is Eagle Strike 48-097; American Jabos
pt VI. I chose "Georgia Peach II' as flown by Ed Powell with the 510 FS/405 FG
late in the war. I was somewhat limited in choices as the plane had to have no
fin fillet and a Curtis Electric asymmetrical prop. It would have been nice to
have pylons, but oh well.
Getting back to painting, the areas between the masked white was painted with Humbrol #33 matte black. I then masked off that and repainted the area outside the tape with more Aluminum. An interesting side note is that when I pulled up the masking at the end of the session, the black areas left black residue on the tape. First time I recall having this happen. I also laid the gear doors over the wells and guesstimated where the bands would cross the doors.
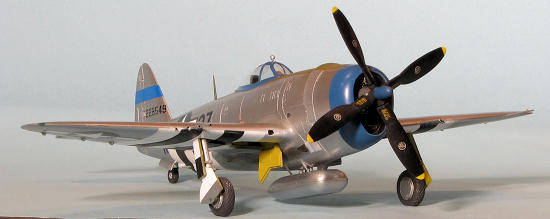
At the fuselage stripes, I had to do more masking in hopes of getting them to look like the profile. The forward white band has to be shorter than the others to clear the code. The nose and spinner were painted Blue #23 using Polyscale acrylics. It was the closest blue I had to match the decals. The upper deck was then painted Model Master olive drab using their enamels. Later, the canopy was removed and painted with the blue.
| FINAL BITS |
Back at the work bench, I did some touchup of the yellow zinc chromate where overspray had gotten in. I also painted the tail wheel and installed the main gear legs once the aluminum strut was brush painted. That is the downside of having a gear door attached to a gear leg. I also added a set of Ultracast resin wheels (48123). To my eyes, the kit wheels are too large in diameter and a bit too skinny (though this might be due to them being large in diameter. Also, I would have to rescribe the tread diamond pattern. A #30 drill bit was required to get the wheel opening large enough and the axles will need to be trimmed back a bit. These were then glued in place and left to dry.
With the main gear and wheels in place, the outer and
inner doors were attached. The inner doors are impossible to put in backwards as
they are keyed. The outer doors take a bit of fussing, but will virtually lock
in place. It was then that I noticed that I had stupidly painted the bottom of
the main gear doors black when I should have left them unpainted metal. A bit of
creative masking took care of that. The canopy was pulled out of its slot and
the frame painted Blue #23 like the cowling. I then glued on
 the small rear view
mirror and slipped the canopy back in place.
the small rear view
mirror and slipped the canopy back in place.
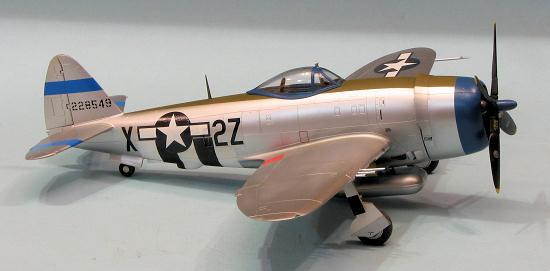
Then the decals were applied. These went on with no real issue aside from the fuselage insignia. You see, the Eagle Strike insignia have one side in sections to match up with the open doors on the Monogram or Hasegawa kit. The Hobby Boss kit molds those shut. Unfortunately, the sheet bits are not complete as the end of the insignia is hidden from view with the doors open. The kit decals have the blue surround too thin. I had no choice but to cut the ends from the second set of sheet insignia and apply those. This also showed that I made the stripes a tad too broad, but nothing really major. The sheet has a lot of data markings which I also applied. During this process, it dawned on me that this kit has no shell ejector chutes on the underside of the wing. Another strike against it for some. These can be represented by small rectangles of black decal if one wishes.
Eventually, all the decals were in place and final touch up painting was done. This included painting the gun barrels with Chrome Silver and adding the formation lights. For the latter I used a Sharpie and it seems to look just fine. The spine antenna needed the base trimmed by about half to fit all the way in. The pitot tube was glued in place as was the drop tank. The prop took a bit of work to get into place as the cavity for the plastic hold down piece is larger than the piece causing it to move around quite a bit. I only lightly applied exhaust stain on this one as I have not seen any photos of these planes looking worn.
| CONCLUSIONS |
 I found this to be quite an enjoyable build. It is
not at all fussy and the fit is really quite good. These kits are designed for
the more casual modeler and as such seem to have found their target.
Though the detailing on the parts is superb, the rather basic interior, lack of
wing pylons and lack of shell ejector chutes, for example, will send those
who are more concerned with complete fidelity to the prototype looking
elsewhere. Despite this, it makes into a very nice finished model and those who
want a simple, relaxing and fairly accurate model will find this one to their
tastes.
I found this to be quite an enjoyable build. It is
not at all fussy and the fit is really quite good. These kits are designed for
the more casual modeler and as such seem to have found their target.
Though the detailing on the parts is superb, the rather basic interior, lack of
wing pylons and lack of shell ejector chutes, for example, will send those
who are more concerned with complete fidelity to the prototype looking
elsewhere. Despite this, it makes into a very nice finished model and those who
want a simple, relaxing and fairly accurate model will find this one to their
tastes.
Copyright ModelingMadness.com. All rights reserved. No reproduction in part or in whole without express permission from the editor.
If you would like your product reviewed fairly and
fairly quickly , please
contact the editor or see other details in the
Note to
Contributors.