| KIT #: | 509 |
| PRICE: | 500 yen SRP |
| DECALS: | Two options |
| REVIEWER: | Scott Van Aken |
| NOTES: | Limited Reissue |
| HISTORY |
It is a truism that one goes to war with what one has and
in terms of the premier fighter of the USAAC, later USAAF, that was the P-40.
Not the fastest plane around nor the most maneuverable and one that was hopeless
above 15,000 feet, the P-40 was well armed and strong, so able to withstand a
lot of punishment. If flown properly, it was a match for anything in the skies,
as the P-40 was a superb aircraft at lower altitudes and especially when the
pilot used 'hit and run' tactics.
the most maneuverable and one that was hopeless
above 15,000 feet, the P-40 was well armed and strong, so able to withstand a
lot of punishment. If flown properly, it was a match for anything in the skies,
as the P-40 was a superb aircraft at lower altitudes and especially when the
pilot used 'hit and run' tactics.
So useful was the aircraft that it continued to be built up until near the end of the war. It was easy to maintain and was a very useful fighter-bomber, despite its liquid cooled Alison engine. As such, it was perfect for the more low-intensive battle areas like the Southwest Pacific, and China. Not to say it was not useful in other places, as it gave sterling service in North Africa and Italy, but was replaced with more potent types in those theaters as soon as possible.
| THE KIT |
 This is Hasegawa's now venerable P-40E kit and came in a boxing that should
have included markings for a Desert Air Force RAF version and Robert Scott's
23rd Fighter Group's aircraft. However, the decals were absent in this one that
was bought second hand for a few dollars.
This is Hasegawa's now venerable P-40E kit and came in a boxing that should
have included markings for a Desert Air Force RAF version and Robert Scott's
23rd Fighter Group's aircraft. However, the decals were absent in this one that
was bought second hand for a few dollars.
It is one of Hasegawa's initial batch of engraved kits and while a bit Spartan in the cockpit, is nicely detailed and lacks the fiddly bits that are so common with modern kits. Just a bomb or drop tank are provided for options and it comes with a one-piece windscreen and canopy. Wheel wells are also devoid of detail, not that there was much in there to begin with. Unlike many modern kits, it comes with a crew figure, something to fill the rather empty cockpit.
| CONSTRUCTION |
This is one of those kits that I looked at in the stash, opened the box and
figured I would go ahead and build it. I was pleased to see that the molds were
still in very good condition as there was no real flash and the detailing still
appeared to be pretty crisp. This was a kit I bought sans decals from a
vendor for about $3 a few years back. I started by installing the radiator and vents
section in the nose. Then I cemented the fuselage halves together and applied
super glue to all the seams for filler. While that
 dried, I glued the wings
together. These will leave a seam on the flaps that needs to be filled and the
wing tip join is often a bit large as well. I have pretty well been using super
glue for filler as it does not shrink and can be scribed through without
cracking as often happens with standard putty.
dried, I glued the wings
together. These will leave a seam on the flaps that needs to be filled and the
wing tip join is often a bit large as well. I have pretty well been using super
glue for filler as it does not shrink and can be scribed through without
cracking as often happens with standard putty.
Meanwhile, I had several True Details resin cockpit sets (72458) that had been around for years waiting for use and so one of those was opened up and pretty much everything on it was painted US Interior Green using Testors Model Master enamels. Later the instrument panel, gunsight and tip of the control stick were painted black. I also painted the seat harness with a buff shade. Test fitting the cockpit into the fuselage, I realized two things. One was that I'd have to cut off the large pour stub on the bottom of it, and I'd have to remove the old cockpit locating pits. That was done. I then cut the control stick from the resin and it went flying somewhere. I drilled a hole where it was to go and used the very inaccurate kit part. I also glued the instrument panel in place after removing it from the resin block. This has to be sliced from the back so you need a good razor saw. The set provides one for a P-40E-M and one for an N. I then glued the seat into the tub and sometime during the setting it slipped so it is now securely cement in place; off center.
 The
interior required much of the resin block under the cockpit tub to be removed so
the wings could fit in place. Once this was done, it was a snap to glue it in
place, once the old interior placement pins were removed. The wing was then
glued in place, followed by the tail planes. I did use some filler for the
former. Next step was to mask the canopy. This part has been molded so often
that it was very difficult to find the canopy frame lines, but eventually it was
masked and then glued in place. The rear quarter windows were left off until the
very end. These frequently have the two 'frames' painted by modelers, but from
what I understand, they should remain unpainted as they were really just clear
Plexiglas pieces used to hold the frames together, unlike the metal frames for
the canopy itself. Paint them if you wish, but I did not.
The
interior required much of the resin block under the cockpit tub to be removed so
the wings could fit in place. Once this was done, it was a snap to glue it in
place, once the old interior placement pins were removed. The wing was then
glued in place, followed by the tail planes. I did use some filler for the
former. Next step was to mask the canopy. This part has been molded so often
that it was very difficult to find the canopy frame lines, but eventually it was
masked and then glued in place. The rear quarter windows were left off until the
very end. These frequently have the two 'frames' painted by modelers, but from
what I understand, they should remain unpainted as they were really just clear
Plexiglas pieces used to hold the frames together, unlike the metal frames for
the canopy itself. Paint them if you wish, but I did not.
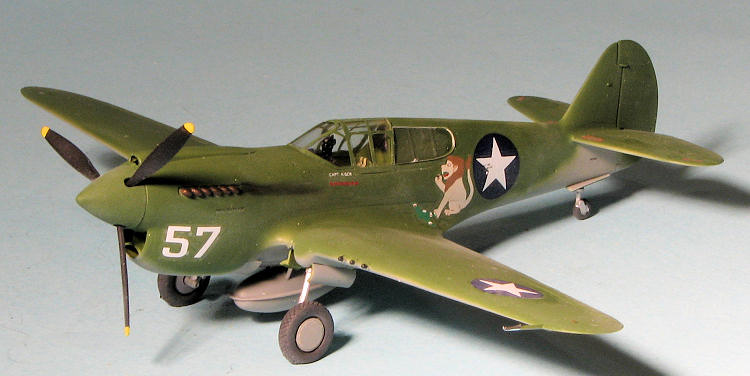
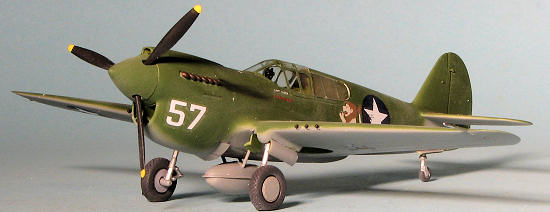
| COLORS & MARKINGS |
 For this
build, I decided to use another scheme from an old Superscale sheet, #72-675 on
49 FG P-40Es. This sheet is dated June 1993, making it nearly 20 years old. I
chose the aircraft of 8FS pilot George Kinser which was painted in Field Green
uppers with Neutral Grey undersides. For both shades, I used Testors Model
Master enamels thinned with lacquer thinner. The decal instructions showed a
rough demarcation line between the two shades so it was hand sprayed. Once the
two colors were applied, the kit returned to the work bench to have the landing
gear installed. Then it went back and had a couple of coats of Pledge applied to
give it a gloss for the decals.
For this
build, I decided to use another scheme from an old Superscale sheet, #72-675 on
49 FG P-40Es. This sheet is dated June 1993, making it nearly 20 years old. I
chose the aircraft of 8FS pilot George Kinser which was painted in Field Green
uppers with Neutral Grey undersides. For both shades, I used Testors Model
Master enamels thinned with lacquer thinner. The decal instructions showed a
rough demarcation line between the two shades so it was hand sprayed. Once the
two colors were applied, the kit returned to the work bench to have the landing
gear installed. Then it went back and had a couple of coats of Pledge applied to
give it a gloss for the decals.
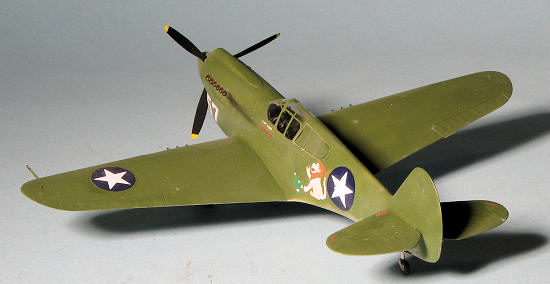
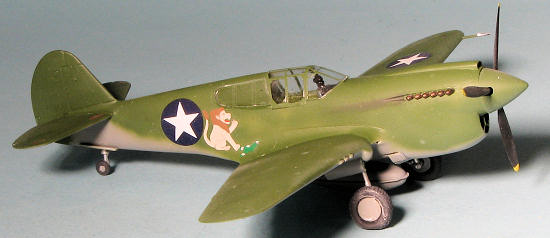
Despite their age, the decals gave me no issues in application and worked great with Microsol setting solution. One possible error on the insignia is that the arms of the center star should reach all the way to the edge. Unfortunately, this particular US insignia has not been well represented in aftermarket. I found sheets in 1/72 for all the other variations, including the Operation Torch version, but not this one. At one time Scalemaster made an excellent sheet for these insignia but that company is long gone. As a thought, since many if not all the planes used by the 49th FG were originally destined for the UK, perhaps it was non-factory insignia application that is the cause of the way they look.
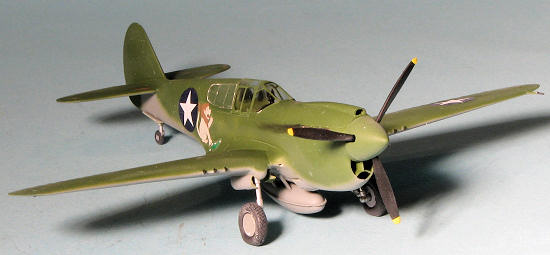
| FINAL CONSTRUCTION |
 Once the
decals were on, I cut apart the doors and glued them in place. For this kit I
used a set of True Details resin wheels. They have better tread detail than the
kit versions, though I could do without the 'flat tire' look that is common with
these wheels. The back of the wheel needs to be drilled out to fit on the axles.
I also painted and assembled the prop, which was then glued in place on the
front. I then returned to the paint shop and sprayed it all with matte clear.
Once the
decals were on, I cut apart the doors and glued them in place. For this kit I
used a set of True Details resin wheels. They have better tread detail than the
kit versions, though I could do without the 'flat tire' look that is common with
these wheels. The back of the wheel needs to be drilled out to fit on the axles.
I also painted and assembled the prop, which was then glued in place on the
front. I then returned to the paint shop and sprayed it all with matte clear.
This allowed me to apply some pastels for exhaust stains. I then glued on the drop tank and did some of the usual paint touch-up that is the norm for me. The masking was removed from the clear bits and that was pretty much it.
| CONCLUSIONS |
 Despite its
age, this is a nice kit. I have built quite a few over the years and they are
easy to find on the cheap from the usual 'used kit' places. The addition of the
True Details cockpit really adds a lot to the finished product and is well worth
the asking price. The end result is a very nice little kit that can be built by
most in a couple of weeks or less. What's more, it takes up very little space on
the display shelf. So if you need a relaxing build, then you should look into
one of these.
Despite its
age, this is a nice kit. I have built quite a few over the years and they are
easy to find on the cheap from the usual 'used kit' places. The addition of the
True Details cockpit really adds a lot to the finished product and is well worth
the asking price. The end result is a very nice little kit that can be built by
most in a couple of weeks or less. What's more, it takes up very little space on
the display shelf. So if you need a relaxing build, then you should look into
one of these.
June 2012
Thanks to me for the huge outlay in funds for this one.
If you would like your product reviewed fairly and fairly quickly, please contact the editor or see other details in the Note to Contributors.