| KIT #: | SH 72338 |
| PRICE: | $25.00 |
| DECALS: | Four options |
| REVIEWER: | Scott Van Aken |
| NOTES: | 2019 'Claws and Teeth' boxing |
| HISTORY |
 The P-40 was a follow-on of
the radial engine P-36, itself a modern, all metal fighter with retractable
landing gear. The in-line Allison V-1710 engine was installed to bring its
performance up to specs with fighter aircraft in Europe. For the most part,
Curtiss was successful in that regard. The P-40E was the first of the type that
was truly combat ready, though earlier P-40B/C variants did see combat in Burma,
China, and North Africa with the AVG, and the RAF.
The P-40 was a follow-on of
the radial engine P-36, itself a modern, all metal fighter with retractable
landing gear. The in-line Allison V-1710 engine was installed to bring its
performance up to specs with fighter aircraft in Europe. For the most part,
Curtiss was successful in that regard. The P-40E was the first of the type that
was truly combat ready, though earlier P-40B/C variants did see combat in Burma,
China, and North Africa with the AVG, and the RAF.
The addition of the armor and self sealing fuel tanks along with the addition of two more guns in the wings required a more powerful engine. However all this also slightly degraded the aircraft's performance. Probably the biggest failing of the aircraft was its inability to operate much above 15,000 feet as the lack of a high altitude supercharger or turbocharger meant that engine power dropped off quite a bit the higher it went. This was not an issue in the Pacific or North Africa as most combat was at levels below that and the P-40 was able to give a good showing against most of its adversaries.
Though the P-40 was further developed, it was more and more used as a fighter bomber in the ground attack role, letting more modern types handle the air to air bomber escort role in Europe and in the Mediterranean. In the CBI, the P-40 stayed in front line service longer than anywhere else.
| THE KIT |
 After
building some Hasegawa P-40s a short while back, it was recommended that I give
the Special Hobby kits a try. So it was that ordered two of them from Italy.
Thanks to the paucity of airline operations due to the Covid-19 Pandemic, these
kits took about 2 months from ordering until they reached my door.
After
building some Hasegawa P-40s a short while back, it was recommended that I give
the Special Hobby kits a try. So it was that ordered two of them from Italy.
Thanks to the paucity of airline operations due to the Covid-19 Pandemic, these
kits took about 2 months from ordering until they reached my door.
It is quite obvious that Special Hobby is doing multiple variants once one looks at the sprues as there are several parts that are only for later aircraft. Indeed, the sprue layout diagram has these parts marked off as not for use for this boxing. The detail level is quite good, though perhaps a bit overdone for some tastes. I liken the panel lines and parts detailing to be closer to Academy than the petite panel lines of Hasegawa's forty year old kits. Special Hobby did the first of this new tool series, a P-40N, back in 2017.
However, the cockpit details are vastly superior to Hasegawa's offerings. I like that there are belt decals. Decals are also provided for the main instrument panel. An interesting feature is that the cockpit floor is part of the upper wing piece. The kit gives us separate wheel well walls to trap in between the upper and lower wing halves. Ailerons are molded into the upper wing piece to provide a sharp trailing edge.
The kit offers exhaust in
three pairs for each side. Rudder is separate. The tailplanes are single piece
and slot into the tail sections.
If building the early P-40E option, then the builder needs to fabricate the
proper pitot. You are provided open or closed cowl flap options, a nice choice.
One can po se the canopy open or closed. For things under the fuselage, you get
one of two drop tank options, or a bomb. Interestingly, one of the tanks is a
design I've not seen before with a pinched and flattened aft end.
se the canopy open or closed. For things under the fuselage, you get
one of two drop tank options, or a bomb. Interestingly, one of the tanks is a
design I've not seen before with a pinched and flattened aft end.
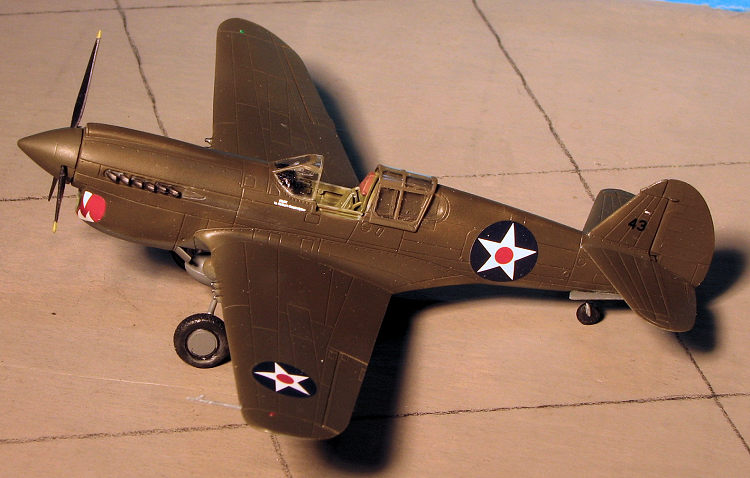
The full color instructions are very well done and offer Gunze paint options. You have two SWPA options. One is the box art plane 'Star Dust' with an RAF style camouflage. The other is 'Bob's Robin' in OD/Neutral Grey when based in Darwin during 1942. This one has white stars only without the blue background. The other two are 23 FG planes with one being Dallas Clinger's plane from Sept 1942 with an RAF style camouflage. The other is an ex-AVG plae as flown by John Petach in July 1942. This OD/Neutral Grey plane still has its Chinese roundels. The decal sheet is very nicely done by Cartograf so you know it is a good one.
| CONSTRUCTION |
 Next the wing and wheel wells are assembled. The control column and flap
handle fit into a piece that goes in between the upper wing. Note that the
upper wing halves are a single piece that incorporates the cockpit floor. I
like this. Don't forget to install the landing light. I did. The wing is
then attached to the fuselage along with the tailplanes and the rudder. The
exhaust are three pieces per side. Most other model companies have these as
a single piece with the little dividers built in. I left these off until
after painting.
Next the wing and wheel wells are assembled. The control column and flap
handle fit into a piece that goes in between the upper wing. Note that the
upper wing halves are a single piece that incorporates the cockpit floor. I
like this. Don't forget to install the landing light. I did. The wing is
then attached to the fuselage along with the tailplanes and the rudder. The
exhaust are three pieces per side. Most other model companies have these as
a single piece with the little dividers built in. I left these off until
after painting. | COLORS & MARKINGS |
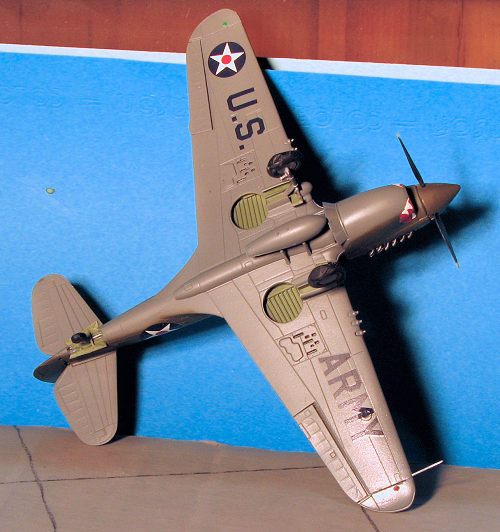 The reason I bought this and some other P-40Es was to use some of
the markings from DK Decals sheet 72053 which has a number of markings for
early war planes based in the Philippines, Java, and Australia. The majority
of these planes are in OD over neutral grey. For this, I used Mr. Color
paints. These lacquer paints work superbly. One thing is that the OD is
pretty much the color of recent paint so it is darker than what you might be
used to. I had originally painted the upper surface with Model Master OD,
but it looked far too light so it was repainted with the Mr. Color. I let
the enamel dry for several days before overpainting it and had no issues. I
also painted the wheels and gear doors.
The reason I bought this and some other P-40Es was to use some of
the markings from DK Decals sheet 72053 which has a number of markings for
early war planes based in the Philippines, Java, and Australia. The majority
of these planes are in OD over neutral grey. For this, I used Mr. Color
paints. These lacquer paints work superbly. One thing is that the OD is
pretty much the color of recent paint so it is darker than what you might be
used to. I had originally painted the upper surface with Model Master OD,
but it looked far too light so it was repainted with the Mr. Color. I let
the enamel dry for several days before overpainting it and had no issues. I
also painted the wheels and gear doors. | CONCLUSIONS |
I am glad that I was able to get motivated enough to complete this as it turned out quite well. Typical of many modern kits, it is fiddly, but not enough to cause any real issues if one is used to it. It certainly is the most detailed P-40 in this scale and I do want to build a few more as I basically like P-40s. Those who want a less fiddly kit to build should look to the Academy or even the older Hasegawa kit for their P-40. One thing for sure, the older kits will still look nice on the shelf and be less expensive. Those who want bells and whistles cannot go wrong with this one. Just get some replacement wheels and you'll be happier.
22 January 2021
Copyright Modeling Madness.com. All rights reserved.
If you would like your product reviewed fairly and fairly quickly, please contact the editor or see other details in the Note to Contributors.
Back to the Main Page Back to the Review Index Page Back to the Previews Index Page