Valom 1/72 Fisher P-75A Eagle
| KIT #: | 72010 |
| PRICE: | $ |
| DECALS: | One option |
| REVIEWER: | Scott Van Aken |
| NOTES: | New Mold kit (2007) |
| HISTORY |
In October 1942, the contract for two prototypes, designated XP-75, was signed with the Fisher Body Division of GM. The design concept was to use the outer wing panels from the P-51 Mustang, the tail assembly from the Douglas A-24 (SBD), and the under carriage from the F4U Corsair in a general layout much as in the P-39 Airacobra with the engine located amidships with the propeller driven through an extension shaft. At an early design stage, however, P-40 Warhawk outer wing panels were substituted for the P-51 panels.
In mid 1943, the need for long-range escort fighter
became more urgent than fast climbing interceptors so a decision was made to
order six more XP-75 airplane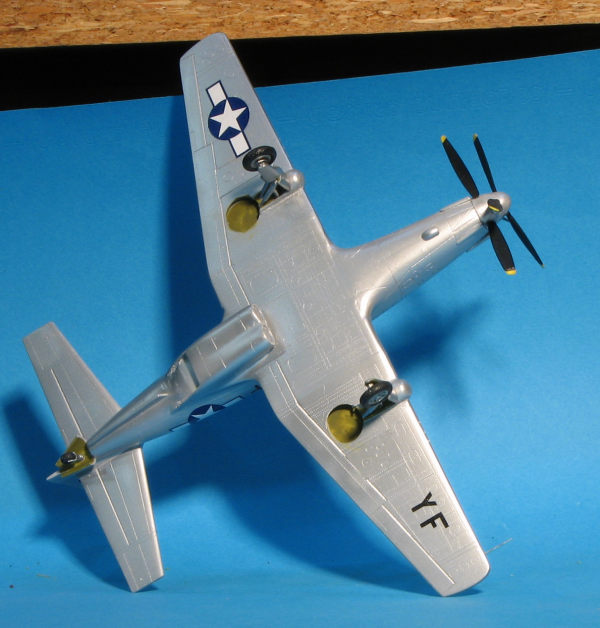 s modified for the long-range role. At this time an
order for 2,500 production aircraft was also let, but with the stipulation that
if the first P-75A was not satisfactory the complete order might be canceled.
s modified for the long-range role. At this time an
order for 2,500 production aircraft was also let, but with the stipulation that
if the first P-75A was not satisfactory the complete order might be canceled.
Powered by a V-3420-19 twenty-four cylinder engine rated at 2,600 hp driving co-axial contra-rotating propellers, the XP-75 flew for the first time on November 17, 1943. The second XP-75 flew shortly thereafter, and all six long-range XP-75s followed into the test program by the spring of 1944. The test program brought up a number of deficiencies, including miscalculation of the fighter’s c.g., engine failure at full rated power, inadequate engine cooling, high aileron forces at high speed, and poor spin characteristics. Re-designs were introduced into the long range XP-75s including a modified tail assembly, new cockpit canopy, and a V-3420-23 engine that corrected most of the problems by the time the first P-75A Eagles entered flight test in September 1944.
By this time, the Army Air Force decided to limit the number of combat aircraft types in production and not enter into large-scale production of new types that might not be available before the war ended. As the P-47D Thunderbolt and P-51D Mustang demonstrated excellent long-range capabilities, the production run of the P-75A Eagle was substantially terminated on October 6, 1944. It was decided to use the five production aircraft completed for experimental work and development of the V-3420 engine. As a result of those events, the P-75A didn’t complete formal performance trials due to termination of the production contract.
| THE KIT |
This is the production version, well, at least as far as it got. To me, this is the coolest looking of the two so far. The kit consists of a base sprue, one other injected sprue, one clear, an etched fret, and a bag of resin bits.
The main sprue is identical to that shown for the
XP-75. For the P-75A the SBD tailplanes and fin/rudder sprue is not included. What is different, aside from the
instructions is a new injection molded canopy. The smaller fret c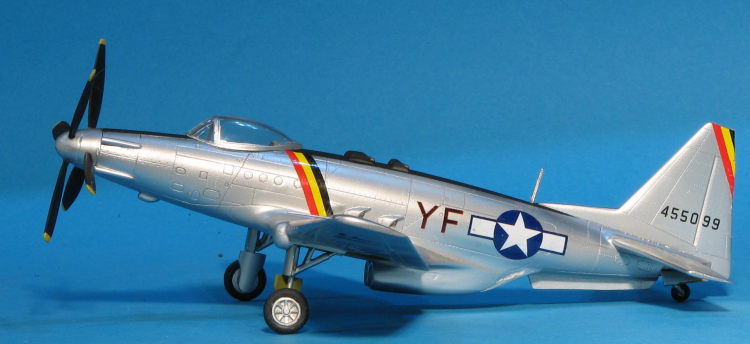 onsists of some interior bits and the
large under fuselage intake. The etched fret is rather minimalist compared to
earlier kits, which is not a bad thing as the goal is to do the kit entirely
from injected plastic. It has belts, rudder pedals and instrument panel. A pair of
radiator grilles and wing inserts are also made of brass. There is a clear
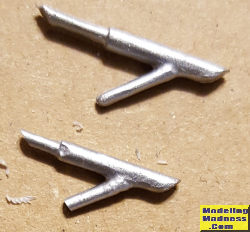
acetate sheet for the instruments (not shown). Resin is used for the prop hub,
wheels and some intake/exhaust stubs. Some of the resin parts will not be used
on this version.
onsists of some interior bits and the
large under fuselage intake. The etched fret is rather minimalist compared to
earlier kits, which is not a bad thing as the goal is to do the kit entirely
from injected plastic. It has belts, rudder pedals and instrument panel. A pair of
radiator grilles and wing inserts are also made of brass. There is a clear
acetate sheet for the instruments (not shown). Resin is used for the prop hub,
wheels and some intake/exhaust stubs. Some of the resin parts will not be used
on this version.
The overall quality of the Valom kit is quite good. Like most manufacturers of short run kits, the molding process seems to improve with each release. I'm quite pleased to see the etched and resin parts count down, though I can also understand that these sorts of things are pretty much inevitable for short run kits. I do like how well molded the canopy is and while I've not fit it, I can anticipate a bit of trimming needed. The detailing on the airframe is nicely engraved with very well done rivet detail. Not the sort of huge rivets we see with Trumpeter kits, but more like the sort of work seen in the plans of older Czech and Soviet paper bound books and magazines. It is quite well done and believable.
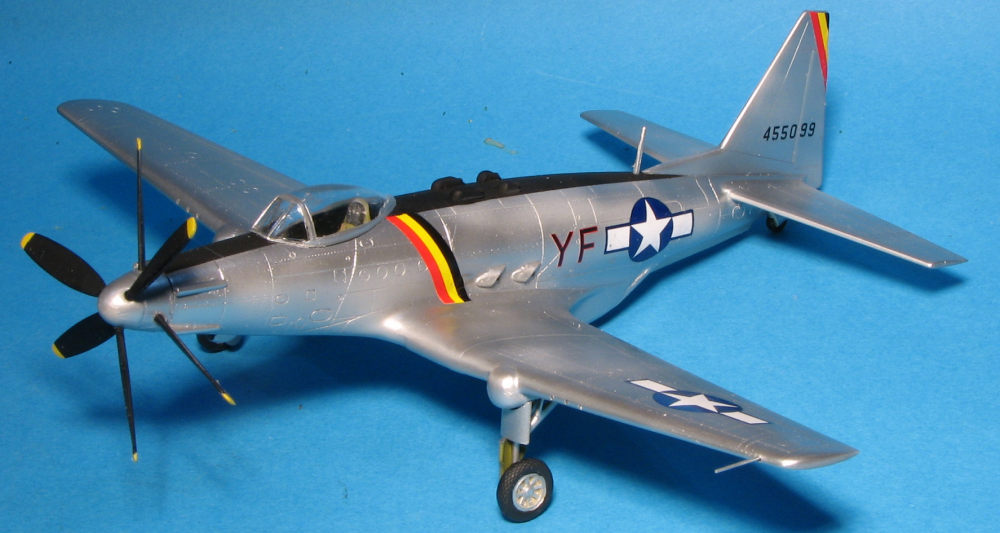
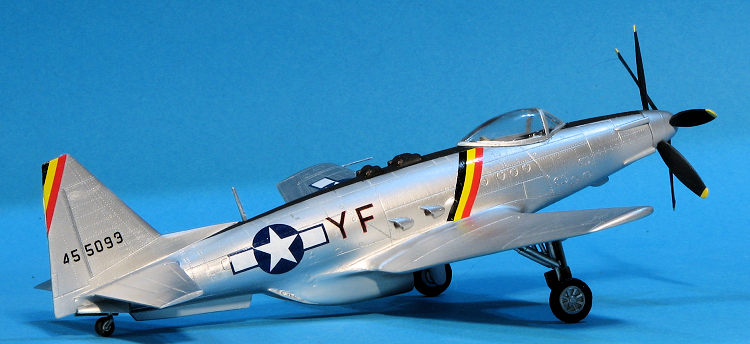
Instructions are the typical Valom type with nicely drawn construction drawings and large part and paint information. A large painting and decal placement guide is provided in full color. There is one serial optionson this overall unpainted metal aircraft. The small sheet is well printed and has the insignia and serials for both of the kits, which really makes perfect sense. Actually, that may well be three kits as the decal sheet is marked for an XP-75A as well. It is well printed, though typical of some decal sheets for US planes, has a blue border that is too skinny in relation to the rest of the markings. When they added the 'wings' to the insignia, they also added a blue border to the star area as well and these insignia do not show that. Not a biggie as most of us have extra US insignia, but for completeness, I thought I'd point that out.
| CONSTRUCTION |
 Unlike many of my builds, I did not start writing this article
until things were about 85% done and I have to say that it has been a struggle,
resulting in the kit being on the shelf of doom many times, a few of them being
almost years. I knew that I'd be in for some work when I started as Valom kits
are generally, not the easiest things to build. Some are fairly straight forward
while others need some help. This one needed a LOT of help. Just to put things
in perspective, I started this one in mid 2007.
Unlike many of my builds, I did not start writing this article
until things were about 85% done and I have to say that it has been a struggle,
resulting in the kit being on the shelf of doom many times, a few of them being
almost years. I knew that I'd be in for some work when I started as Valom kits
are generally, not the easiest things to build. Some are fairly straight forward
while others need some help. This one needed a LOT of help. Just to put things
in perspective, I started this one in mid 2007.
I began as usual with attaching all the bits onto the cockpit floor. The kit provides etched belts and rudder pedals, but no sidewall detailing at all. The canopy is fairly large (think P-47), so you'll see some of that stuff. I also assembled the spinner and the lower fuselage intake section. The cockpit section was put into the fuselage and after much fussing around to get it reasonable positioned, the halves were closed.
 The wings were
then built up and I attached the fin. This latter part does not fit all that
well, but like the rest of the fuselage, filler and sanding were sufficient to
get it to fit. Same with the butt joined horizontal stabs. The wings required
quite a bit of root work to fit well but were eventually attached. On the
underside of the wings you have a brass plate for the cartridge ejection chutes
and the landing gear knuckles. The latter also needed a lot of filler.
The wings were
then built up and I attached the fin. This latter part does not fit all that
well, but like the rest of the fuselage, filler and sanding were sufficient to
get it to fit. Same with the butt joined horizontal stabs. The wings required
quite a bit of root work to fit well but were eventually attached. On the
underside of the wings you have a brass plate for the cartridge ejection chutes
and the landing gear knuckles. The latter also needed a lot of filler.
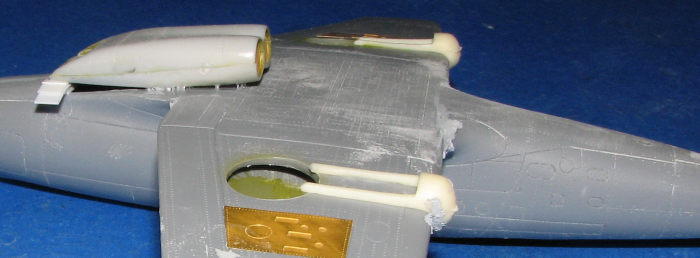
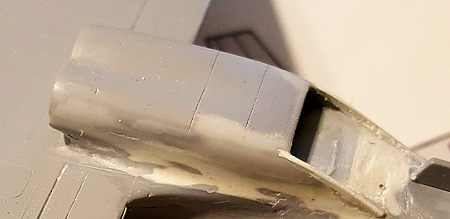 Then came the
biggest consumer of time and filler on the whole kit, the underside scoop. You
see, on the real airplane, the scoop is supposed to be nearly level with the
bottom of the fuselage. However, once put on the kit it was seriously angled
down in the front. The only way to cure this was to build up the attachment area
with filler. This took multiple applications of epoxy filler and was one of the
reasons it was on and off the shelf of doom for over ten years. Tons of fussing
were required to get it even close to being acceptable, but eventually, I was at
a stage where it was a case of diminishing returns.
Then came the
biggest consumer of time and filler on the whole kit, the underside scoop. You
see, on the real airplane, the scoop is supposed to be nearly level with the
bottom of the fuselage. However, once put on the kit it was seriously angled
down in the front. The only way to cure this was to build up the attachment area
with filler. This took multiple applications of epoxy filler and was one of the
reasons it was on and off the shelf of doom for over ten years. Tons of fussing
were required to get it even close to being acceptable, but eventually, I was at
a stage where it was a case of diminishing returns.
 Eventually, I decided to go ahead and just finish it. I
attached the ventral strake after trimming it back as well as the tail wheel
doors. The gun fairings (which are too long) were glued on as were the exhaust.
There is no locator for any of these parts so one just uses guesswork and a look
at where they might go from the instructions. The canopy was attached and
masked. I also opened up the hole in the nose for the spinner assembly and glued
that in place. It does not turn. I also marked on the leading edges with a
pencil about where the wing guns might go and then drilled those areas out along
with the mounting hole for the pitot.
Eventually, I decided to go ahead and just finish it. I
attached the ventral strake after trimming it back as well as the tail wheel
doors. The gun fairings (which are too long) were glued on as were the exhaust.
There is no locator for any of these parts so one just uses guesswork and a look
at where they might go from the instructions. The canopy was attached and
masked. I also opened up the hole in the nose for the spinner assembly and glued
that in place. It does not turn. I also marked on the leading edges with a
pencil about where the wing guns might go and then drilled those areas out along
with the mounting hole for the pitot.
I then used liquid mask on the canopy and gave the airframe another coat of primer to check for things I might have missed. I then headed for the paint shop.
| COLORS & MARKINGS |
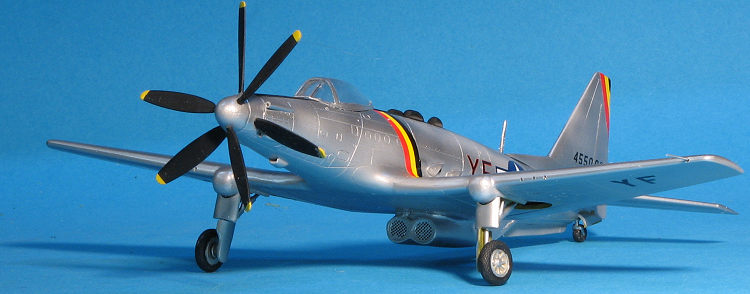
I still wasn't sure if I'd do an actual aircraft or a whiffer with this. Either way, the plane would be overall bare aluminum so I sprayed everything with Alclad II standard aluminum. This showed up some areas I missed, but I pretty well decided that if the areas were not egregiously bad, I was going to let it slide. The canopy and windscreen frames were masked and the area for the anti-glare panel was masked off for painting. This was painted in black, though I could have used olive drab as well .
 The tape was
removed for the anti-glare painting, and the exhaust were painted with Vallejo's
Tinny Tin. I then attached the main landing gear after drilling out the holes
for them. The placement of the holes is such that the gear sticks pretty much
straight down instead of a bit forward. This makes the retraction struts a bit
too long so those have to be trimmed to fit. Tail gear hole had to be drilled
out as well.
The tape was
removed for the anti-glare painting, and the exhaust were painted with Vallejo's
Tinny Tin. I then attached the main landing gear after drilling out the holes
for them. The placement of the holes is such that the gear sticks pretty much
straight down instead of a bit forward. This makes the retraction struts a bit
too long so those have to be trimmed to fit. Tail gear hole had to be drilled
out as well.
The tail wheel was attached as were the main wheels.
Surprisingly, the latter items slid right onto the kit axles. I also took the
time to drill out the nose gun fairings. I then went to attach the gear doors.
The instructions are very vague about precisely how the larger of the two doors
is attached. It also shows the smaller one with an indentation on both sides
(which is not on the kit part)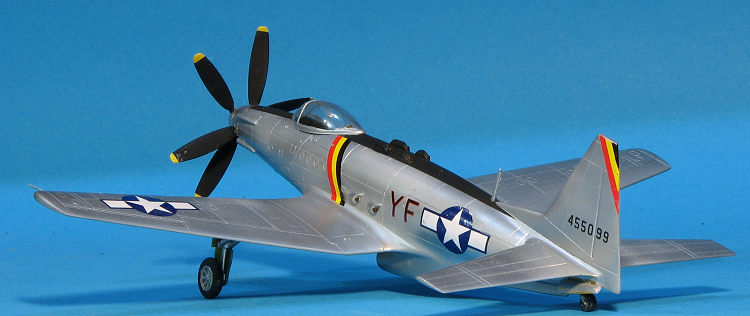 . However, there are good photos of these doors on
the 'net and it is really easy to apply.
. However, there are good photos of these doors on
the 'net and it is really easy to apply.
I finally decided on a whiffer scheme. The Valom kit
decals were used for the insignia and I cobbled together a serial from what was
on the sheet. Interestingly, the clear in between the serial numbers was
beginning to break apart so most of the numbers were individual, even though I
didn't really mean them to be. I used some other markings from a EuroDecal sheet
 on post war P-51s and P-47s, choosing the wing commander's stripes, suitably
modified, from the 355th FG in 1946.
on post war P-51s and P-47s, choosing the wing commander's stripes, suitably
modified, from the 355th FG in 1946.
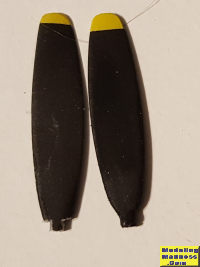
With that done, it was on to the final steps. This included installing the radio mast, making and installing a pitot tube, and doing something about the props. Valom doesn't have much help on the pitch of these as the front and rear are different. Once more, the 'net was a big help in this. Also, the rear blades are more 'buried' into the spinner than the front, which is not dealt with in the kit props. What I did was to take my motor tool and carefully grind away at the lower portion of the rear blades. Once I did that, the attachment holes were enlarged and the shaft of the blades shortened to fit. Then they were cemented in place. Not perfect, but better, and I was done.
| CONCLUSIONS |
It has been a while since it took me 12 years to finish a kit, but I'm glad that this one is off the shelf of doom. It didn't take up as much space as some others, but it does add to my WWII prototypes collection and keeps another kit out of the trash. It isn't impossible to build, but to do it right will take a lot more work than some are willing to put into it.
10 May 2019
Copyright ModelingMadness.com. All rights reserved
Thanks to Valom for the review kit.
If you would like your product reviewed fairly and quickly, please contact the editor or see other details in the Note to Contributors.