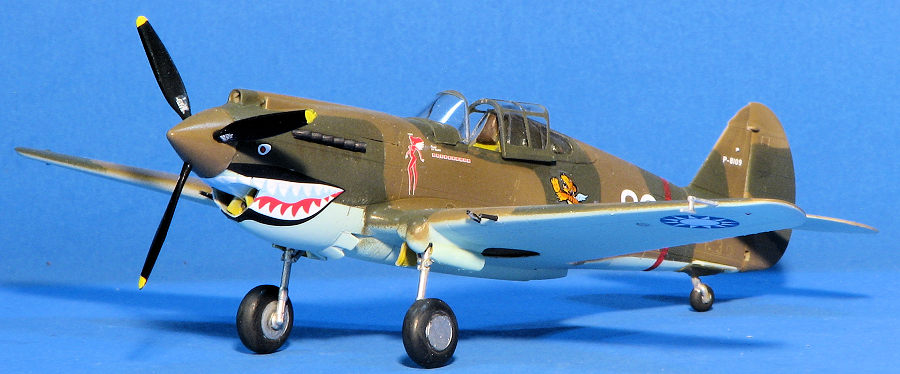
Arma Hobby 1/72 Hawk 81-A2
| KIT #: | 70094 |
| PRICE: | Gift |
| DECALS: | Three options |
| REVIEWER: | Scott Van Aken |
| NOTES: | Includes resin bits. |
| HISTORY |
The Flying Tigers, known officially as the 1st American Volunteer Group (AVG), were a unit of the Chinese Air Force, recruited from amongst US Navy, Marine Corps and Army aviators and ground crew.
AVG leader Claire Chennault received crated Model Bs which his airmen
assembled in Burma at the end of 1941, adding self-sealing fuel tanks and a
second pair of wing guns, such that the aircraft became a hybrid of B and C
models. These were not well-liked by their pilots: they lacked drop tanks for
extra range, and there were no bomb racks on the wings. Chennault considered the
liquid-cooled engine vulnerable in combat because a single bullet through the
coolant system would cause the engine to overheat in minutes. The Tomahawks also
had no radios, so the AVG improvised by installing a fragile r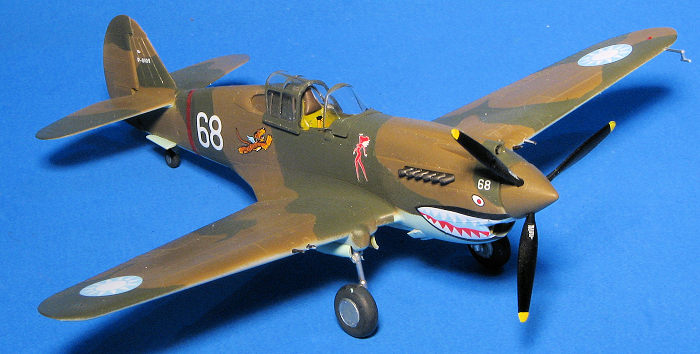 adio transceiver,
the RCA-7-H, which had been built for a Piper Cub. Because the plane had a
single-stage low-altitude supercharger, its effective ceiling was about 25,000
feet (7,600 m). The most critical problem was the lack of spare parts; the only
source was from damaged aircraft. The planes were viewed as cast-offs that no
one else wanted, dangerous and difficult to fly. But the pilots did appreciate
some of the planes' features. There were two heavy sheets of steel behind the
pilot's head and back that offered solid protection, and overall the planes were
ruggedly constructed.
Compared to opposing Japanese fighters, the P-40B's strengths were that it was sturdy, well-armed, faster in a dive and possessed an excellent rate of roll. While the P-40s could not match the maneuverability of the Japanese Army air arm's Nakajima Ki-27s and Ki-43s, nor the much more famous Zero naval fighter in slow, turning dogfights, at higher speeds the P-40s were more than a match. Chennault trained his pilots to use the P-40's particular performance advantages. The P-40 had a higher dive speed than any Japanese fighter aircraft of the early war years, for example, and could exploit so-called "boom-and-zoom" tactics. The AVG was highly successful, and its feats were widely publicized by an active cadre of international journalists to boost sagging public morale at home. According to its official records, in just 61⁄2 months, the Flying Tigers destroyed 297 enemy aircraft for the loss of just four of its own in air-to-air combat.
| THE KIT |
Arma Hobby is somewhat a new kid on the block. They have a reputation for well made, well detailed kits that are generally a step above what has come before them. Looking in the box, I would compare them somewhat to equivalent kits from Special Hobby, though SH kits are known to be tricky to build.
The kit itself is quite standard when it comes to
1/72 kits. The one deviation from standard construction sequences is that Arma
has you assemble the wings first. This comprises of separate wheel wells and a
full span upper and lower wing. As with the real aircraft, the upper wing is the
floor of the cockpit. There are a couple of items to add to each sidewall. Some
of these items have decals to attach. The instrument panel also takes a decal if
you wish. One then assembles and paints the radiator section that fits into the
lower nose. I was surprised to see that the instructions
 have you paint the area
around the radiators with red. Only then do you install that piece, the
instrument panel and the rear bulkhead into the cockpit halves. Then the forward
radiator piece and the piece that holds the prop shaft are installed and the
halves joined.
Notice that the nose guns and fairings are molded into the fuselage halves. The upper cowling is then installed along with the carb intake, exhausts and the lower forward cowling piece. With this first issue kit a set of resin gun barrels are provided to replace the wing and cowl guns if you so desire. The fuselage is then attached to the wing. It is only now that the resin seat is installed.
At this point, the cowl flaps and aft section to the wings are installed, followed by the one piece tailplane, fin, and rudder. Then the landing gear are built up and installed. Then the main gear doors. Small retraction struts (two per side) are then attached to the main gear. Prop and spinner are glued in place as are the wing guns and pitot tube. Finally, the clear bits. Arma includes a set of canopy and wheel masks, something I wish every kit maker would do. I should add at this point that Arma includes a clear stand along with this kit. This is a jig to ensure that you get the main landing gear straight. There is a brace for the rear fuselage and the wings along with depressions for the main wheels. This is a first in my exprience.
Markings are for three Flying Tigers; Charles Older with 3 Pursuit, Greg Boyington with 1 Pursuit, and Dick Rossi with 1 Pursuit. All three are in US equivalent dark earth/dark green over sky. Paints are provided from multiple manufacturers. The decals are superbly printed and should work just fine. Instructions are very well done and in color. I should mention that Arma is mum about what shade to paint the area behind the quarter windows, but it should be the exterior color.
| CONSTRUCTION |
On this one, I took the radical approach of following the instructions. First thing I did was assemble the wings, trapping the main gear wells between the halves. It is obvious that there will be later P-40s from Arma as the early wells hide the later well detail molded into the upper wing. I did find that if one does not completely remove the sprue stubs, parts will not fit. I then painted these inserts in faded OD using Mission Models paint.
Next, I attached the control stick and the flap handle to the
upper wing before painting all the interior parts with Mr.Color C.27 interior
green. This is a much more yellow shade than what one normally uses on US planes
of this era as Curtiss interior green was in this shade or close to it. Next the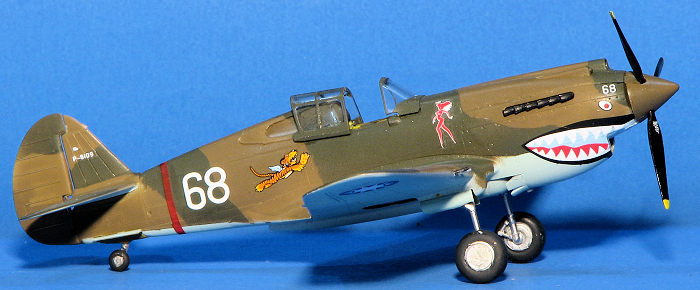 sidewalls had their detail areas added and those were painted. When painting the
rear bulkhead piece that has the headrest, the instructions call for the head
rest to be black. Period color photos show this to be a dark brown leather.
With those items painted, it was time to install the teensy decals in the interior part. It is fortunate that they provide two full sets of data markings as attaching these very small decals is a challenge. I have to assume that a double kit of Flying Tigers will be released as the decal sheet provides enough data and other markings for two.
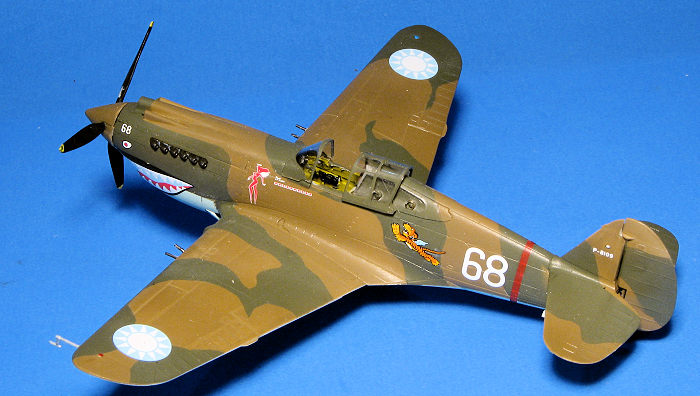
Having done all that, the interior was installed along with the radiator section and the fuselage halves were glued together. The wings were assembled and then installed. Fit here was very good. Tailplanes and rudder were then glued on. The rudder is lacking a positive attachment point and so it quite easy to knock off even if you think it is on tight. The clear parts were masked using the supplied masks and then attached. I temporarily tacked on the canopy section as I wanted to to be open on the finished model.
| COLORS & MARKINGS |
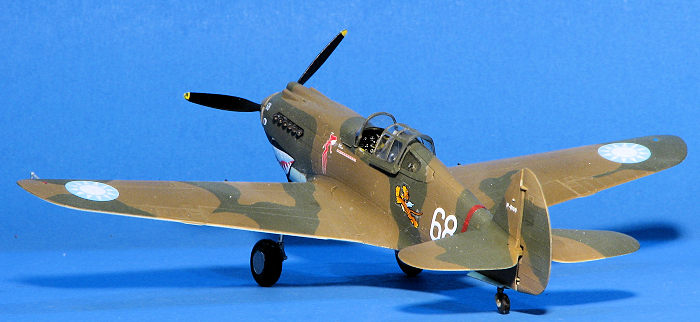 This
aircraft was painted in the US for the RAF using US equivalent shades. For this
one I used US dark earth and RAF dark green on the upper surfaces and a light
blue from Tamiya on the underside. As usual, it was a 'several hours of masking
for 5 minutes of spray painting' for the upper surface. When the colors were all
on, a gloss clear was applied.
Before applying the decals, the landing gear were installed. Main gear are fairly fussy thanks to the small retraction struts. Fortunately, the kit supplies a form that ensures that you get the main gear on straight. Decals are quite thin and went on without any issues. As a note, Arma does not supply the fuselage stripe. They expect you to paint it on. I used a decal from one of the number of stripe sheets I have. You might notice that the upper portion of the sharkmouth is a light blue. There are decals to fit in the radiator opening to match that, which is a nice touch. I chose the option for the Hell's Angels squadron as I'd already done an Adams and Eves several years ago on an Airfix kit. Those markings are duplicated with the Arma sheet.
The airframe was then sprayed with Tamiya matte clear and the masking removed. Gun barrels and exhaust were then installed, a bit of touch up was done and that was it.
| CONCLUSIONS |
Overall, this is a very nice kit. Rather pricey for what you get, but the kit does provide some extras you don't normally find like the masks and the form. Fit is generally very good and others who have built this kit have said nice things about it.
Thanks to my friend Kevin Krajniak for allowing me the opportunity to build this.
| REFERENCES |
https://en.wikipedia.org/wiki/Curtiss_P-40_Warhawk
30 October 2026
Copyright ModelingMadness.com. All rights reserved. No reproduction in part or in whole without express permission from the editor.
If you would like your product reviewed fairly and fairly quickly, please contact the editor or see other details in the Note to Contributors.