
Eduard 1/48 P-40E Warhawk 'Pacific Star'
| KIT #: | 11185 |
| PRICE: | $89.00 delivered |
| DECALS: | Ten options |
| REVIEWER: | Scott Van Aken |
| NOTES: | 2025 boxing. Two complete kits |
| HISTORY |
 The Curtiss P-40 Warhawk is an American single-engined, single-seat, all-metal fighter-bomber that
first flew in 1938. The P-40 design was a modification of the previous Curtiss
P-36 Hawk which reduced development time and enabled a rapid entry into
production and operational service. The Warhawk was used by most Allied
powers during World War II, and remained in frontline service until the end
of the war. It was the third most-produced American fighter of World War II,
after the North
American P-51 Mustang and Republic
P-47 Thunderbolt; by November 1944, when production of the P-40 ceased,
13,738 had been built, all
at Curtiss-Wright
Corporation's main production facilities in Buffalo,
New York.
The Curtiss P-40 Warhawk is an American single-engined, single-seat, all-metal fighter-bomber that
first flew in 1938. The P-40 design was a modification of the previous Curtiss
P-36 Hawk which reduced development time and enabled a rapid entry into
production and operational service. The Warhawk was used by most Allied
powers during World War II, and remained in frontline service until the end
of the war. It was the third most-produced American fighter of World War II,
after the North
American P-51 Mustang and Republic
P-47 Thunderbolt; by November 1944, when production of the P-40 ceased,
13,738 had been built, all
at Curtiss-Wright
Corporation's main production facilities in Buffalo,
New York.
The P-40D was the first combat ready Warhawk. It was built in small numbers and replaced by the P-40E, the type the USAAF took into combat in the southwest Pacific. At low altitude, the P-40E could hold its own against some Japanese fighters as long as it used its ruggedness and speed. It generally came out second best in a turning fight against the lighter Japanese planes, but tactics dictated avoiding those situations. The E model served on all but the European front. Despite nearing obsolescence, it was widely used in the ground attack mission with some airframes lasting until the end of hostilities.
| THE KIT |
 About
a year or so ago, Eduard embarked on a program to cover aircraft that fought in
the Pacific War. They had already done the Hellcat so started out with the F4F
Wildcat. This was followed by the A6M, which is still an on-going program, and
now the P-40. All of these types have been well covered by other kit makers such
as Tamiya, Hasegawa, and even Monogram. However, Eduard has a reputation for
adding in as much detail as possible and this somewhat high parts count appeals
to many modelers. Besides, there are always those who are attracted to the new
and all of this drives sales.
About
a year or so ago, Eduard embarked on a program to cover aircraft that fought in
the Pacific War. They had already done the Hellcat so started out with the F4F
Wildcat. This was followed by the A6M, which is still an on-going program, and
now the P-40. All of these types have been well covered by other kit makers such
as Tamiya, Hasegawa, and even Monogram. However, Eduard has a reputation for
adding in as much detail as possible and this somewhat high parts count appeals
to many modelers. Besides, there are always those who are attracted to the new
and all of this drives sales.
Not surprisingly, Eduard started with the E model P-40, the variant that was widely used by both the US and Allies in both the southwest Pacific and the CBI. Since this is a double kit, the fairly large box is jammed full of sprues. Each pair is separately bagged and it is fairly obvious that there will be other variants such as the N (which has already been announced). This means that one the sprues there will be parts not used in this build such as the smaller wheels and wide blade prop of the P-40N. Best to keep some of those in your spares box for your other P-40N kits that might be lacking these details.
As expected, there are a lot of options. For instance, you can have open or closed cowl flaps (which can also be done in p.e.) and Eduard provided two different flap controls in the cockpit depending on your choice. There are also optional rear bulkheads for the interior and even different seats. I found it interesting that there is a small fuselage light that you are to build then fill and sand smooth, just like on other kits.
The exhaust is molded as six pieces per side, which adds to the parts count, however, it means you can install them after painting. In the main gear wells, you can model them with or without the canvas inside. The gun barrel part is an insert for the leading edge of the wing as is the 'knuckle' for the landing gear. Before assembling the wing one must decide on what will be carried on the centerline (if anything) and open the appropriate holes.
 Separate control surfaces are supplied, which are shown assembled in the
neutral position. I'm sure a bit of surgery can change that. The kit does not
provide separate flaps, which is fine as they were not normally left lowered.
The wing tip and other formation lights are separate items. Wheels are four
parts so you can paint wheels and tires separately. There is a masking set
provided that includes wheel masks, but it seems to me you don't really need
them.
Separate control surfaces are supplied, which are shown assembled in the
neutral position. I'm sure a bit of surgery can change that. The kit does not
provide separate flaps, which is fine as they were not normally left lowered.
The wing tip and other formation lights are separate items. Wheels are four
parts so you can paint wheels and tires separately. There is a masking set
provided that includes wheel masks, but it seems to me you don't really need
them.
Landing gear is well done with both the main and tail gear able to be installed after painting. The main gear has a number of small pits as part of the retraction mechanism. Canopy and windscreen are separate so you can pose the canopy open. As mentioned, a masking set is provided along with colorful placement instructions.
Two different drop tanks and two different bombs are included. The bombs have p.e. fins which means that when the weekend edition is produced, bombs will not be an option. None of these planes have a radio mast so if you want to duplicate the antenna, there will be some rigging involved. A diagram is provided for that purpose.
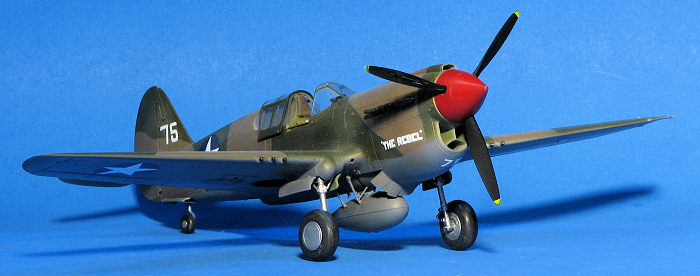
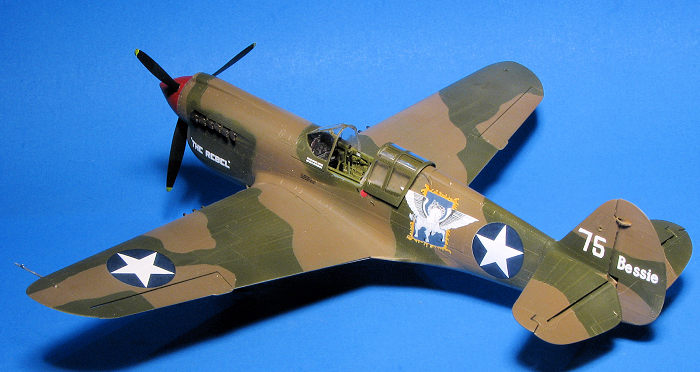
The instruction book is very good. It starts with a history before going into the building. All color information is provided in Gunze references. There are ten markings options as befits a kit like this. There are a variety of camouflage schemes. Three of them are in a US equivalent RAF scheme of dark earth, dark green, over neutral grey. That includes one of the box art planes from the 9th FS/49th FG. Another is an ex Flying Tiger plane with the 23rd FG. A third is also with the 23rd FG, this being Robert Smith's plane with the 16th FS. In OD are 'Bob's Robin' with the 9th FS/49th FG. This one has US ARMY under the wings and faded red dot in the insignia. John Chennault's Aleutian Tiger with the 343rd FG is next followed by George Kiser's plane with the 8th FS/49th FG. Another with the faded center insignia is William Hennon's plane with the 7th FS/49th FG. In OD and dark earth are two Australian planes. One with 76 Squadron in the early markings with the red center to the insignia. The other is with 82 Squadron with the later insignia and a white tail. The final option is with the New Zealand air force from 15 Squadron in a green with a white tail and large white stripes on the nose and fuselage. These stripes will need to be painted. While there are a lot of aftermarket sheets for the P-40E, Eduard has provided a lot of options with this one.
| CONSTRUCTION |
Since I've not built one of these before, I went with the construction sequence. You have to decided which markings option you'll be using right away as the seats are different depending on the choice. I decided to build the first option so that pretty well decided things. Right away I noticed that some of the sprue attachment points were in places where one couldn't use a sanding stick to remove the stubs. This made things a bit difficult because on many of the cockpit parts, the attachment point nearly filled the space between two rather close gluing stubs. This was all made a bit more difficult as the sprue attachment points are fairly large for a modern kit. The sprue attachment for the 1/72 MiG-15 I recently finished is half the size. On the subject of sprue attachment points, you have to endure that the stubs are all sanded/filed down or you'll run into fit issues later.
I deviated a bit from the instructions by not building up a full interior and instead attaching the side panels to the inside of the fuselage. This made attaching the instrument panel a bit tricky, but it wasn't that difficult. I glued one side of the panel then taped on the other fuselage half until the glue dried to ensure it was properly aligned. That seemed to work out just fine.
 Construction moved to the radiator. There are etched grilles that fit just fine.
One thing to note is that when the fuselage is closed up, you won't see much
unless you shine a light in there. I did not use the etched cowl flaps as that
just seemed like too much p.e. for my tastes. A plastic one is provided and
while the instructions don't show it, figuring out how to fit everything is
quite easy.
Construction moved to the radiator. There are etched grilles that fit just fine.
One thing to note is that when the fuselage is closed up, you won't see much
unless you shine a light in there. I did not use the etched cowl flaps as that
just seemed like too much p.e. for my tastes. A plastic one is provided and
while the instructions don't show it, figuring out how to fit everything is
quite easy.
The fuselage halves were closed up after attaching the tail gear housing. I left off gluing on the exhaust stubs until after painting. There is a separate piece to install for the carb intake and that took a bit of fussing to get in place. I couldn't find the masking set so hand cut the masks for the quarter windows and after painting the area behind them with Mission Models faded OD, those were installed.
Now for the wings. I am going to use the larger of the two drop tanks, but the instructions were mute on which holes to use. If you go to near the end of the instructions where the tank is attached, you will see that it uses the outer holes so those were opened up. Wheel wells were assembled and I chose the option for the canvas covers so those were painted fresh OD on the supposition that they wouldn't have faded since they had no exposure to the sun. These were then installed in the upper wing and the gun ports in the lower shown. Then the blanking plate behind the shell ejection chutes was attached. I then glued the wing sections together. Fit is quite good as has been the fit during the whole build. The leading edge 'knuckles' were then glued in place.
Then the wing was attached. Fit is very good. There is a tiny gap at the aft portion of the wing that will need to be filled, but that was it. The tailplanes were glued together than attached to the airframe. I used the one piece elevators to keep them lined up. When dry, the elevators had the attachment tabs bent so that they could be posed in a drooped position. I also attached the ailerons and the rudder. The small piece that fits behind the cowl flaps was then installed. I left off all the clear lights until after painting.
I then started working on the landing gear and main gear wells. In step N they would have you attach the small gear doors to part F41/42 then glue this in place. Instead, glue F41/42 to the airframe and slide the small gear doors into place. Much easier. The main landing gear is quite straight-forward. I used none of the photo etch. I then skipped several steps, masked and attached the windscreen and used a spare temporary canopy in preparation for painting.
| COLORS & MARKINGS |
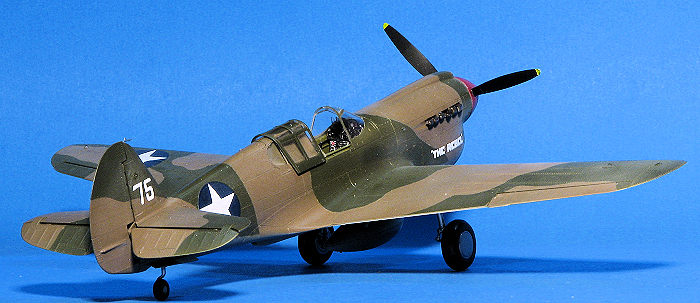 First step was a nice primer coat with Tamiya grey primer. I momentarily
considered leaving the primer for the underside color, but it is really too
light so I sprayed on some Mr.Color neutral grey. While that was drying, the
exhaust were painted with Alclad II exhaust manifold. For the upper colors I
used Hataka dark earth and dark green. Took a fair amount of masking, but that's
standard for these kinds of schemes. A clear coat of SMS gloss clear prepped the
airframe for decals.
First step was a nice primer coat with Tamiya grey primer. I momentarily
considered leaving the primer for the underside color, but it is really too
light so I sprayed on some Mr.Color neutral grey. While that was drying, the
exhaust were painted with Alclad II exhaust manifold. For the upper colors I
used Hataka dark earth and dark green. Took a fair amount of masking, but that's
standard for these kinds of schemes. A clear coat of SMS gloss clear prepped the
airframe for decals.
I had no real issues with the kit markings, but did notice that the roundels were a bit off register. I also noticed that the decals came off the backing within seconds and did not seem to succumb very well to setting solutions. As usual, I did not add the plethora of stencil markings.
I then managed to drop the kit and broke off one of the main gear wheels. After reattaching it, I added the various small main gear struts, followed by the main and tail wheel gear doors. This was followed by a semi-matt clear coat to seal in the decals.
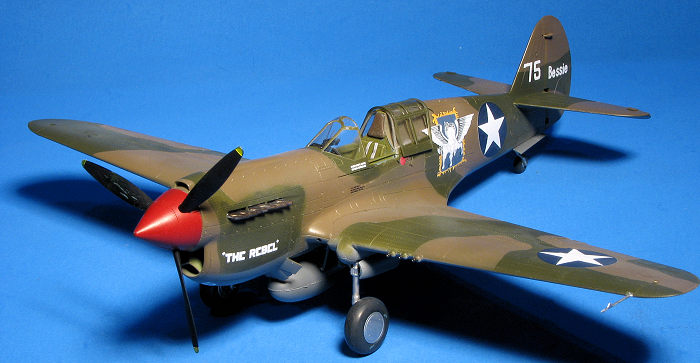
I'd previously painted and assembled the prop. I used Hikari brilliant red for the spinner, but since I sprayed it on the bare plastic, it darkened nicely. Then I installed the exhaust. This for me, was the second worst part of the build. Not only did I find it difficult to install them the same depth, but also to keep them aligned. Not only that but I lost one to the rug gnomes and so had to sand down one of the fishtail exhaust. Later a couple of them fell out as I'd apparently not gotten them properly situated. The second impossible task was installing the Liliputian wing and tail lenses. I eventually just built up several layers of clear glue to simulate those. Probably third on the list would be installing the drop tank. There is an obvious mounting post on the pylon, but it doesn't match any of the openings in the lower wings. I also found that the side braces wouldn't touch the tank without some trimming.
The prop was glued on, the pitot installed along with the landing light, and the over-wide open canopy piece was attached with some clear glue for the final steps.
| CONCLUSIONS |
This is a typical newer Eduard kit. It has a ton of promise with good fit of the major components, but is a very fiddly kit to build. It is obvious that it is aimed at very experienced modelers who are used to dealing with sometimes questionable fit of the kit's smaller pieces. In the hands of those modelers, a superb replica can be built. There is no doubt that this is a kit designed for Eduard fan-boys and is the current pinnacle of Warhawk accuracy. Those who don't want to deal with all its idiosyncracys and just want a straight forward build would probably be better served by the somewhat less accurate Hasegawa offering. Will I build another? Well yes, because the box came with two kits.
| REFERENCES |
https://en.wikipedia.org/wiki/Curtiss_P-40_Warhawk
May 2025
Copyright ModelingMadness.com. All rights
reserved. No reproduction in part or in whole without express permission from
the editor.
Review kit courtesy of my wallet If you would like your product reviewed fairly and fairly quickly, please contact the editor
or see other details in the
Note to
Contributors. Back to the Main Page
Back to the Review
Index Page
Back to the Previews Index Page