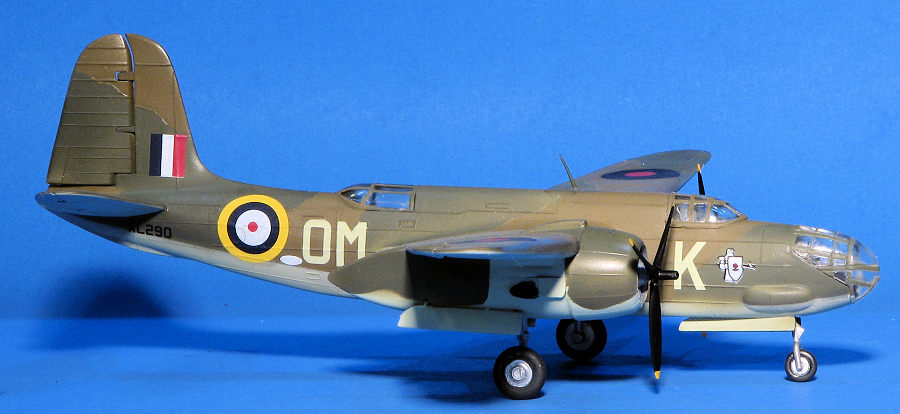
Frog 1/72 A-20 Havoc/Boston
| KIT #: | F-208 |
| PRICE: | $10.00 'used for 2 "complete" kits' |
| DECALS: | Two options |
| REVIEWER: | Scott Van Aken |
| NOTES: | Fairly crude kit by today's standards |
| HISTORY |
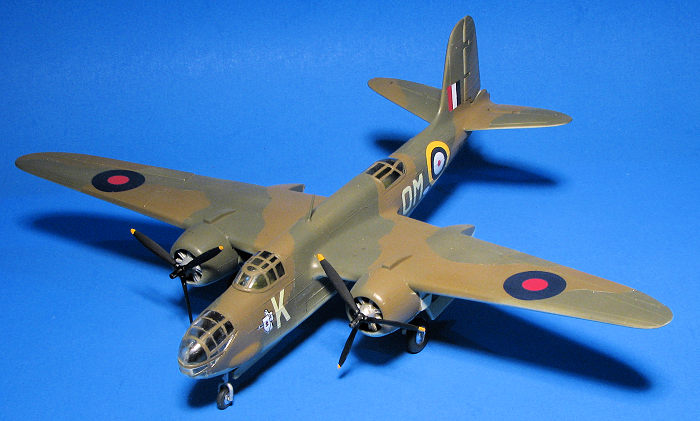 Though
initially built for France and treated with indifference by the US Army, things
changed after the original DB-7s were modified and upgraded. The Army liked
these later aircraft because of its good performance and because it had no
adverse handling characteristics. As a result, the type was ordered, initially
in small numbers but later orders increased.
The A-20C was an attempt to develop a standard,
international version of the DB-7/A-20/Boston, produced from 1941. It reverted
to the slanting nose glass, and it had RF-2600-23 engines, self-sealing fuel
tanks, and additional protective armor. These were equipped to carry an external
2,000 lb (910 kg) aerial torpedo. A total of 948 were built for Britain and the
Soviet Union, but many were retained by the USAAF after the Japanese attack on
Pearl Harbor. The Soviet A-20s were often fitted out with turrets of indigenous
design.
| THE KIT |
When I got back into model building in the mid-1970s, I built a lot of Frog kits. Several reasons. One is that I was a die-hard 1/72 modeler. Another is that they had kits of what was then some rather exotic aircraft. They also provided multiple markings options. The kits were standard fare for most model companies at the time. Raised external panel lines, sparse cockpits with crew figures, separate flight controls, and fairly basic, if not crude detailing.
This particular kit was bought from a kit sales web site and came with two complete kits. Both of them had most of the parts cut from the sprues. One had the fuselage halves already glued together and suffered from a broken prop blade and a cracked forward transparency.
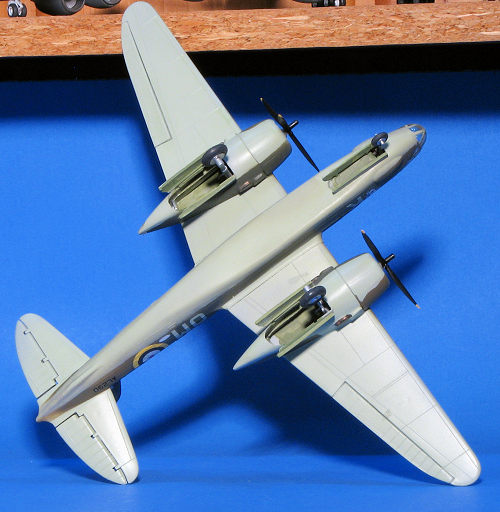 The cockpit and gunner's position consist of a floor and seat. Nothing
else. There is no bombardier's position. Two crew members are provided for the
seats. The nose gear must be installed when gluing the fuselage halves together.
This feature is also true of the main gear when gluing the engine nacelles
together. There is no gear well detail of any sort.
The control surfaces are all separate and are two pieces for each surface. There are low ejector stubs that must be removed prior to gluing the halves together. The fit is only fair and you'll find that there are fairly extensive gaps between the control and flight surfaces. As mentioned, the main gear will need to be installed prior to closing the nacelle halves. The gear themselves are fairly generic and the wheels are definitely toy-like. The kit will need a lot of nose weight to keep from tail sitting. No rear fuselage prop is provided, but you can always make one is required. Test fitting one of the two row engines found that the rear cylinders are off by about 10 degrees from where they should be. Fixing this will require some effort. There is also no positive locator for the engine, which will be troublesome in getting it centered. No real exhaust is provided. As I said, these kits are fairly crude by today's standards.
Instructions are well done, though the paper has become fairly brittle over the years. The unusable decals are for two aircraft. One is the box art plane with the RAAF in 1943 based in New Guinea. You'll have to drill the nose and install gun barrels to duplicate this one. The other is an all black 418 Squadron RAF plane from 1942. The decals are heavily yellowed and not usable. Fortunately, there are aftermarket sheets that can be used. This kit appears to be an A-20C, which was used by a number of countries.
| CONSTRUCTION |
Though the fuselage was assembled, it needed filler, especially on the multiple sink areas opposite the alignment pins and sockets. This was true of all the parts with alignment pins/sockets. Meanwhile, I assembled the rudder over the mounts on the fin. The horizontal stabilizers were then assembled and then glued onto the tail section. Once dry and faired in, the elevators were then attached.
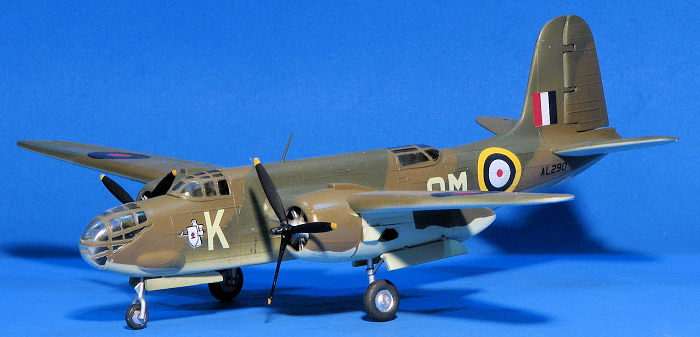 Next, I assembled the wings, trapping the ailerons in place. Note that I had to
do considerable sanding on both the wings and ailerons to remove short, fat
ejector pin towers. Once cleaned up, I assembled the engine nacelles, trapping
the main landing gear legs in the process. These were then attached to the
wings. The nacelles are handed so no concerns on getting the wrong one on the
wrong wing. Just be sure when assembling them, that the axles point outward. Fit
of the nacelles is not too bad, though the very end of them needs to have a
large gap filled and sanded smooth.
At this time, the wings were attached. They are a very tight fit, so much so that I had to sand on them to reduce the thickness of the mounting tab. Again, the fit is fair and can use filler. The engines were next. While you get two rows, they don't line up properly. Fixing it will take a lot of cutting, so I left it alone. There is no positive locator for the engines so it is a case of just getting the tips of the cylinders glued to the back of the cowling opening. I then glued the cowlings to the nacelles. Not a good fit. Then a disaster as one of the engines broke loose after the cowlings were well attached and filler applied to the gaps. It took a LOT of fussing about, but finally, I got it attached though it isn't straight. I then masked and attached the clear bits. The nose part was cracked, but I figured getting a replacement would be difficult. Engines were covered with Silly Putty and it was time for painting.
| COLORS & MARKINGS |
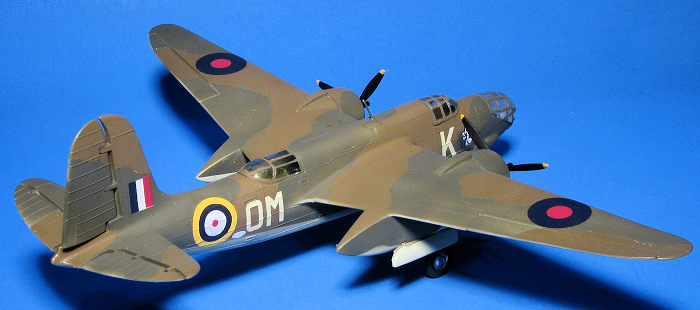 Since the kit came with no decals, I decided to go with an early RAF
option on Print Scale 72-084. This was dark earth/dark green over sky. I used
the colors from a Hataka RAF set. I got the underside painted, followed by the
upper green and then simply lost interest in the build so the kit sat for the
better part of 6 months. Once it had time to marinate, I masked the upper
surface colors and painted on the dark earth. It was the usual 2 hours of
masking for 5 minutes of painting. There were a lot of touch-ups to do and I
missed a few, but by this time, I just wanted to get it done and move on.
The Print Scale decals are excellent and provided no issues on a glossed surface. I decided to save all the stencil markings for a more deserving project. I then used Tamiya clear matte to seal in the markings. The various masks were removed and I used a bit of sprue for the radio mast as that bit was missing. Wheels were painted and glued in place on the gear with the axles for the main wheels cut flush with the wheel. I also cut the prop shafts as they were too long before gluing them. Thanks to the tons of nose weight, it sat on the nose gear. That was it.
| CONCLUSIONS |
What looked at first to be an easy build was not really. The generally poor parts fit and having to hand mask the transparencies made this a bit of a slog from time to time. While the MPM/Special Hobby A-20/Boston kits are by no means an easy effort, at least the detail is a lot better and one should put one's efforts into those. I've not built the Matchbox version, but I cannot imagine it being anything but a decent fitting effort. Save this one for the collectors.
| REFERENCES |
https://en.wikipedia.org/wiki/Douglas_A-20_Havoc
23 October 2026
Copyright ModelingMadness.com. All rights reserved. No reproduction in part or in whole without express permission.
If you would like your product reviewed fairly and fairly quickly, please contact the editor or see other details in the Note to Contributors.