| KIT #: | 1034 |
| PRICE: | $11.98 on the box |
| DECALS: | Two options |
| REVIEWER: | Scott Van Aken |
| NOTES: | Limited release |
| HISTORY |
The P-40 was one of those aircraft which would be characterized as 'the best that we have for the moment'. Though nearing obsolescence even when the war broke out for America in late 1941, the truth was that there wasn't anything better to be used. More potent aircraft like the P-38, P-47 and P-51 were being developed and wouldn't see combat for a year at the best. So, like in all wars, one fights it with what one has and hopes for the best.
 Fortunately, the P-40 had already been tried in combat
by the British in North Africa and so the results of that experience were added
to the later versions coming off the line. Truth is that at low level, the P-40
was a pretty good fighter. A bit heavy compared to some, but able to withstand a
lot of damage and able to carry a respectable load of ordnance. An experienced
pilot was able to do well in the Warhawk if they took advantage of its heavy
armament and high diving speed to do hit and run attacks. In a dog-fight,
especially against Japanese planes, it was not at its best.
Fortunately, the P-40 had already been tried in combat
by the British in North Africa and so the results of that experience were added
to the later versions coming off the line. Truth is that at low level, the P-40
was a pretty good fighter. A bit heavy compared to some, but able to withstand a
lot of damage and able to carry a respectable load of ordnance. An experienced
pilot was able to do well in the Warhawk if they took advantage of its heavy
armament and high diving speed to do hit and run attacks. In a dog-fight,
especially against Japanese planes, it was not at its best.
Even when it was surpassed by other types, the P-40 soldiered on until late 1944 with the USAAF in the Pacific/CBI and even longer with some Allied nations. The most widely produced version was the P-40N. It was a result of extensive weight reduction and had the most powerful Allison engine that would fit into the airframe. It was also equipped with drop tank or bomb racks and provided good service in the fighter-bomber role. All but the very early P-40Ns could be distinguished by the altered canopy section to the rear that provided better rear view. Not surprisingly, most surviving P-40s are this version.
| THE KIT |
Hasegawa jumped on the engraved panel line bandwagon in the early/mid 1980s and this was one of a number of WWII fighter kits that they produced. It was still before the 'do multiple versions with one basic set of sprues', but you'd also find the two larger sprues with their P-40E kit; the smaller one with the fuselage containing the N specific bits.
Even though tens of thousands of these kits have been
produced, this one only shows a tad of wear with a teeny bit of flash on one
part and some small sink areas on the lower wings near the tips. Both easy to
repair. Probably the weakest part of this kit in
 the minds of many is the
cockpit section. There is a generic tub with molded in seat and a control stick.
The instrument panel blank is set to accept a decal. Much of this Spartan
approach still continues with Hasegawa 1/72 kits, though not quite to this
degree. Fortunately for us all, there are aftermarket resin cockpit sets for
these kits so we can really fix things up. The canopy is a one-piece affair and
quite clear. Vacuform replacements are also available for those
interested.
the minds of many is the
cockpit section. There is a generic tub with molded in seat and a control stick.
The instrument panel blank is set to accept a decal. Much of this Spartan
approach still continues with Hasegawa 1/72 kits, though not quite to this
degree. Fortunately for us all, there are aftermarket resin cockpit sets for
these kits so we can really fix things up. The canopy is a one-piece affair and
quite clear. Vacuform replacements are also available for those
interested.
Wheel wells are a respectable depth and have sufficient detail for most. Gear are well done and quite scale as are the diamond tread tires. Again, resin replacements are available and in this case recommended as the N often had spoked wheels, something not provided in the kit. Some consider the prop to be a bit narrow, but it looks fine to me. The only underside options are a single bomb or drop tank.
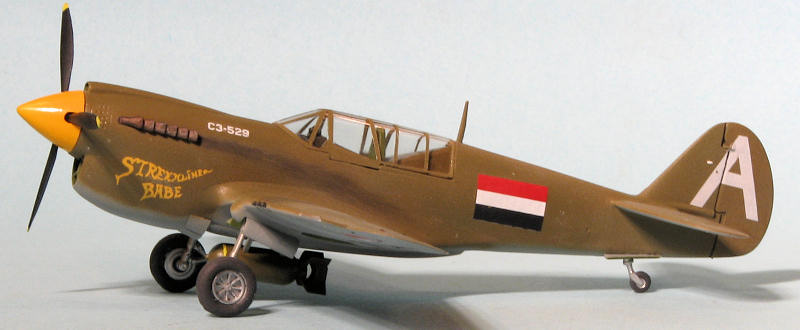
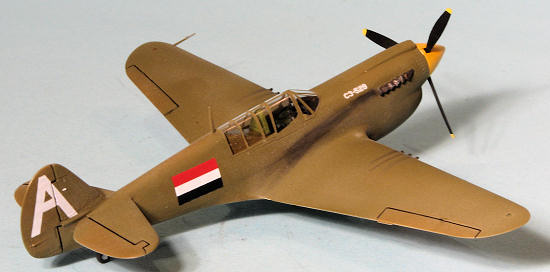
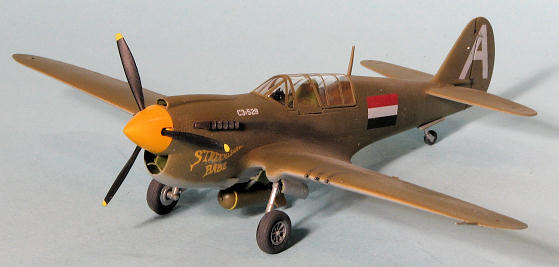
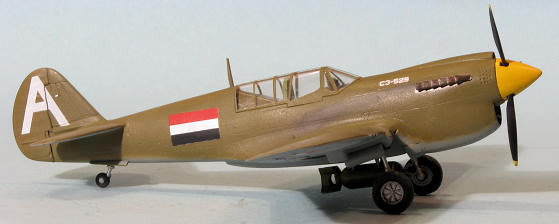
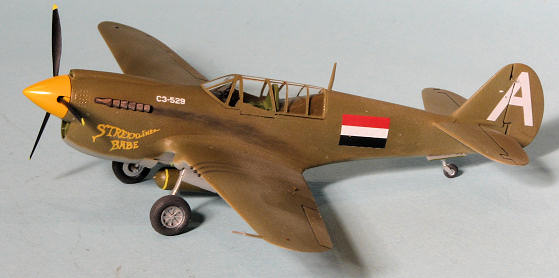
Markings are provided for two aircraft. One is the box art plane from the 13th Fighter Group (the term Pursuit Group went away shortly after the start of the war). This was flown by the Group's commanding officer and is in unpainted metal. The other is from the 7th FS/49th FG and flown by Jack Fenimore while based in New Guinea. Typical of this unit, it has a white empennage, white wing leading edges and a blue spinner with a white band. It is probable that the underside of the horizontal stabs is the standard underside color, in this case, Neutral Grey. I built a Mauve kit with these markings and here is the article so you can see the camo scheme. Decals are done by Aeromaster so are superbly done and not the usual Hasegawa kit decal quality.
| CONSTRUCTION |
This kit was built sort of in conjunction with a P-40E kit. I had ordered a True Details cockpit set for the P-40E and found out that I had two of them already in the stash. So I decided to do an N and used this particular kit.
 Construction
went pretty much like the earlier build. This one had the interior bits painted
with Interior Green once I glued the seat and stick to the resin tub. The side
panels were also painted at this time. I did some brush painting using the guide
that was provided in the True Details instructions. The side panels were then
glued at the bottom and slightly angled out.
Construction
went pretty much like the earlier build. This one had the interior bits painted
with Interior Green once I glued the seat and stick to the resin tub. The side
panels were also painted at this time. I did some brush painting using the guide
that was provided in the True Details instructions. The side panels were then
glued at the bottom and slightly angled out.
Meanwhile, I cemented the fuselage halves together after installing the radiator and divider in place. I also removed the interior alignment lugs. By the way, you have to pretty well remove the resin pour stub from the bottom of the resin cockpit or you will not be able to get the wings installed. Speaking of wings, the upper and lower halves were cemented together and the hole for the gun camera opened up so that item could be glued on later. With the interior done and the usual seam work done on the fuselage, the interior was installed. You need to clamp the side pieces in place or you will get a poor fit. Clamping tweezers work fine for this.
The wing was then installed as were the tailplanes. There is a seam on the flaps that needs to be filled and that was done. After making sure all the interior bits were in place, I masked off the interior save for the back area. Apparently this was painted the exterior color, something I have never done with a P-40N and I've built quite a few. Yet it seems that this was the way it was done. I headed for the paint shop for the first round of painting.
| COLORS & MARKINGS |
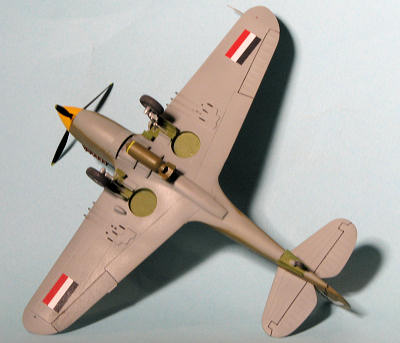 planes
were originally delivered in standard P-40 colors of Olive Drab over Neutral
Grey with Medium Green splotches along the wings. In these markings, they
also had an insignia on the upper left to cover the US insignia. When
repainted, the Medium Green was overpainted and there was no upper wing
insignia. The aircraft were actually rather plain aside from a name or nose
art. I did 'Streamline Babe' as representative of an overpainted aircraft.
Like all these planes they were part of 120 Squadron with different colored
spinners. This one is yellow and adds some color to the aircraft.
planes
were originally delivered in standard P-40 colors of Olive Drab over Neutral
Grey with Medium Green splotches along the wings. In these markings, they
also had an insignia on the upper left to cover the US insignia. When
repainted, the Medium Green was overpainted and there was no upper wing
insignia. The aircraft were actually rather plain aside from a name or nose
art. I did 'Streamline Babe' as representative of an overpainted aircraft.
Like all these planes they were part of 120 Squadron with different colored
spinners. This one is yellow and adds some color to the aircraft.| FINAL CONSTRUCTION |
With the markings in place, clear matte was sprayed on to hold
in the decals. I then cut and attached the gear doors and installed the prop and
spinner. Since the kit only supplies the covered wheels, I had to look around
for some spoked whels for this one, as that is usually what was installed on
P-40Ns. Aries had a set and so I ordered them from the LHS. I was surprised by
the $6.99 price, even if they did come with some wheel masks. They also have the
less usual circumferal tread instead of the normal diamond pattern. So I sprayed
the wheels with a very dark grey and applied the mas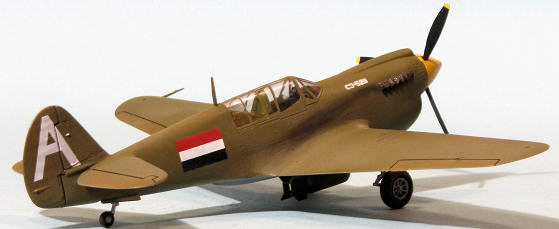 ks
over the tire section before spraying the hubs in Aluminum. The masks are a tad
large so I had to touch up with a brush. Frankly, the hubs are so pronounced
that the masks are really not necessary.
ks
over the tire section before spraying the hubs in Aluminum. The masks are a tad
large so I had to touch up with a brush. Frankly, the hubs are so pronounced
that the masks are really not necessary.
I also had to drill out the hubs to match the Hasegawa axle stubs. These were attached and I attached the exhaust, which had been painted with Vallejo Tinny Tin, cut the gear doors and glued those in place. I should mention that I have been told that the Hasegawa P-40 landing gear are too short when compared to photos. Be that as it may, I have built a lot of these kits and never really noticed this so it must not be that obvious, at least not to me.
I built up the bomb and attached the rack. I shakily painted a yellow ring around the forward section of the bomb and glued it in place. No long wire antenna needed as these planes had VHF radios that did not need the long wire. A bit of pastels for the exhaust and gun stain, the masking was removed from the canopy and that was it.
| CONCLUSIONS |
 Whether
it is this Hasegawa kit or the Academy version, you really cannot go wrong on
these if you model 1/72 scale. There are a ton of aftermarket bits and decals
for these if you wish to get past the basics. You can also find these pretty
easily on the second hand market so no need to take out a loan when it comes
time to build them.
Whether
it is this Hasegawa kit or the Academy version, you really cannot go wrong on
these if you model 1/72 scale. There are a ton of aftermarket bits and decals
for these if you wish to get past the basics. You can also find these pretty
easily on the second hand market so no need to take out a loan when it comes
time to build them.
July 2012
Copyright ModelingMadness.com. All rights reserved. No reproduction in part or in whole without express permission from the editor.
If you would like your product reviewed fairly and fairly quickly, please contact the editor or see other details in the Note to Contributors.