Revell 1/72 P-36C Hawk
| KIT #: | H-677 |
| PRICE: | $1.30 |
| DECALS: | One option |
| REVIEWER: | Scott Van Aken |
| NOTES: | Part of a set of three that included a MC.200 and P-26 |
| HISTORY |
The Curtiss P-36 Hawk, also known as Curtiss Hawk Model 75, was a U.S.-built fighter aircraft of the 1930s. A contemporary of the Hawker Hurricane and Messerschmitt Bf 109, it was one of the first fighters of the new generation – sleek monoplanes with extensive use of metal in construction and powerful piston engines. Obsolete at the onset of World War II and best known as the predecessor of the Curtiss P-40, the P-36 saw only limited combat with the United States Army Air Forces but was extensively used by the French Air Force and also by British Commonwealth and Chinese air units. Several dozen also fought in the Finnish Air Force against the Soviet Red Air Force. With around 1,000 aircraft built, the P-36 was a major commercial success for Curtiss.
| THE KIT |
The Revell kit of the
P-26 was released in the later 1960s along with several other 1/72 aircraft such
as the P-26, Tempest, Wildcat, Macchi C.200, PZL P.11c, P-40E and a number of
others that for a while, were among the best done. All of these kit are some of the
best in this scale from this time period. Not ultra-detail ed,
they are missing any wheel bay detail (if appropriate), have but a pilot figure
to fill the cockpit and are not exactly parts intensive.
ed,
they are missing any wheel bay detail (if appropriate), have but a pilot figure
to fill the cockpit and are not exactly parts intensive.
However, they are accurate in shape and well engineered. The P-36 consists of a one-piece lower wing with the dihedral built into it. The wheels are a single piece, with the main gear molded into the gear door. This allows a hub to be fitted to the 'outside', allowing the wheels to turn. A fairly nice engine is provided and this fits into the cowling which in turn
is fitted with a nicely done prop. The canopy is fairly well done and in several sections. The windscreen has a tab that fits into a slot in the upper fuselage. The lone option is to have shell collectors fitted under the wings. Since the holes are already drilled, most will put them on. This is all complemented by a simple, but sturdy stand.
Instructions for the time were well done with generic color information and markings for this one may well have been Finnish AF, but I don't really recall.
| CONSTRUCTION |
This kit was built back in the dim past, before my skills were
properly honed to the razor sharp level they are today. It was after I'd learned
to scrape seams, use sandpaper and filler so it isn't that big a disaster!
First thing I did was to paint all the 'inside' bits with good old Testors Chromate Green. Yes, it isn't the correct shade, but back in 1980 or so, that wasn't really a concern. Neither was totally cleaning up the parts once removed from the sprues, but what the hey, we all went through that stage and some are still there!
With the inside bits painted, the fuselage halves were glued together as were the wings. These were then glued in place along with the one-piece tail planes. The fit of the wings is excellent with nearly no filler needed and none on the upper wing root. One does have to be sure to trap the tail wheel between fuselage halves at this time. The engine was painted and cemented into the cowling, which was tacked onto the forward fuselage.
Landing gear were glued in place minus the tires and hubs and the windscreen and canopy were glued in place. I also glued on the spent shell trays. The tail wheel doors and little 'knuckle' doors were also left off. The clear bits were then masked (including the left off quarter light windows) and it was time to paint.
| COLORS & MARKINGS |
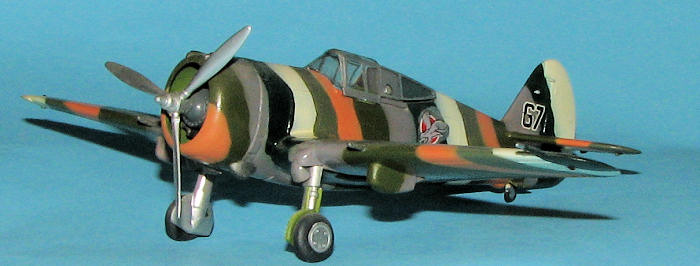
I have always liked those experimental camo schemes that were
applied to the P-36 and with a Microscale decal sheet containing those markings
in hand, I went for it.
 Now you have
to realize that this sheet was pre-FS595 and so the colors provided were
generalizations. In the following decades, more information on the exact shades
has come to light so many of these colors are no longer considered correct.
However, back then I did what I could with the information provided.
Now you have
to realize that this sheet was pre-FS595 and so the colors provided were
generalizations. In the following decades, more information on the exact shades
has come to light so many of these colors are no longer considered correct.
However, back then I did what I could with the information provided.
First, the canopy area and the center part of the fuselage along with the prop and gear doors were painted with Testors non-buffing aluminum. A small section of the fuselage was masked as that would be where the unit badges would go. I then started painting the various colors according to the instructions. Some were mixed and some were straight from the bottles. At this time, I was using Gunze acrylics almost exclusively and so that is what was sprayed on. There was a LOT of masking done to get these things done properly and that is what took most of the work. I started with the lighter shades and masked over them as the painting progressed.
Once it was done, I applied the few markings from the sheet that were needed.
| FINAL BITS |
 The
usual touch up painting was needed and the last pieces were glued in place. This
consisted mostly of gear doors, the wheels and hubs, the rear quarter windows
and the prop.
The
usual touch up painting was needed and the last pieces were glued in place. This
consisted mostly of gear doors, the wheels and hubs, the rear quarter windows
and the prop.
| CONCLUSIONS |
And there you have it. I know this kit is not the most detailed, but it is still quite accurate and can be found without too much trouble, though I know you'll fork over more than 85 cents for it. If you are looking for a relatively easy build or something that you can add extra detail to, then this would be an excellent place to start.
| REFERENCES |
May 2008
Copyright ModelingMadness.com If you would like your product reviewed fairly and fairly quickly, please
contact the editoror see other details in the
Note to
Contributors.