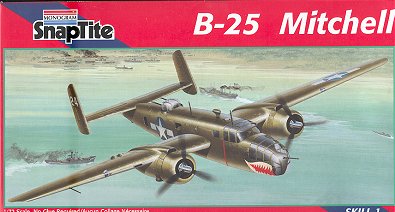
Monogram 1/72 B-25C Mitchell
|
KIT # |
1100 |
|
PRICE: |
$9.50 |
|
DECALS: |
Aren't any. They are stickers!! |
|
REVIEW: |
|
|
NOTES: |
It's a snap kit. |
|
HISTORY |
Renowned for its exploits during the early war with the daring attack from the Hornet, the B-25 went on from strength to strength and ended the war as one of the most used Allied medium bombers. Finally supplanted by the A(later B-)-26 Invader, the Mitchell soldiered on as a bomber trainer and VIP aircraft well into the late 1950's. Several Central and South American Air Forces used the B-25 as their primary bomber. Many of these later model B-25s found thier way into the hands of warbird owners who lovingly show off their pristine aircraft at every opportunity.
|
THE KIT |
The subject of Monogram's snap kit is a very early B-25C; probably a -1 or -5. Unlike most of these aircraft, the kit does not supply the belly turret, an item that was removed from some aircraft, particularly those operating with the 5th Air Force in the Southwest Pacific. As an aside, it is interesting that Monogram picked such specific early models for both this kit and their Snaptite B-26 Maurader. While the majority of the builders of this kit (i.e. young children) don't care, those of us who try to make a rather accurate representation of a model will have difficulty finding replacement decals for this kit. Undoubtedly you are by now wondering why I am bothering with this kit when there is a superb early Mitchell produced by Italeri. Our club is having a 'build the same kit' contest and this is what was picked. We cannot use any aftermarket or other spare parts besides decals. Any modifications must use what is in the box or scrap/sheet styrene. No spares box goodies, either. This will really challenge many of us to exercise our skills. Hey, it is like 20 years ago; before the huge influx of aftermarket parts.
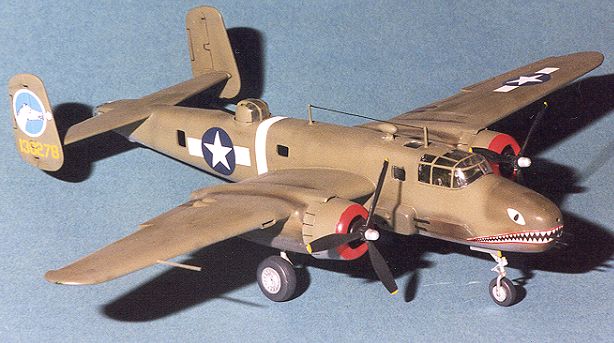
Due to the horrid stickers in this kit, I had to use aftermarket decals. I also wanted to minimize the interior scratchbuilding so decided to do a 5th AF gunship. This meant that I could paint over the bombardier's position. In addition, I would have to scratchbuild the side gun pods and drill holes in the nose for the four .50 cal guns that were there. It also meant that I had to do some converting of this kit from the C model to a D model. The biggest external difference was the engine exhaust which changed from a single large collector to multiple exhausts either on the outside of the engine cowling, or as in the earlier D's as a series of exhaust pipes just under the cowl flaps. There were other minor differences that will be covered as the project goes along. Thankfully these aircraft had the lower turret removed so I wouldn't have to build one!!
|
CONSTRUCTION |
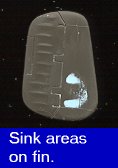
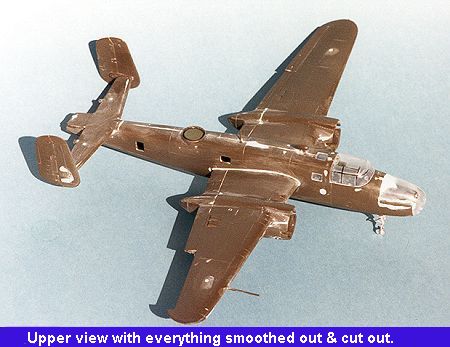
What one gets when opening the box is a mass of Olive Drab plastic. Sink marks abound, especially where the huge locator pins and sockets are placed. There is also considerable flash on many of the parts. First job is to clean up the flash and fill in the sink marks. That done, the large locator pins were removed so that pieces could be test fit without it being permanent. Actually, fit is quite good. It looks like there will be a considerable gap at the wing root that will need filled and smoothed. This is similar to what I experienced with the B-26 many years ago.
|
|
|
|
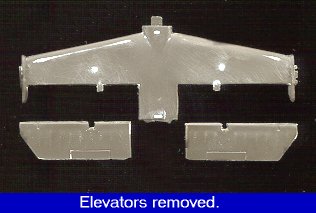
Once the sinks were filled, the ailerons and horizontal control surfaces were cut off to be repositioned later. The design of this kit makes this a simple task as they are molded on to one half of the wing/stabilizer. The rudders, however are one piece and a rather complex shape so those were not removed. Call me chicken if you want.
|
|
|
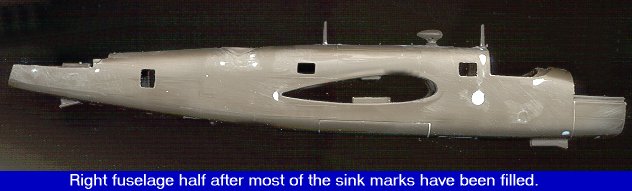
The interior is VERY basic consisting of a floor with built in seats and instrument panel, and a set of control sticks. You also get a couple of crew, but frankly, they are not well done and were left off. First part was painting the interior bits. These were done in a darkish interior green. Several conversations with those who restore aircraft, led me to the discovery that on these early aircraft, it was common not to paint interior areas other than the cockpit as the aircraft were not expected to last long enough to corrode! One thing I did was to use a few extra decal bits to add some 'boxes' to the cockpit, just to make it busier looking. An instrument panel and seat harness decals were scrounged from the spares box, otherwise it would be very bare indeed. At the same time, a bulkhead was added behind the cockpit and the cockpit attachment point was removed. This is to allow the cockpit to slide back a bit as it is way too far forward as kitted. Next the nose gear was painted aluminum and installed, as was the base for the rear turret. The windows aft of the cockpit were cut from the canopy and glued in one half. When windows had dried, the fuselage halves were glued together. It was then set aside while I went to work on the wing and engine nacelles.
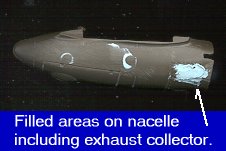
The main gear had the oleo scissor hinge drilled out and one wing underside was attached to the upper wing half. The main gear were then set in the engine nacelles and the nacelles glued together. These items then had thier seams sanded and filled as necessary. Test fitting showed that it would easier to fill seams if the wing was first installed and then the nacelles glued on, so that is what I did. The horizontal stabilizer (sans fins and elevators) was also glued in place. When dry, multiple applications of filler were required to get rid of the rather large gaps. Speaking of large gaps, what is also what I had where the wings fit into the fuselage! Those took several runs with the filler as well. Then on to the engine nacelles. SURPRISE! More gaps! Out with the filler again for these! Gee this kit is using more filler than an old Airfix Kit!
|
|
|
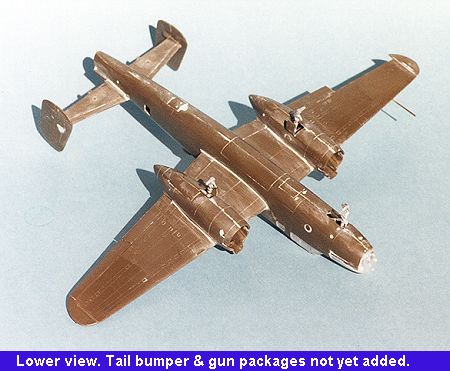
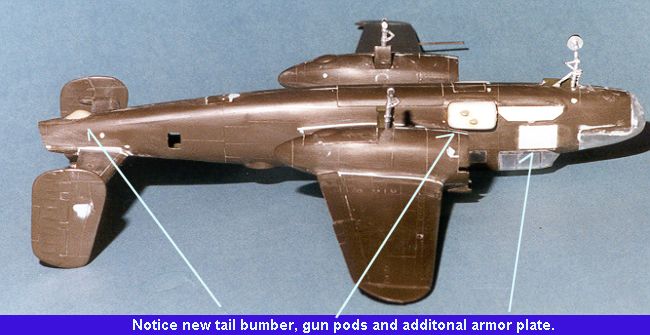
Next area for gluing was the nose transparency, but before that, I filled the nose with as much weight as I could fit in there. Superglue was used to attach the nose and it needed clamped in place as the transparency was wider than the nose. Once dry the transparency had filler applied to take care of gaps and then sanded smooth. This is a gunship so this area would be painted over. Then the main canopy was attached with non-fogging superglue and then it an all transparencies masked in preparation for painting. Looking over the airframe, I noticed a couple of things I had forgotten. One was the tail bumper. The kit version isn't accurate for the plane I was doing so I used some A+B putty and shaped a new tail bumper.
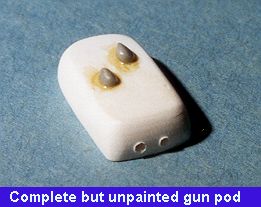
Next the side gun pods were made from layers of styrene sheet glued together. Not really a very difficult job, just a bit time consuming. Once the styrene layers were good and dry, I used a bastard file to get the large chunk down to close to the length of the gun pods. Then a razor saw was used to cut several segments. This left me with a number of rectangles basically the proper shape. Some more filing and sanding got them down to the size and shape I wanted. These pods were field modifications and not as streamlined as those in later, dedicated strafers. A couple of holes were drilled out in the front for the gun barrels. Then a piece of sprue was roughly shaped to a teardrop shape and several sections were cut off. These were to be the bulges on the side of the gun pods. The bulges were staggered as I saw in photos. Next the pods were glued low on the side of the fuselage, just forward of the wing root. Some filler was needed to smooth things out a bit. Looking at photos, I noticed that there was a piece of plating added just forward of the pods to protect the skin of the aircraft from the blast of the guns. That was added using thin plastic sheet. Then it was time to do some painting.
|
PAINT & DECALS |

The first bits to be painted were the cowlings. They were painted in gloss white in preparation for the overlaying color. That overlaying color was gloss red, courtesy of Gunze Sangyo acrylics. Once dry, it was masked off and the airframe was painted Neutral Grey. In addition to being the underside color , it also makes a great primer and was used to see what I missed. Happy that all was in pretty good shape, the Neutral Grey underside areas were masked off as were the red cowling fronts, and the airframe was painted faded OD by Extracolor. As luck would have it, I had mixed it wrong and it took almost a week to dry. Next I used fresh OD, also by Extracolor and painted the gun pods, nose and extra armor plate with this color. I also highlighted all the panel lines with it. Then the panel lines were lightly resprayed with the faded OD and the aircraft left to dry.
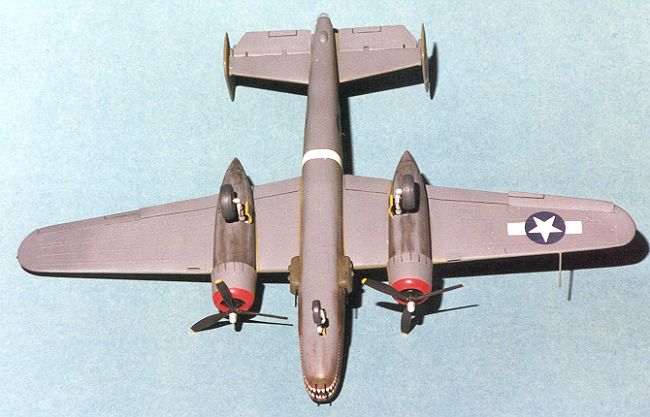
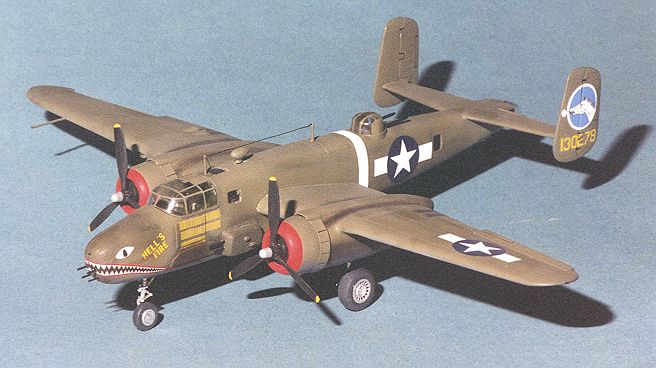
Once nice and dry (and this was a two week evolution), Bare Metal Foil was added to the oleos, the wheels snapped in place and the decal sheet dug out of the decal dungeon. Microscale sheet # 72-373 was used. It has schemes for a B-25H and three B-25C/D aircraft of the 5th AF in the Southwest Pacific. I had already used the 405 BS/38 BG green dragon about 15 years ago, so of the two left, I chose to do 'Hell's Fire' of the 500th BS/345 BG. This one has a nice shark mouth, and a wide, white stripe around the mid fuselage to give it some additional color. The Microscale decals gave me no real problems except for the fact that the sharkmouth and fuselage stripe were not designed to go around compound curves. They reacted well with Champ decal setting solution.
After all the decals were dry and excess solution wiped from them, the aircraft was given a coat of clear acrylic matte. Once that had dried, the canopy was unmasked and final bits were added on. This included all the guns (most of which were made with from stretched sprue and drilled out), and the clear tail cone. Then pastels were used to simulate engine exhaust as well as gun stains. These were then overcoated again with a bit of clear matte to seal them. Finally an antenna was made using stretched sprue and the nose decal was touched up a bit.
|
CONCLUSIONS |
Were one to buy this kit for a new modeler, I could not recommend a more appropriate kit. It can be snapped together and stickered in a very short time. The props and wheels turn so the budding builder will have a ready to play with aircraft in no time at all. For the serious builder, put this one down on the very bottom of the 1/72 B-25 list. For the purposes of our contest (which I was fortunate to win) it was a good choice, but it is a kit I am unlikely to ever build again!

|
REFERENCES |
Deadly Duo; the B-25 and B-26 in WW-II: Charles A Mendenhall, 1981
Warpath Across the Pacific: Lawrence J Hickey, 1986, 2nd edition
Copyright ModelingMadness.com. All rights reserved.
Back to Reviews Page 2019