Testors/Hawk 1/72 SNJ/T-6 Texan
Kit Number: 609
Price: $3.50 MSRP
Decals: Two USN Versions; one very colorful early WWII, the other Post war in overall aluminum
Reviewer: Scott Van Aken
Date of Review: 13 August 1997
The most prolific trainer of the WWII period was undoubtedly the North American T-6/SNJ. Many T-6/SNJ variants are still flying today, thanks to thier ease of maintenance, sturdiness and aerobatic abilities. They are also just downright fun to fly.
The Testors kit of the SNJ is actually the old Hawk mold of this kit as Testors bought all the Hawk molds when the company went out of business. Suffice it to say, this kit is simple in the extreme, with one piece wings and stabilizer, no cockpit details, and just an imprint of the engine in the cowling. There are 19 parts including a two-piece stand. Quite unexpected in a kit from the 1950s and early 60s is that all the details and panel lines are nicely engraved.
I couldn't let this kit be built without an interior, so one was cobbled up using Aeroclub seats and various bits and pieces of spare plastic. Since the greenhouse is rather thick and distorts the interior somewhat, it is not necessary to go to great lengths to superdetail the cockpits. once the interior is completed and the fuselage glued together (the tail wheel is part of one half so care needs to be taken not to break it off), it is time to fill the hole in the wing where the stand goes. Once that is done, it can be glued to the fuselage and the horizontal stabilizers and canopy attached. Some putty is required for the wing and more is required for the horizontal stabilizers to get a nice fit. Actually, much of that could be reduced by careful fitting and trimming.
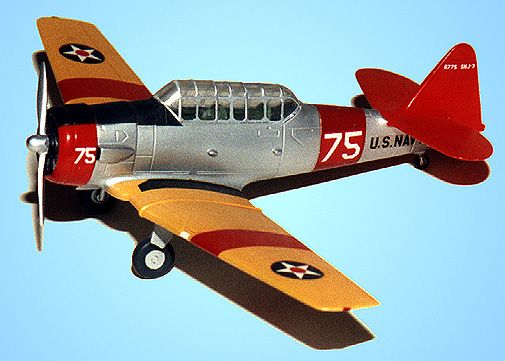
The cowling/engine combination is a separate item that can be attached at a later stage. Actually, this is helpful as it makes it easy to paint and attach the propeller. I used the kit decals for the very colorful scheme of silver fuselage, yellow wings and red tail of an SNJ-3. Testors paints were used for the yellow wings (don't forget that this color wraps under the leading edge) , aluminum fuselage and under wing area, and the red tail and cowling. After the usual masking and painting, it was time for the decals. They are Scalemaster and fit beautifully, although the red wing and fuselage stripes are a bit transparent and are a different color where there is a darker background under the wings and on the fuselage. Strangely, the white 75 on the fuselage band is well backed with white. Why wasn't the entire band done this way?
Once dry, the engine was painted black and drybrushed, the exhaust opened up, the prop installed and the landing lights painted white. Finally the antiglare panel was painted black. It looks very much like the aircraft on the cover of the book, 'The Incredible T-6: Pilot Maker', by Walt Ohlrich and Jeff Ethell. Last assembly was the installation of the landing gear, wheels and doors. There is almost no depth to the gear wells so it is up to you if you want to hassle with it.
I have built a number of other Testors/Hawk kits, as they are a fun kit to build. On several of them, I have replaced the plastic prop with an Aeroclub version and that helps the kit a lot. Highly recommended to all builders as long as you are not fussy about details!
Copyright ModelingMadness.com. All rights reserved.
Back to Reviews Page 2017