Hasegawa 1/72 P-47D Thunderbolt
|
KIT # |
00180 |
|
PRICE: |
$16.98 |
|
DECALS: |
One aircraft |
|
REVIEWER: |
|
|
NOTES: |
'Royal Air Force' boxing |
|
HISTORY |
For a peek in the box and the usual brief history on the type, visit the preview
|
CONSTRUCTION |
There is nothing that improves these Hasegawa kits more than a resin detail set. The cockpits are especially bare in this older kit, consisting of naught more than a big seat for the pilot figure. Though many 1/72 Hasegawa kits are screaming for a resin cockpit, the cries have been heard by True Details for the P-47 kit. Set 72457 is what you want and it will set you back a cool $4.00. Cheap by any standards of today and a real boon for this kit.
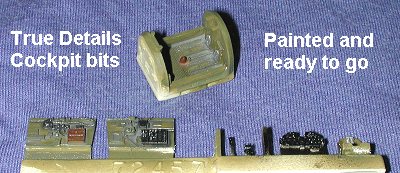 I started by painting all the resin bits while still attached to
the blocks. This consisted of basically spraying everything with Aeromaster US
Interior Green. Yes, I'm sure that there is a rather unique 'Republic Interior
Green' shade, but for most of us, generic Interior Green will do just fine,
thank you. The instrument panel and some other bits were then painted flat
black and details picked out in various other airplane-appropriate colors.
I started by painting all the resin bits while still attached to
the blocks. This consisted of basically spraying everything with Aeromaster US
Interior Green. Yes, I'm sure that there is a rather unique 'Republic Interior
Green' shade, but for most of us, generic Interior Green will do just fine,
thank you. The instrument panel and some other bits were then painted flat
black and details picked out in various other airplane-appropriate colors.
While all that was drying, the wings and drop tanks were glued together. The kit offers bombs, but my T-bolts are not mud-movers, they are escort fighters! When the interior bits were dry, they were carefully sawed off the resin backing/blocks and glued together as shown in the instructions. What I didn't do was to remove the resin block from the bottom of the tub. If you trim the forward lower section to clear an obstacle in the fuselage half, you don't have to go through all that sawing and dust. I also did not glue in the side panels. True Details designs this so that you slide the side panels in place and then glue them. What I did was to slide them in place and then put slow drying superglue on the back of them. When the interior was in place, I was able to adjust the side panels to best fit before the glue had set.
 After than was installed, the other fuselage half was glued in place and the
usual bits of filler used once all had dried. I found that the forward fuselage
and the area around the turbocharger exhaust were the spots that needed the
filler. On the wings, some was needed on the underside near the wing tips.
The wings were then glued in place and when dry, the small areas at the join had
filler applied and then sanded smooth. The tail planes fit quite well and I did
nothing more than sand the join to get rid of the glue that had oozed up at the
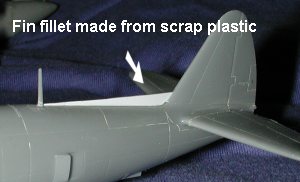
joins. Looking through my pitiful collection of 1/72 bubble top Jug decal
sheets, I realized that all the schemes I had for them were for planes with the
small fin fillet. I then cut a section of card stock to the proper size and
glued it in place. I can only hope that the Academy kit has this included as
this feature was retrofitted onto all earlier bubbletop P-47s in the combat area
once they came out in the -30 version.
After than was installed, the other fuselage half was glued in place and the
usual bits of filler used once all had dried. I found that the forward fuselage
and the area around the turbocharger exhaust were the spots that needed the
filler. On the wings, some was needed on the underside near the wing tips.
The wings were then glued in place and when dry, the small areas at the join had
filler applied and then sanded smooth. The tail planes fit quite well and I did
nothing more than sand the join to get rid of the glue that had oozed up at the
joins. Looking through my pitiful collection of 1/72 bubble top Jug decal
sheets, I realized that all the schemes I had for them were for planes with the
small fin fillet. I then cut a section of card stock to the proper size and
glued it in place. I can only hope that the Academy kit has this included as
this feature was retrofitted onto all earlier bubbletop P-47s in the combat area
once they came out in the -30 version.
At this time, the cowling was tacked on and the cockpit stuffed with tissue. It was then time to head for the paint shop.
|
PAINT & DECALS |
 First step was to apply a coat of primer. In this case, it was Floquil Reefer
white. Two reasons. One was that the cowling was to be painted yellow and I
needed a white base. Secondly, it allowed me to see any problems and would be a
good base coat for the light colored gloss enamel that would be put over it.
Then the initial coat of Alclad II aluminum was sprayed on. This is NOT a light
or shiny color as aluminum is a rather dark shade if not polished. I then masked
off several sections and sprayed other shades of aluminum on the kit to add some
interest to it.
First step was to apply a coat of primer. In this case, it was Floquil Reefer
white. Two reasons. One was that the cowling was to be painted yellow and I
needed a white base. Secondly, it allowed me to see any problems and would be a
good base coat for the light colored gloss enamel that would be put over it.
Then the initial coat of Alclad II aluminum was sprayed on. This is NOT a light
or shiny color as aluminum is a rather dark shade if not polished. I then masked
off several sections and sprayed other shades of aluminum on the kit to add some
interest to it.
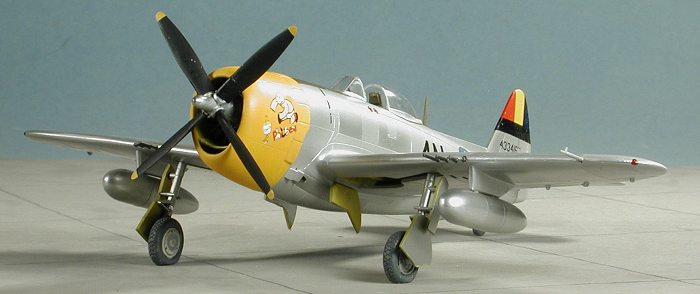
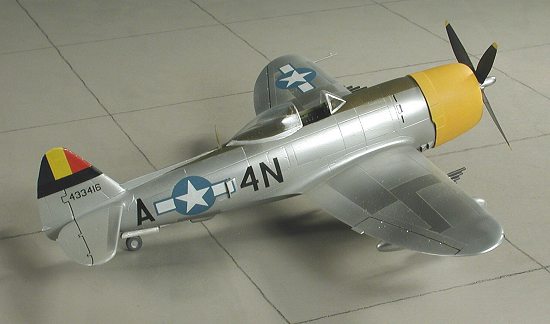
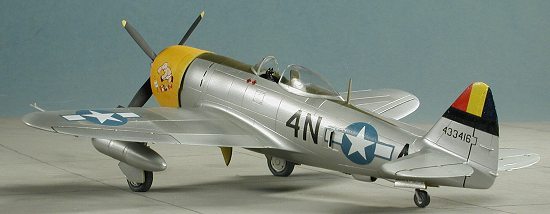
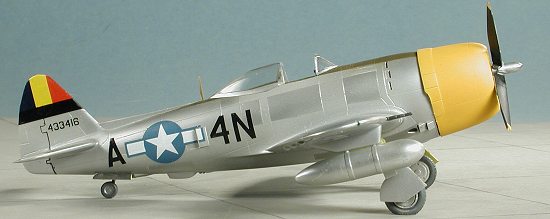
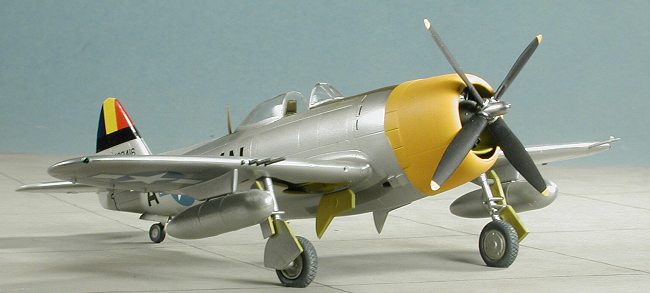
Then the plane was masked and the OD anti-glare panel was painted. Make sure that the fin fillet is masked as this was not painted. The cowling was given a coat of yellow. Then the kit was taken back to the workbench and the landing gear installed in preparation for decals.
I had decided to use a rather old Superscale sheet; 72-278, that had a 394 FS/
467 FG T bolt on it. It has some rather unusual faded insignia that I'm not sure
is correct, but does add some interest to things. Taking the first decal from
the sheet (the nose art), it was wetted and applied. Or should I say, I tried to
apply it. Apparently the years have not been kind to this sheet as the nose art
started to unravel. Not exactly a sterling start. Though some of it is a bit
mangled, I got most of it on intact. Since this sheet was produced before the
Hasegawa kit reached the market (the Jo-Han kit is what is recommended), the
fuselage insignia had to be cut to clear the cooler exhaust door. Then I
went to the Microscale Superfilm and recoated all of the rest of the decals on
the sheet to prevent them from similar
 problems. Because of the
fussiness of the decals, I forgoed....forewent....err.... I didn't put on any of
the small stencil decals
problems. Because of the
fussiness of the decals, I forgoed....forewent....err.... I didn't put on any of
the small stencil decals
The only problem I have ever run into when using Superfilm is that the coating induces a tendency for the decals to curl up when applied. Applying setting solutions only seems to exacerbate this tendency, however, some careful installation and later application of mild setting solution does help. The fin decals don't cover completely, so after they were on and dry, they were touched up using Testors paint in the small square bottles. Those colors were an exact match.
|
FINAL CONSTRUCTION |
 With the decals on, it was
time for the final pieces. This included installing the engine into the cowling
and then adding the prop. This was a press fit as it is quite tight. Then I
installed the True Details wheels after trimming back the axles on the main
gear. The gear doors were cut apart and glued in place. Then for the canopy. I
wanted to pose it open, but Hasegawa's canopy is a single piece. I bought some
Squadron replacement vacuform canopies for this purpose, but frankly, they were
a waste of money. The demarcation line between the glass part and the frame is,
for all practical purposes, non-existent. This makes it almost impossible to
mask. I even tried Bare
With the decals on, it was
time for the final pieces. This included installing the engine into the cowling
and then adding the prop. This was a press fit as it is quite tight. Then I
installed the True Details wheels after trimming back the axles on the main
gear. The gear doors were cut apart and glued in place. Then for the canopy. I
wanted to pose it open, but Hasegawa's canopy is a single piece. I bought some
Squadron replacement vacuform canopies for this purpose, but frankly, they were
a waste of money. The demarcation line between the glass part and the frame is,
for all practical purposes, non-existent. This makes it almost impossible to
mask. I even tried Bare 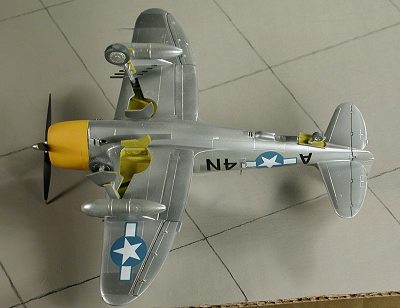 Metal
Foil as a masking material as it is super-sensitive and generally shows even the
faintest lines underneath it; no joy. My only other option was to cut the kit
canopy. I looked at my razor saws and even the thinnest of them was too thick.
Fortunately, the clear plastic is commendably thin, so after a semi-lengthy time
of careful scribing with a scalpel, I managed to separate the windscreen from
the canopy.
Metal
Foil as a masking material as it is super-sensitive and generally shows even the
faintest lines underneath it; no joy. My only other option was to cut the kit
canopy. I looked at my razor saws and even the thinnest of them was too thick.
Fortunately, the clear plastic is commendably thin, so after a semi-lengthy time
of careful scribing with a scalpel, I managed to separate the windscreen from
the canopy.
As a side note on the canopy, I masked it and sprayed it with a few coats of Alclad II. Then I put tape on the inside of the canopy as well when I cut it. Despite the rather intense handling, no Alclad II came off on my hands, nor did it attack the plastic of the canopy. I can only reiterate that when using Alclad II, applying several thin coats is the way to go.
|
CONCLUSIONS |
Again, a very nice little 1/72 kit from Hasegawa. Despite not being the cutting edge of models, these are fine kits. What makes them equally nice is that they can often be found at what goes for pocket money nowadays at various swap meets and on eBay. Add the True Details cockpit and wheels and you have a superb model. As a late note, I've been told by many that the fin fillet is the wrong shape and so no need to resend that info to me!
November 2002
#1247 in a series
Copyright ModelingMadness.com. All rights reserved. No reproduction in part or in whole without express permission from the editor.
If you would like your product reviewed fairly and quickly, please contact the editor or see other details in the Note to Contributors.
Back to the Reviews Index Page 2024