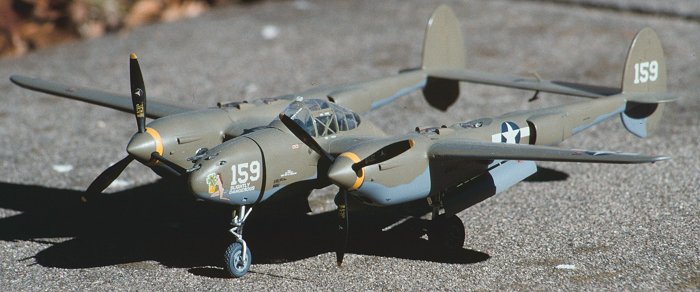
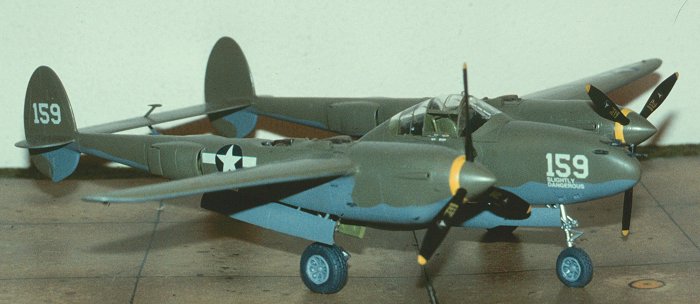
Hasegawa 1/48 P-38F/G/H Lightning
Kit Number: JT 103
Price: $36.25
Decals : Three schemes, Two Pacific Theater, One European Theater; all in OD over Neutral Grey.
Date of Review: 2 April, 1996
Comments: The P-38 has been a favorite of modelers for a number of years, but in 1/48 all we have had is the Monogram kit. Not that that in itself is bad as the Monogram kit has a lot going for it; including a fully detailed gunbay. The problem with the Monogram kit is that the fit is not really the best. I built this kit a few years ago and had problems with the nose section; especially getting a good fit with the open doors. I finally gave up on the nose and, after removing the guns, put in a bunch of weight and puttied the whole nose section. I vowed never to build another 1/48 P-38.
Time passes and Hasegawa releases a 1/48 P-38. Not only that, but it is an older version with the more streamlined radiator ducts. Throwing caution to the wind (and forgetting my vow), I got one as soon as it was on sale somewhere. I read the reviews on the kit (which were generally favorable) and began construction. The Hasegawa kit has a great interior which I detailed with dry brushing and Reheat instrument decals. Fortunately , I am not given any nose guns so could pack the nose with a ton of weight to prevent tail-sitting. After cementing the nose together, I went to work on the rest of the aircraft. The tail boom/engine combination went together pretty well, but I found the nose radiator intakes to be a bit smaller than I would have liked so had to apply some putty there. I like the ability to have the boom radiator exhaust doors positionable so put mine in the open position. The detail in the main gear wells is great, including the radiator ducting from the boom mounted radiators. The gear itself was beautifully molded as well. I left off all the landing gears until after painting. It is possible, but requires careful assembly to put them in afterwards.
Then came the wings. Hasegawa is the only one who correctly puts the interestingly curved wingtips on their kit. It is obvious that someone was doing some research. There are a multitude of holes and different positions for the landing lights to accommodate the different versions of the P-38. Read the instructions carefully to determine which are appropriate for your version. Then it was time to attach all the bits together. Careful dry fitting will show the need to do a bit of adjustment to assure a tight fit, but it can be done and this went with little hassle. Now the airframe was basically complete. The propellers and their spinners can be left off until the kit is completed. The version I was doing (the box art kit), required yellow decals on half of the spinners, but I painted that part yellow as the Hasegawa decals are a bit transparent, and I recommend you paint any areas like that as well. It is vogue nowadays to have separate propeller blades. Frankly, I was quite happy with having all the blades attached to each other as I never had any alignment problems. Now I have to worry about blade alignment. This seems to be an area that is more complicated than it needs to be and I wish the manufacturers would revert.
Now it was time for the canopy to be attached. Hasegawa has chosen to mold the canopy so it can be open. This means not only a separate windscreen, but a separate back piece, top, and two side pieces. This is one time that I wish a one piece canopy would be included in the box as well. While the windscreen and back piece fit very well, the same cannot be said for the side pieces and the top. It required a huge amount of fiddling and still is not satisfactory. One of the problems is the attachment of the sprues. It is very difficult to remove the clear bits without doing some damage to them. The Lightning canopy is also a pain to mask due to the very small frame lines. This is an area I did not like. Monogram did have an opening top, but the fit was good and I did not have to mess with the side pieces.
After masking, it was time for the paint. Gunze Sangyo for both the top OD and bottom Neutral grey. Followed by a coat of Future for the gloss coat. I used kit decals and they fit very well, albeit they are a bit transparent, but since the kit is not multi colored camo, there is no problem. The turbocharger intakes are a press fit on the top of the booms. Then on to the landing gear. These were attached with super glue and were another fiddly part of construction as the glue points are not positive and the gear tends to slip around a bit. Especially troubling were the gear retraction struts and they flopped all over the place. Patience and tweezers are the key to this area. On went the True Details wheels. Finally the gear doors were left to be attached. There is not a single Lightning kit made in any scale (and I've made just about all of them), that have gear doors that fit properly and the Hasegawa kit is no exception. I guess there is something about all the compound curves of the booms, but if you get the front to fit, the back sticks out and vice versa. I did the best I could and it is acceptable enough.
Conclusions are a tough one. It is not the Perfect P-38, but it is getting closer. I have not built Minicraft's, so I can't judge that one. I would recommend this as the best 1/48 Lightning I have built, but would warn any builders that there are pitfalls that one needs to watch. Not recommended for beginners, but the rest of you should be able to build a good replica.
Copyright ModelingMadness.com. All rights reserved. No reproduction in part or in whole without express permission from the editor.
Back to Reviews Page 2024