Azur 1/72 NA.57 (BT-9)
|
KIT # |
009 |
|
PRICE: |
$14.95 |
|
DECALS: |
Three Aircraft |
|
REVIEW : |
|
|
NOTES: |
Short run with resin and vac canopy` |
|
BACKGROUND |
For a look at the kit in the box and a short history, please
visit the preview. CONSTRUCTION
With paint dry, the forward instrument panel was glued in place, but not after
being severely trimmed to fit. There is a back cockpit section and that was
glued in place. The second instrument panel was glued onto the housing for the
back seater. Fit was good. The two control stubs (the stick parts broke) were
glued to the cockpit floor with superglue. The floor was then glued to one
sidewall and the fuselage halves glued together.
After a considerable amount of
sanding and such, the wings were mated to the fuselage. Again, multiple
applications of filler were needed. The tail planes were next attached. More
filler was used. I now had a pretty complete airframe so turned my attention to
the wheel spats.
The NA.57/BT-9/Yale, had fixed landing gear in semi covered spats. Well, my kit
had one of the wells partially filled in where it should have been more open. A
hassle, but not unexpected from a short run kit. This required some time
scraping out the excess plastic so that the wheel could actually be put into the
spat.
With that complete, the landing gear and tail wheel were glued to the bottom of
the wing and fuselage respectively. Fit is good. Thankfully, I use a pretty
'hot' glue so it helps melt the part in place! Then the engine and cowling were
glued on. First the engine was glued to the firewall and then the cowling glued
on. You need to align the cowling properly as it need to match up with an intake
that will go on the top and the exhaust that exits the cowling. There is a
dimple to show where the exhaust will go and that helps. When the cowling is
glued on, then attach the carb intake (which to my mind is way too large) and a
small exhaust scoop.
Moving to the interior, the aft instrument panel and anti-glare shield were test
fit. I had to do quite a bit of trimming of the instrument panel to get it to
fit. Before gluing this in place, the roll over assembly needs to be attached
behind the pilot's seat. It is then painted a very light grey. With this in
place, then you can install the aft instrument panel. There is a small
head rest that fits in the roll over assembly for the pilot. Getting it in place
was a chore, to say the least.
Now for the 'fun' part. Installing the canopy. I trimmed this thing the best I
could and glued it on with superglue (non-fogging). To say it doesn't fit too
well should not surprise most of you. I have a terrible time with vac canopies
and would feel much more confident about cutting them if there was a spare;
which there isn't. Once it was glued in place, the gaps were filled along the
bottom edge and it was masked. Pretty it isn't, but it is in place!
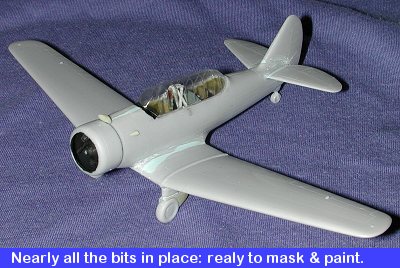
Then on to masking. Not my favorite job on a kit like this. There must be 50
panes on the NA 57. After a good hour or two of masking, the job was done and
with some tissue stuffed in the engine area to keep most of the paint out, it
was time to add some color and hide all that filler! PAINT
& DECALS
Because of a total lack of aftermarket decals and a nearly equivalent lack of
references, it seemed as if the only options were those provided by the kit
decal sheet. Now those are really quite good, giving a nice variety of markings
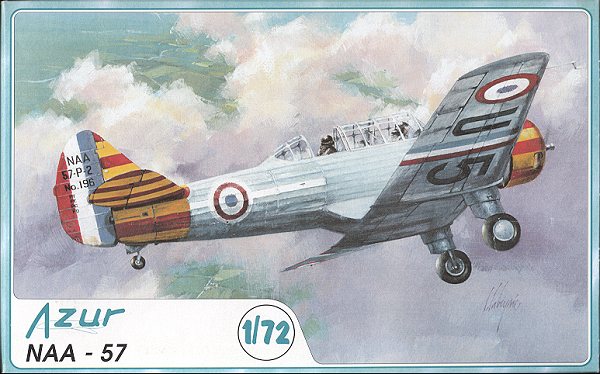
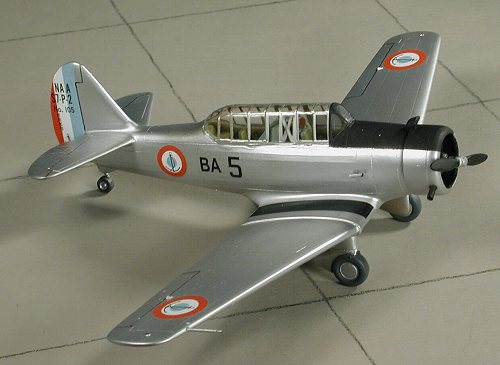
for the plane. The most colorful are the Vichy markings as shown on the box art,
but I wasn't quite in the mood to paint all that red and yellow. Not wanting to
do a Luftwaffe version, I took the cowards way out and chose the overall silver
version. This meant that the plane had to be undercoated with a gloss enamel.
This is mainly to hide scratches and provide a universally smooth 'primer'. I
used some left over Xtracolor dark earth, and while generally lighter colors are
preferred, it should work well enough.
Decals for this kit are made by Cartograf in Italy instead of the usual
Propagteam. Unfortunately, the blue is still too light a shade. I'm not really
sure why it is that Azur insists on having the blue too light. It is obvious
from period color photos as to the proper shade of the blue in the roundel and
fin stripes. Heck, they even get it right on the box art! Anyway, the overall
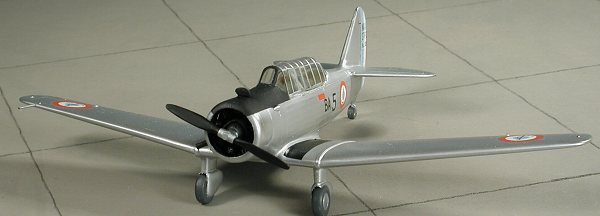
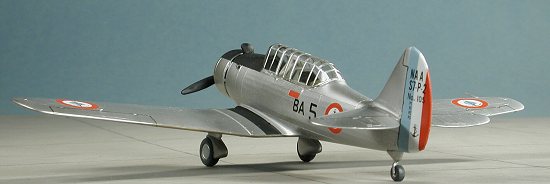
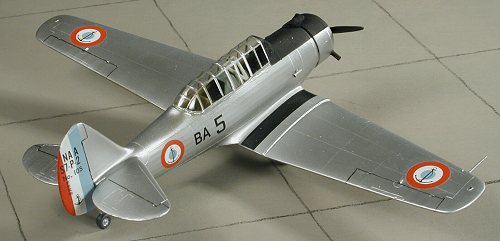
silver aircraft is pretty devoid of any special markings. Just roundels, fin
stripes and aircraft numbers. You have the option to paint the fin stripes as
serial numbers are provided separately, which is a nice touch.
The decals are much tougher than those from previous sources. I used Champ
setting solution and was able to fuss with the decals for several minutes. With
others, it is an almost immediate reaction. In fact, the fin stripes needed
three applications before they finally succumbed and conformed. Same with
the black walkway stripes. The fin stripes fit fairly well as they are oversize
in the horizontal so some trimming kept the overlap to a minimum. In the
vertical, however, they were a touch too short. Not a problem as there are two
sets of fin stripes and I just cut a segment out of the other set to fill a gap
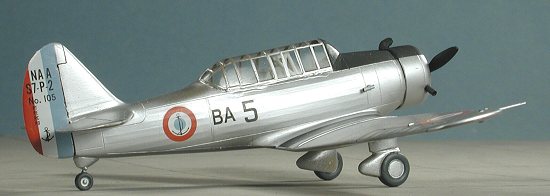
on the lower part of the rudder. BTW, the decals have misprinted 57 as S7.
French coded things with the first line being the manufacturer and type; NAA -
North American Advanced (Trainer). The second line is the type and number of
places; 57-P2. The third line is the serial number; 105 CONSTRUCTION CONTINUES The prop was painted black with an aluminum hub area, the exhaust painted
Burnt Iron, the engine drybrushed with aluminum and the venturi and pitot tube
painte aluminum as well. When the wing tip lights were dabbed with clear red and
green, that completed all the painting. The last step was to outline the control
surfaces with my Rapidograph drafting pen, and the kit was complete. CONCLUSIONS
All of that aside, this really is a neat kit. I like the T-6/Harvard family of
trainers and this is a sort of younger brother to those. If you wanted to do a
Yale, it seems that all you'd need to do is replace the rudder with a later
version. For a BT-9, I'm not really sure how much difference there is, but it
can't be that much. If you have experience with short run kits this one will be
no different from the others. January 2002 Review kit courtesy of my kit collection. Copyright ModelingMadness.com.
All rights reserved. No reproduction in part or in whole without express
permission from the editor. If you would like your product reviewed fairly and fairly quickly, please
contact the editor or see other details in the Note to
Contributors.
Back to Reviews Page 2016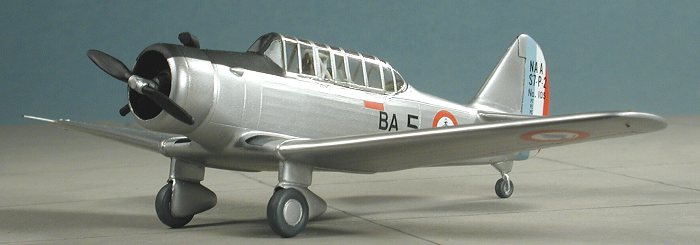
 Construction starts with the wings. They had the ejector pins
snipped off, were glued together, cleaned up and set aside until needed. Then
the interior was worked on. This basically involved gluing the seats onto the
floor pan. This assembly and the interior walls were then painted US interior
green using Model Master's enamel. While this was drying, the cowling halves
were glued together and the resin bits cut off their resin blocks. Some of the
resin parts are very fine and will either break or go flying off into the aether!
Construction starts with the wings. They had the ejector pins
snipped off, were glued together, cleaned up and set aside until needed. Then
the interior was worked on. This basically involved gluing the seats onto the
floor pan. This assembly and the interior walls were then painted US interior
green using Model Master's enamel. While this was drying, the cowling halves
were glued together and the resin bits cut off their resin blocks. Some of the
resin parts are very fine and will either break or go flying off into the aether!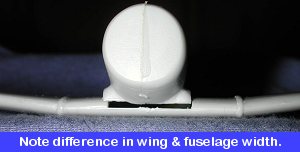 The floor did not
fit at all well and needed some shims and lots of superglue and accelerator to
where it fit semi-well. All the seams were given filler (some more than once)
and then the tail was glued on (again, filler needed). With the tail in place,
the wings were glued on. Well, this was after the fuselage wing roots were
sanded down as the fuselage was too wide to accommodate the wings. In addition,
the rear part of the wing attachment is all wrong for an NA.57. If you look at
the box art, you'll notice a fairing that juts down to the wing. The kit does
not have this. In fact, it is more like a T-6 or a Wirraway where the rear of
the wing is flush with the bottom of the fuselage. I suspect that the Wirraway
fuselage was used as a master.
The floor did not
fit at all well and needed some shims and lots of superglue and accelerator to
where it fit semi-well. All the seams were given filler (some more than once)
and then the tail was glued on (again, filler needed). With the tail in place,
the wings were glued on. Well, this was after the fuselage wing roots were
sanded down as the fuselage was too wide to accommodate the wings. In addition,
the rear part of the wing attachment is all wrong for an NA.57. If you look at
the box art, you'll notice a fairing that juts down to the wing. The kit does
not have this. In fact, it is more like a T-6 or a Wirraway where the rear of
the wing is flush with the bottom of the fuselage. I suspect that the Wirraway
fuselage was used as a master.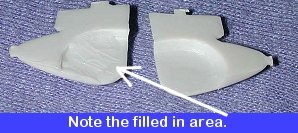
 Once that was dry, the Testors
Metallizer Aluminum (non-buffing) was applied. Thanks to the enamel undercoat,
the stuff didn't come off on my hands and can be masked with no real trauma.
When it had dried, the nose area was masked with Tamiya tape and painted flat
black. The tape was taken off and it was time for the decals.
Once that was dry, the Testors
Metallizer Aluminum (non-buffing) was applied. Thanks to the enamel undercoat,
the stuff didn't come off on my hands and can be masked with no real trauma.
When it had dried, the nose area was masked with Tamiya tape and painted flat
black. The tape was taken off and it was time for the decals.
 With the decals on, it was time
to do some touchup painting. This included the tires and engine. I also drilled
a hole for and installed the wing tip pitot tube. Two are provided, for some odd
reason, but only one is used. There are two venturi tubes, but one went flying
off into the ozone when I initially cut it off the sprue, so only one was glued
in place. The exhaust was glued on and then the prop attachment hole was drilled
out on the engine.
With the decals on, it was time
to do some touchup painting. This included the tires and engine. I also drilled
a hole for and installed the wing tip pitot tube. Two are provided, for some odd
reason, but only one is used. There are two venturi tubes, but one went flying
off into the ozone when I initially cut it off the sprue, so only one was glued
in place. The exhaust was glued on and then the prop attachment hole was drilled
out on the engine.
 These short run kits are really
deceptive. You open the box and see that there is just a single sprue and only a
few other resin bits and a vac canopy. "Can't be too hard", you think. Well,
easy they really are not. At least not for me. I really like the unusual
subjects and that is why I build them, knowing that they will not be contest
models and that they will frustrate me at least once during the building!
These short run kits are really
deceptive. You open the box and see that there is just a single sprue and only a
few other resin bits and a vac canopy. "Can't be too hard", you think. Well,
easy they really are not. At least not for me. I really like the unusual
subjects and that is why I build them, knowing that they will not be contest
models and that they will frustrate me at least once during the building!