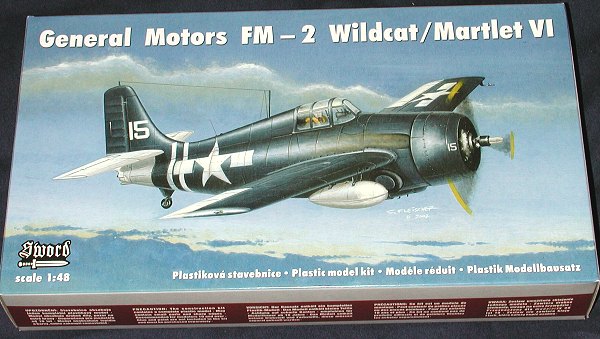
Sword 1/48 FM-2 Wildcat
|
KIT # |
48005 |
|
PRICE: |
$29.95 MSRP |
|
DECALS: |
Two Aircraft |
|
REVIEWER: |
|
|
NOTES: |
Short run with vac canopy |
|
BACKGROUND |
For more information on what is in the box and a brief history, please visit the preview.
|
CONSTRUCTION |
 As usual, construction starts with a thorough reading of the
instructions, and the gathering together of subassemblies. In this case, it
meant wheels, engine, wings, wheel well and cockpit. I noted that several of the
mounting points are too shallow and will need to be drilled out and in some
cases enlarged. A short session with a drill twist will take care of these as
they crop up. I also removed the resin blocks from the three resin pieces and
after butchering the seat getting it off the block, I discovered to my shock
that I had two of the same console sides. Grabbing the phone, I called
Squadron and they sent me a replacement
piece. It is customer service like this that has kept me buying from them for
the last 20 plus years. Once the part came, it was painted and made ready to
install when the time came.
As usual, construction starts with a thorough reading of the
instructions, and the gathering together of subassemblies. In this case, it
meant wheels, engine, wings, wheel well and cockpit. I noted that several of the
mounting points are too shallow and will need to be drilled out and in some
cases enlarged. A short session with a drill twist will take care of these as
they crop up. I also removed the resin blocks from the three resin pieces and
after butchering the seat getting it off the block, I discovered to my shock
that I had two of the same console sides. Grabbing the phone, I called
Squadron and they sent me a replacement
piece. It is customer service like this that has kept me buying from them for
the last 20 plus years. Once the part came, it was painted and made ready to
install when the time came.
During the assembly of the cockpit, I found that the control column was going to end up under the seat, not exactly a good thing, so I cut off the control attachment cover and set it aside until later on. The back walls were glued in place and the seat was then glued in. I then glued the instrument panel section to its locating area and proceeded to check fit by placing it into the fuselage. It didn't really fit well and I had to shuffle the forward bulkhead around a bit to get a decent fit. The center console part was glued in. I then used a short section of Contrail rod to attach the rudder pedals to and when that was dry glued them to the back of the center console. They really did not fit perfectly. It is almost as if the pedals are a bit too big. The whole thing was then painted Interior Green.
 Of all the subassemblies, the landing
gear one is probably the trickiest. Though similar to the Tamiya kit, it isn't
the same. I found that some of the parts were molded with a bit too wide an
angle to fit into their holes without having to 'squeeze' them down a bit to
fit. Though nothing broke, I'm not sure how well this stress will hold up. I
also came to the realization while building this assembly that this is still a
short run kit. It doesn't beat you in the head with it, but the softness of the
plastic and the need to clean up every part before gluing it are two
traits. In fact, the landing gear sprue had some particularly heavy mold seams
that needed cleaned up. I also found some ejector pin stubs that needed removed.
Sword has the surface detailing down well, they now need to concentrate on the
cleanliness of their smaller parts.
Of all the subassemblies, the landing
gear one is probably the trickiest. Though similar to the Tamiya kit, it isn't
the same. I found that some of the parts were molded with a bit too wide an
angle to fit into their holes without having to 'squeeze' them down a bit to
fit. Though nothing broke, I'm not sure how well this stress will hold up. I
also came to the realization while building this assembly that this is still a
short run kit. It doesn't beat you in the head with it, but the softness of the
plastic and the need to clean up every part before gluing it are two
traits. In fact, the landing gear sprue had some particularly heavy mold seams
that needed cleaned up. I also found some ejector pin stubs that needed removed.
Sword has the surface detailing down well, they now need to concentrate on the
cleanliness of their smaller parts.
While all of that was drying, I painted the engine steel and glued it to the 'firewall'. This is a butt join like most of the ones on this kit so you need to spend some time making sure it fits properly. I did this by test fitting it in a fuselage half a number of times until I was satisfied. Then it was time to start putting some of this stuff into the fuselage halves.
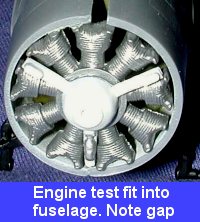 This is where it became complicated.
l was now at the stage where I had to add in all these subassemblies. Test
fitting showed that with some fudging, all the parts could fit. I started with
the cockpit. It was relatively trouble-free. This was aligned with the headrest
section and it fit well against an ejector tower on the back. Next was the
engine and firewall. While it fit, I was completely unable to get the other
fuselage half to fit properly without a rather large gap. It seems that Sword
did not take into consideration the larger diameter of the 1820 when 'adapting'
the Tamiya fuselage, or made the engine too big. My guess is the former.
However, it does seem as if the front of the cowling was designed for the larger
engine so I did not trim cylinder heads.
This is where it became complicated.
l was now at the stage where I had to add in all these subassemblies. Test
fitting showed that with some fudging, all the parts could fit. I started with
the cockpit. It was relatively trouble-free. This was aligned with the headrest
section and it fit well against an ejector tower on the back. Next was the
engine and firewall. While it fit, I was completely unable to get the other
fuselage half to fit properly without a rather large gap. It seems that Sword
did not take into consideration the larger diameter of the 1820 when 'adapting'
the Tamiya fuselage, or made the engine too big. My guess is the former.
However, it does seem as if the front of the cowling was designed for the larger
engine so I did not trim cylinder heads.
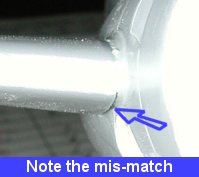
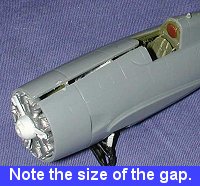 The last part was the landing gear
assembly. This was all glued together with the help of superglue as the parts
just did not want to fit without some grunt work. I then tried to install it in
the fuselage. No joy. I ended up having to trim the forward part of the
assembly. Even with the bulkhead perpendicular in the fuselage, the landing gear
has a decided forward slant to it that I don't think is normal for the Wildcat.
I then glued on the other fuselage half. As I suspected, there was a HUGE gap on
the forward section.
The last part was the landing gear
assembly. This was all glued together with the help of superglue as the parts
just did not want to fit without some grunt work. I then tried to install it in
the fuselage. No joy. I ended up having to trim the forward part of the
assembly. Even with the bulkhead perpendicular in the fuselage, the landing gear
has a decided forward slant to it that I don't think is normal for the Wildcat.
I then glued on the other fuselage half. As I suspected, there was a HUGE gap on
the forward section.
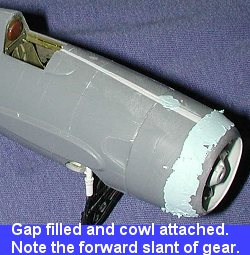 Once the clamped fuselage was dry, I
then began using strip plastic to fill in the gap. I also tested one of the vac
canopies to make sure that it would fit the wider forward base. No problems
thanks to the flexibility of the plastic! The plastic was then put in place and
copious amounts of glue was used. I like to use a 'hot' glue that somewhat melts
the plastic and makes for a strong bond. Superglue will eventually crack under
any sort of stress. I did, however, use superglue to fill in some of the gaps
between laminates. Then several applications of filler to smooth things out.
There is a small section that goes forward of the landing gear. It needed
trimming to fit properly. I also had to do some trimming of the landing gear
attachment on that part. Then the forward cowling was glued on. It is a bit too
small, but would have been way too big had I trimmed cylinder heads to get the
upper fuselage halves to meet. Again, I used glue to sort of melt things and the
fit was good. The small ledge all around the cowling was then slathered with
filler and later sanded smooth.
Once the clamped fuselage was dry, I
then began using strip plastic to fill in the gap. I also tested one of the vac
canopies to make sure that it would fit the wider forward base. No problems
thanks to the flexibility of the plastic! The plastic was then put in place and
copious amounts of glue was used. I like to use a 'hot' glue that somewhat melts
the plastic and makes for a strong bond. Superglue will eventually crack under
any sort of stress. I did, however, use superglue to fill in some of the gaps
between laminates. Then several applications of filler to smooth things out.
There is a small section that goes forward of the landing gear. It needed
trimming to fit properly. I also had to do some trimming of the landing gear
attachment on that part. Then the forward cowling was glued on. It is a bit too
small, but would have been way too big had I trimmed cylinder heads to get the
upper fuselage halves to meet. Again, I used glue to sort of melt things and the
fit was good. The small ledge all around the cowling was then slathered with
filler and later sanded smooth.
 The next step was to attach the
tail planes. These have small pegs that fit into holes on the fin. These holes
are too shallow so were drilled out. Then the tail planes were glued in and the
fit was quite good. Can't say the same for the wings. They are actually wider at
the root than the wing roots. You have a choice of ledge at the top or the
bottom. I chose the bottom. I also had to file flush one of the wings as somehow
the bottom half of one managed to be longer than the other! Once all that was
done and sanded, the tail wheel was added. Fit there was fair, and needed some
filler.
The next step was to attach the
tail planes. These have small pegs that fit into holes on the fin. These holes
are too shallow so were drilled out. Then the tail planes were glued in and the
fit was quite good. Can't say the same for the wings. They are actually wider at
the root than the wing roots. You have a choice of ledge at the top or the
bottom. I chose the bottom. I also had to file flush one of the wings as somehow
the bottom half of one managed to be longer than the other! Once all that was
done and sanded, the tail wheel was added. Fit there was fair, and needed some
filler.
Turning to the cockpit again, I looked for a gunsight, but could not find one, nor was there one shown in the instructions. I then painted the anti-glare panel painted flat black and did a bit of touchup painting as well. At this time I decided to build the plane with the canopy closed, so carefully trimmed the canopy I'd already used for rough test fitting. When I got it best I could, it was masked and glued in place with non-fogging (so I thought) superglue. The engine was stuffed with tissue and I masked as best I could the landing gear. Time now for paint.
|
PAINT |
You don't have to be Nostradamus to realize that it would be
easy to paint this puppy. I got out the Aeromaster USN Gloss Sea Blue enamel
(the last of it, sadly) and in a couple of applications, painted the entire
airframe. Oddly, the paint took 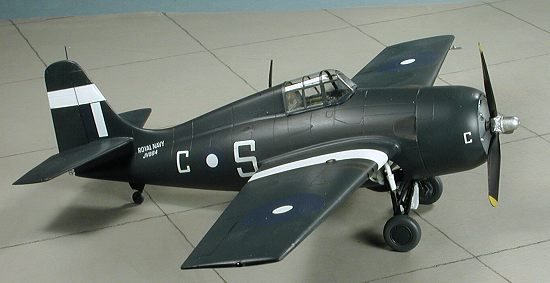 several
days to where it was hard enough to touch. Sometimes gloss paints will dry
enough to handle in hours, but other times, like this one, it will take days.
Once that was done It was taken back to the workbench.
several
days to where it was hard enough to touch. Sometimes gloss paints will dry
enough to handle in hours, but other times, like this one, it will take days.
Once that was done It was taken back to the workbench.
|
BACK FOR MORE |
At this juncture, the wheels were glued on. Previously they had been airbrushed overall RLM 66 dark grey and then hand brushed with gloss sea blue in the hubs. The holes in the wheels are too small to fully accept the axles, so they were drilled out somewhat and then glued in place. While on its back, the tail wheel was painted RLM 66. I also attached the center brace between the gear and then glued on the gear doors. Fit was fair but not great. Once all that was dry, it was on to the decals.
|
DECALS & A GLITCH |
 The decals for this kit are made
by Techmod. I've not used these decals before so was unsure just how to approach
them. I cut out the first decal and then realized that I had not painted on the
white bands around the wing and tail! I was then torn between using white decal
stripes or actually painting them on. After wrestling with this for a bit, I
decided the only proper way to do this was to paint them. I then used up a huge
amount of tape (and time) in masking off the aircraft. Once everything was
masked, the kit was taken back to the paint shop and the white stripes painted
on with Floquil Reefer White. This is not a pure white, but close enough and it
covers extremely well, only needing two coats.
The decals for this kit are made
by Techmod. I've not used these decals before so was unsure just how to approach
them. I cut out the first decal and then realized that I had not painted on the
white bands around the wing and tail! I was then torn between using white decal
stripes or actually painting them on. After wrestling with this for a bit, I
decided the only proper way to do this was to paint them. I then used up a huge
amount of tape (and time) in masking off the aircraft. Once everything was
masked, the kit was taken back to the paint shop and the white stripes painted
on with Floquil Reefer White. This is not a pure white, but close enough and it
covers extremely well, only needing two coats.
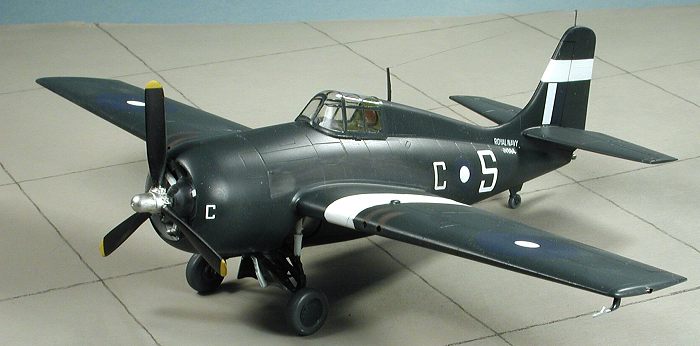
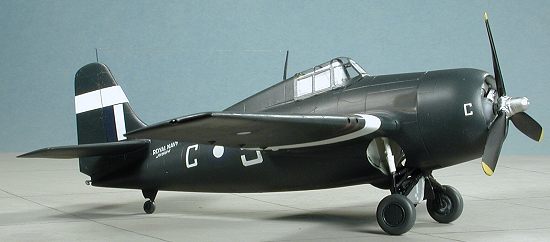
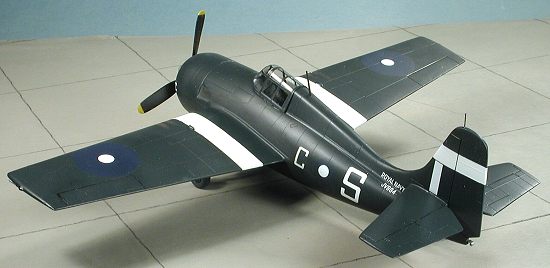
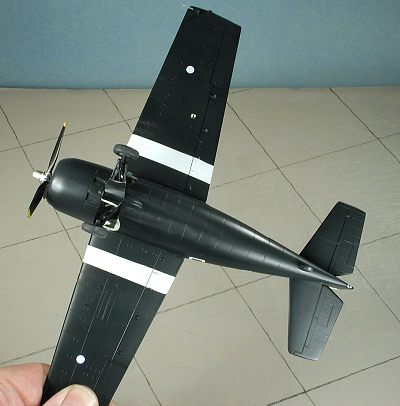
The masking was removed with no problems and it was back to applying decals. I wanted to do the Royal Navy version as I figured most folks would do the USN one shown on the box art. Heck, there are even some aftermarket schemes for this on a couple of Aeromaster sheets. But I wanted to do the kit out of the box. I started with the roundels and fin flashes. When I put them on, I was a bit shocked to see the blue blend in with the paint. You can barely tell the blue on the decals exists. I'd highly recommend to those of you wanting to do this scheme to lighten up your sea blue so that the roundels can be perceived against the background.
I also wasn't sure just how well the decals would stick so tried some Solvaset on a few of them. The decals seemed relatively impervious to the solution and also seemed to work just fine with no solvent at all. I had no silvering problems and am quite impressed with them. Once they were on and dry, the kit was wiped down with fresh water and then a semi-matte was sprayed on the plane to seal them in. I figured the blue would become un-glossy within a relatively short time of ocean exposure.
|
FINAL BITS |
 At this time, the radio mast was
glued in as was the pitot tube. There was no fin mast so a hole was drilled and
a segment of stretched sprue glued in place. These were later brush painted. The
kit also does not give you a clear landing light. Not a problem as I used an MV
lens (#29) in there and it fit perfectly. The tail hook had a hole drilled for
it and was then installed. Once again, I used hair for a radio antenna wire. The
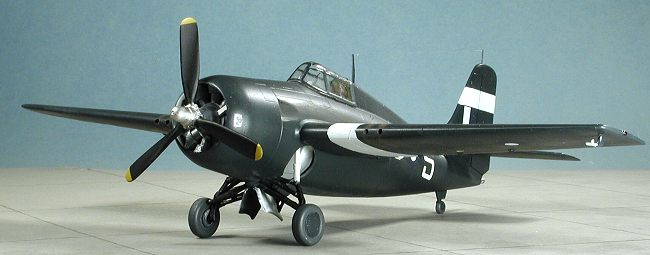
prop (which is the right type and not the wrong version shown on the box art)
was then glued onto the front of the engine. Removing the masking from the
canopy, I was less than thrilled to see that some fogging had occurred from the
superglue. This almost never happens when using the type I use, but goes to show
that you can always be surprised. Last thing to do was some engine exhaust
and a bit of gun staining with pastels, both of which are near invisible on the
dark blue background.
At this time, the radio mast was
glued in as was the pitot tube. There was no fin mast so a hole was drilled and
a segment of stretched sprue glued in place. These were later brush painted. The
kit also does not give you a clear landing light. Not a problem as I used an MV
lens (#29) in there and it fit perfectly. The tail hook had a hole drilled for
it and was then installed. Once again, I used hair for a radio antenna wire. The
prop (which is the right type and not the wrong version shown on the box art)
was then glued onto the front of the engine. Removing the masking from the
canopy, I was less than thrilled to see that some fogging had occurred from the
superglue. This almost never happens when using the type I use, but goes to show
that you can always be surprised. Last thing to do was some engine exhaust
and a bit of gun staining with pastels, both of which are near invisible on the
dark blue background.
|
CONCLUSIONS |
This is the first Sword kit I have built, though I do have several in the collection. I had been told that they are not as easy as they seem and I can now attest to that. You can see that though they need some help, they can be made into very nice models. It is a typical short run kit in many ways and so I wasn't totally surprised by the work that was needed to build the kit. This is a kit that you'll need a bit of short run experience to finish. You'll have a few hurdles to overcome, but in my opinion, the end result is super and worth the effort.
July 2002
Copyright ModelingMadness.com. All rights reserved. No reproduction in part or in whole without express permission from the editor.
If you would like your product reviewed fairly and fairly quickly, please contact the editor or see other details in the Note to Contributors.