
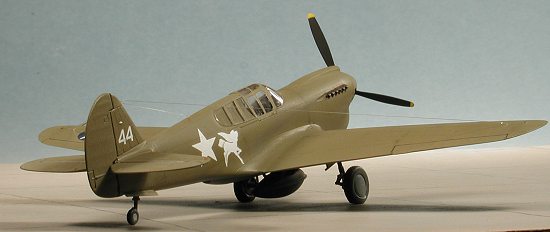
Minicraft/Hasegawa 1/72 P-40E Warhawk
|
KIT # |
114 |
|
PRICE: |
$4.98 back about 15 years ago! |
|
DECALS: |
See Review |
|
REVIEW : |
|
|
NOTES: |
|
THE KIT |
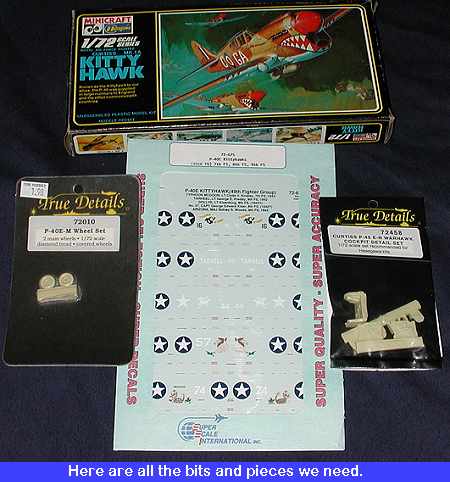
Go Here to see what is in the box.
|
BACKGROUND |
Many of the e-mails that I get are from people who are either new to the hobby or just getting back into it after a hiatus of several years or even decades. One thing that these folks are always asking about is what is next after out of the box. The purpose of this build is to take you to the next level in terms of updating your model. This particular review will concentrate on resin parts; specifically cockpit and wheels. Etched brass is another subject altogether, and one that requires skills that even I have trouble with at times. Resin parts have the benefit of generally being cheaper and easier to work with than etched brass bits.
 I have chosen a
subject for which both the kit and the aftermarket bits are easy to get. First
of all the kit. Hasegawa's 1/72 P-40E kit has been around for a long time and is
readily available either at your hobby shop or from various on-line retailers.
It has been reissued a number of times, generally with different decals. It can
also be found quite readily at swap meets or other places that sell second hand
models. This particular kit cost me $3 at a swap meet, but you can get it for as
little as a buck if you are good at haggling!
I have chosen a
subject for which both the kit and the aftermarket bits are easy to get. First
of all the kit. Hasegawa's 1/72 P-40E kit has been around for a long time and is
readily available either at your hobby shop or from various on-line retailers.
It has been reissued a number of times, generally with different decals. It can
also be found quite readily at swap meets or other places that sell second hand
models. This particular kit cost me $3 at a swap meet, but you can get it for as
little as a buck if you are good at haggling!
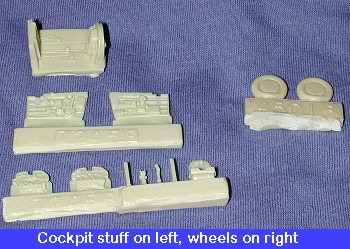
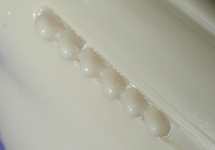
The kit has really only one major fault and that is a pretty bland interior. Your basic seat, floor, instrument panel and control stick. Fortunately, True Details does set 72-458 at the very reasonable cost of $2.98 that completely replaces the kit interior with one that has MUCH more detail. Add another $1.98 for the 72-010 resin wheels and you will have a pretty sharp model. You can keep the kit wheels if you wish as they are not that bad, it is just that the TD ones have crisper detailing. Add another few dollars for an aftermarket decal sheet and you are set! If the cost of the decal sheet (generally around $6) is too much for you, you can go in with a friend to split the costs. Most P-40 1/72 sheets have 5-6 aircraft on them so you can do more than one from it. By the way, the interior is good for the P-40N, but the wheels may not be as most P-40Ns have spoked wheels and these are not.
Alright. We have our kit, aftermarket resin parts and decal sheet. The next thing to do is to get underway with some dedicated cutting, hacking and sawing with a bit of gluing on the side!
|
CONSTRUCTION |
 When
dealing with resin parts, the first thing one does is to clean them with warm,
not hot, soapy water to remove any mold release. This mold release is an oily
material sprayed into a resin mold to keep the resin from sticking to it. If you
don't clean it off, you may easily have trouble getting paint to stick to it.
When
dealing with resin parts, the first thing one does is to clean them with warm,
not hot, soapy water to remove any mold release. This mold release is an oily
material sprayed into a resin mold to keep the resin from sticking to it. If you
don't clean it off, you may easily have trouble getting paint to stick to it.
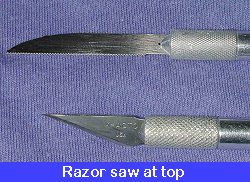
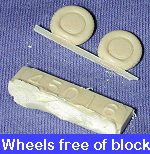
The next step is to start removing the resin bits from the blocks. The only safety equipment needed is a dust mask to keep you from breathing in the resin dust. A respirator is even better. Lay out all the resin bits to make sure that nothing is missing or broken.
 There are two
ways to remove resin parts and it really depends of the thickness of the
attachment as well as the shape of the parts. For thin attachments, a hobby
knife is usually good enough. You just scribe at the join until it is free. For
most other parts a razor saw is what is needed. There are various types of saw,
but the ones I like are those that fit into an knife handle. Just easier to use.
Do beware when sawing as flesh is much easier to saw through than resin. You
also don't want to hold resin parts with a death grip as some of the larger ones
(like the cockpit tub) can be snapped with too much pressure.
There are two
ways to remove resin parts and it really depends of the thickness of the
attachment as well as the shape of the parts. For thin attachments, a hobby
knife is usually good enough. You just scribe at the join until it is free. For
most other parts a razor saw is what is needed. There are various types of saw,
but the ones I like are those that fit into an knife handle. Just easier to use.
Do beware when sawing as flesh is much easier to saw through than resin. You
also don't want to hold resin parts with a death grip as some of the larger ones
(like the cockpit tub) can be snapped with too much pressure.
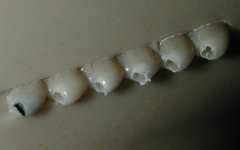
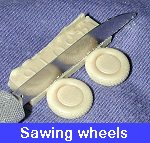 So lets start
removing some resin block. I started
So lets start
removing some resin block. I started
 with the wheels. Using the razor saw, start sawing at the
attachment point under the wheels. It is a good idea to leave a sliver of
resin attached to the wheels. This is to prevent you from sawing them off at a weird
angle. It is much easier to gently sand away the thin ribbon of resin than to
try to replace a chunk that you have accidentally gouged out of a part. Trust
me, few can actually saw level! Now on to some of the other parts.
with the wheels. Using the razor saw, start sawing at the
attachment point under the wheels. It is a good idea to leave a sliver of
resin attached to the wheels. This is to prevent you from sawing them off at a weird
angle. It is much easier to gently sand away the thin ribbon of resin than to
try to replace a chunk that you have accidentally gouged out of a part. Trust
me, few can actually saw level! Now on to some of the other parts.
The sidewalls of the cockpit will need to be removed a bit
differently than using a saw. 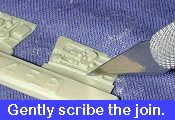 Thanks
to the fact that they are curved on the bottom, using a saw really isn't the
best way to cut these parts. The attachment of the sides to the resin block is
also
Thanks
to the fact that they are curved on the bottom, using a saw really isn't the
best way to cut these parts. The attachment of the sides to the resin block is
also 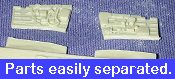 a lot thinner than with
other pieces so scribing the join line with a sharp hobby knife blade is the
best way. Just lay the part down on a relatively hard surface (I use a thick
rubber mat), and gently scribe the part several times. Applying too much
pressure could cause the part to crack, so take it easy. It took about 20-25
passes to cleanly separate the parts. Then you can just sand the underside to
make it smooth.
a lot thinner than with
other pieces so scribing the join line with a sharp hobby knife blade is the
best way. Just lay the part down on a relatively hard surface (I use a thick
rubber mat), and gently scribe the part several times. Applying too much
pressure could cause the part to crack, so take it easy. It took about 20-25
passes to cleanly separate the parts. Then you can just sand the underside to
make it smooth.
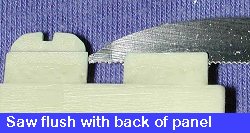 Now that we have
that taken care of, it was time to remove the instrument panel. True Details was
nice enough to supply panels for both the P-40N and the earlier models. For the
P-40E, we need the panel on the outside of the block. Now instrument panels
require a slightly different approach to removal. For these, one needs to saw
flush with the back of the panel. Not really difficult as the resin backing
doesn't go all the way to the top of the panel. Just saw away at it carefully
and try to keep things flat as you don't want to accidentally saw the panel in
half (been there; done that!).
Now that we have
that taken care of, it was time to remove the instrument panel. True Details was
nice enough to supply panels for both the P-40N and the earlier models. For the
P-40E, we need the panel on the outside of the block. Now instrument panels
require a slightly different approach to removal. For these, one needs to saw
flush with the back of the panel. Not really difficult as the resin backing
doesn't go all the way to the top of the panel. Just saw away at it carefully
and try to keep things flat as you don't want to accidentally saw the panel in
half (been there; done that!).
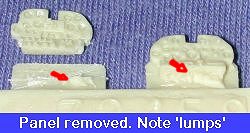 As you get near
the bottom of the panel, stop and saw the bottom of the panel, but no all the
way through. You do this for a couple of reasons. One is to have a nice flat
cut. The other is that there is often some extra lumps of resin in the underside
sections of these panels and this is the easiest way to cut them out. Then go
back and finish at the back of the panel. In just a few moments you will have
the panel clear and ready to paint/install. Any unevenness in the back can be
gently sanded smooth. Leave the control stick and gun sight on the resin
block until just before you need it. These parts are easily lost.
As you get near
the bottom of the panel, stop and saw the bottom of the panel, but no all the
way through. You do this for a couple of reasons. One is to have a nice flat
cut. The other is that there is often some extra lumps of resin in the underside
sections of these panels and this is the easiest way to cut them out. Then go
back and finish at the back of the panel. In just a few moments you will have
the panel clear and ready to paint/install. Any unevenness in the back can be
gently sanded smooth. Leave the control stick and gun sight on the resin
block until just before you need it. These parts are easily lost.
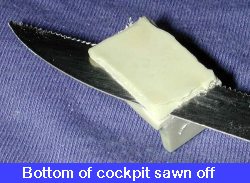 The next thing I
did was to test fit the cockpit into the fuselage halves. It seems as if it will
fit without removing any of the interior pins. I next tried to fit the bottom of
the wing on. No go. This meant that I had to remove the resin block from the
bottom of the cockpit tub. Sometimes you can get away with just trimming these
parts, but not in this case as the clearances won't allow it. With a 'U' shaped
piece such as the cockpit tub, it is quite easy to apply too much pressure to it
while holding it. The result is that you break it in half. Using just enough
pressure to hold it securely, but without having a 'death grip' on it, saw away
until the resin block comes free. Then test fit it again to makes sure you have
enough room.
The next thing I
did was to test fit the cockpit into the fuselage halves. It seems as if it will
fit without removing any of the interior pins. I next tried to fit the bottom of
the wing on. No go. This meant that I had to remove the resin block from the
bottom of the cockpit tub. Sometimes you can get away with just trimming these
parts, but not in this case as the clearances won't allow it. With a 'U' shaped
piece such as the cockpit tub, it is quite easy to apply too much pressure to it
while holding it. The result is that you break it in half. Using just enough
pressure to hold it securely, but without having a 'death grip' on it, saw away
until the resin block comes free. Then test fit it again to makes sure you have
enough room.
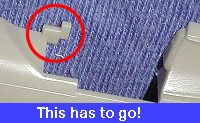 Turning to the
rest of the kit, it is time to glue together some subassemblies and to prep some
of the other parts. First of all, the fuselage. The 'thingie' that is supposed
to be the gunsight needs to be removed. Once you cut it off, make sure that you
notch the area like the opposite fuselage half so the new gunsight will fit.
Actually, it wouldn't be a bad idea to make each notch just a teeny bit larger
as the resin sight is a bit wider.
Turning to the
rest of the kit, it is time to glue together some subassemblies and to prep some
of the other parts. First of all, the fuselage. The 'thingie' that is supposed
to be the gunsight needs to be removed. Once you cut it off, make sure that you
notch the area like the opposite fuselage half so the new gunsight will fit.
Actually, it wouldn't be a bad idea to make each notch just a teeny bit larger
as the resin sight is a bit wider.
 Now you can glue the radiator splitter to the radiator, the
wings together (your choice if you want the gun camera attached. If so drill out
the hole for it), and your choice of bomb or drop tank. I chose the drop tank.
Once the halves are glued together, glue in the supports and test fit them in
the holes in the underside of the wing to make sure they will dry properly. This
is because we'll have to fill in the gaps where the braces attach to the tank
(or bomb). When dry, they are puttied and then sanded smooth.
Now you can glue the radiator splitter to the radiator, the
wings together (your choice if you want the gun camera attached. If so drill out
the hole for it), and your choice of bomb or drop tank. I chose the drop tank.
Once the halves are glued together, glue in the supports and test fit them in
the holes in the underside of the wing to make sure they will dry properly. This
is because we'll have to fill in the gaps where the braces attach to the tank
(or bomb). When dry, they are puttied and then sanded smooth.
Give those a bit of time to dry and start on some of the resin
assemblies. First of all cut off the seat and
 stick and glue those to the
cockpit tub. Then cut off the gunsight and glue it to the instrument panel. Take
all of these parts to the paint shop and paint them. The interior gets a coat of
US Interior green while the instrument panel gets a nice matte black. When done
painting the main colors, follow the painting guide that comes with the interior
to do all the little bits and pieces. This will take a couple of days to paint
everything and give the paint time to dry.
stick and glue those to the
cockpit tub. Then cut off the gunsight and glue it to the instrument panel. Take
all of these parts to the paint shop and paint them. The interior gets a coat of
US Interior green while the instrument panel gets a nice matte black. When done
painting the main colors, follow the painting guide that comes with the interior
to do all the little bits and pieces. This will take a couple of days to paint
everything and give the paint time to dry.
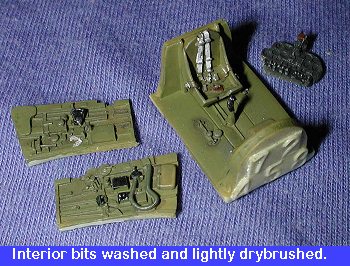
When everything is dry, give it a nice wash. I use Rustall black wash as it doesn't really flood things with black and is water based so I can wash it off before it dries. Doesn't harm already dried paint, either. With that done, I take some steel (or aluminum) Metallizer and do the drybrush thing to all the interior parts, being very careful not to overdo it or knock something adrift.
With that done, the instrument panel is glued to the fuselage,
the radiator intake is glued to the nose of the fuselage and the sidewalls are
glued to the 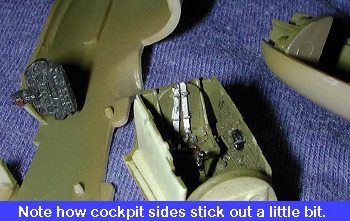 interior, but only
on the bottom. This way the sides can be gently squeezed when installed in the
fuselage and will therefore fit snugly against the sides of the fuselage without
gluing them.
interior, but only
on the bottom. This way the sides can be gently squeezed when installed in the
fuselage and will therefore fit snugly against the sides of the fuselage without
gluing them.
On to some more gluing. The cockpit will fit from the underside without any real traumas. That being the case, the fuselage halves were glued together. This does two things. It makes sure that the instrument panel was properly seated (it wasn't so I pulled it out) and it makes it much easier to sand the seam that runs through the padded head rest. Not having any interior to get in the way really helps.
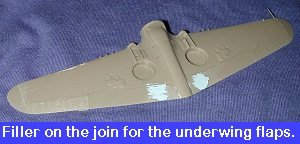
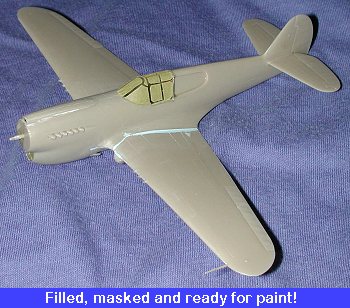
With the fuselage and wings together, there was some filler that
needed application. When checking for seams to fill, I first try to remove as
many as 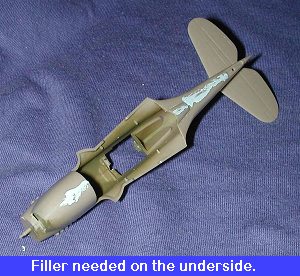 possible by just sanding
alone. Sometimes they are shallow and that will work. The trick is to make sure
that you don't sand a flat spot on a rounded surface or sand a wide groove in
things. This last one is a particular hazard when doing wing roots and with
softer plastic (like in short run kits) it happens quite easily. On the
underside of the wings, there is a join line that needs filled as the flaps are
a single piece. Part of the flap is molded on the underside of the
fuselage.
possible by just sanding
alone. Sometimes they are shallow and that will work. The trick is to make sure
that you don't sand a flat spot on a rounded surface or sand a wide groove in
things. This last one is a particular hazard when doing wing roots and with
softer plastic (like in short run kits) it happens quite easily. On the
underside of the wings, there is a join line that needs filled as the flaps are
a single piece. Part of the flap is molded on the underside of the
fuselage.
 Now would be a
good time to take your #79 drill bit and do the gun ports and start on the
exhaust stubs if you wished to drill those out. It does add quite a bit to the
finished product, but can also be difficult to do properly. I have found that
starting the hole with the tip of a very sharp pointed xacto blade helps a great
deal. This is also the time where I add the horizontal stabilizers. Doing it now
and making sure they are square goes a long way to helping to make sure that the
wings go on properly as you have a good reference in the back.
Now would be a
good time to take your #79 drill bit and do the gun ports and start on the
exhaust stubs if you wished to drill those out. It does add quite a bit to the
finished product, but can also be difficult to do properly. I have found that
starting the hole with the tip of a very sharp pointed xacto blade helps a great
deal. This is also the time where I add the horizontal stabilizers. Doing it now
and making sure they are square goes a long way to helping to make sure that the
wings go on properly as you have a good reference in the back.
 Exhaust before drilling...... |
 and after. Still needs cleaned. |
 Once the tailplanes were solidly on and the various sanding had
been done where needed, it was time to reinstall the instrument panel and then
put in the interior. I used superglue for these as I wanted a quick hold once
the parts were in place. Both fit well with no real hassles. The side panels
stuck up a bit above the sides of the cockpit, but have not yet been trimmed as
they may well be hidden by the closed canopy frame.
Once the tailplanes were solidly on and the various sanding had
been done where needed, it was time to reinstall the instrument panel and then
put in the interior. I used superglue for these as I wanted a quick hold once
the parts were in place. Both fit well with no real hassles. The side panels
stuck up a bit above the sides of the cockpit, but have not yet been trimmed as
they may well be hidden by the closed canopy frame.
The wing was then installed and it was obvious that there was a bit of a problem. The wings were just as straight as could be from side to side. 'So what's the problem?', you say. Well, the P-40 wings have a bit of dihedral and are not supposed to be flat. Fixing this isn't really that easy as the fuselage and the wings are well braced. My only real choice was to start sanding away at the fuselage wing root. Not a job that I really enjoyed doing as I just cannot do these kinds of thing right.
 Not sure what caused the flatness of the wings, but thinking
back on things, I have a sneaking suspicion that it has to do with the resin
interior. I did not remove any of the old interior locating pins as they didn't
seem to be in the way. It could be that they caused the fuselage to be wider and
so caused the glitch with the wing dihedral. I have not had this problem with
any stock kits so it makes sense. Live and learn. Anyway, the damage had been
done so the fuselage was sanded, the wings attached, and the filler used to
cover up my goof.
Not sure what caused the flatness of the wings, but thinking
back on things, I have a sneaking suspicion that it has to do with the resin
interior. I did not remove any of the old interior locating pins as they didn't
seem to be in the way. It could be that they caused the fuselage to be wider and
so caused the glitch with the wing dihedral. I have not had this problem with
any stock kits so it makes sense. Live and learn. Anyway, the damage had been
done so the fuselage was sanded, the wings attached, and the filler used to
cover up my goof.
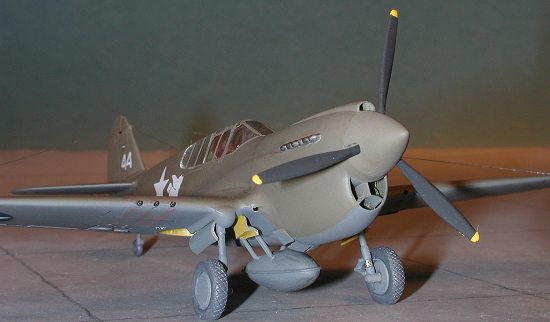
The model was then flipped over and the cowl flaps glued in place. Next step was to do some touch up painting in the cockpit and to get the canopy ready to install. Since the area under the 'quarter windows' was to be fuselage color, those wouldn't be put in until near the very end. The canopy was masked and then glued in place. The canopy is very clear and all of the interior bits can be seen rather easily. It also covered up the fact that the resin sidewalls were a bit too high so won't be noticed. Once that was accomplished, the prop spinner and landing gear were removed from the sprues as was the prop in preparation for painting.
|
PAINT & DECALS |
 For a P-40E in SWPA, we are talking about your standard OD or
Medium Green uppers with Neutral Grey lower surfaces. Nothing really fancy or
complicated unless you want to do a plane that was originally going to the RAF.
Those will have a two-color upper surface camo scheme similar to what the Flying
Tigers P-40B/C's wore. Well, I chose an easy one. This 8 FS P-40E was to be
Dark Earth on the upper surfaces and Neutral Grey undersides. Now I didn't have
any Dark Earth and frankly, I have my doubts about a single upper color being an
RAF one, so chose a faded Olive Drab. They are pretty close matches.
For a P-40E in SWPA, we are talking about your standard OD or
Medium Green uppers with Neutral Grey lower surfaces. Nothing really fancy or
complicated unless you want to do a plane that was originally going to the RAF.
Those will have a two-color upper surface camo scheme similar to what the Flying
Tigers P-40B/C's wore. Well, I chose an easy one. This 8 FS P-40E was to be
Dark Earth on the upper surfaces and Neutral Grey undersides. Now I didn't have
any Dark Earth and frankly, I have my doubts about a single upper color being an
RAF one, so chose a faded Olive Drab. They are pretty close matches.
The underside was first painted and then masked when dry. The upper color came next. I used Aeromaster Enamels for both of these colors. When those colors were completely dry (like a few days), I brought the kit back to the work bench and did some hand painting. Specifically the chromate wheel wells and gear door interiors. Then the landing gear was added and the plane taken back for a coat of Future clear gloss acrylic in preparation for the decals.
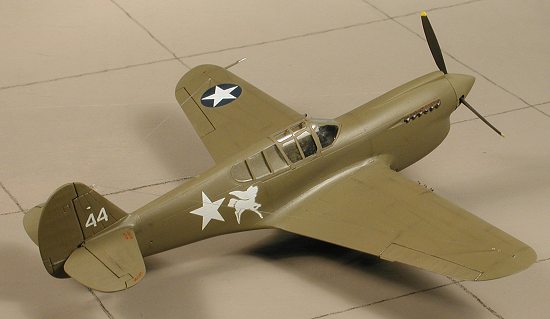
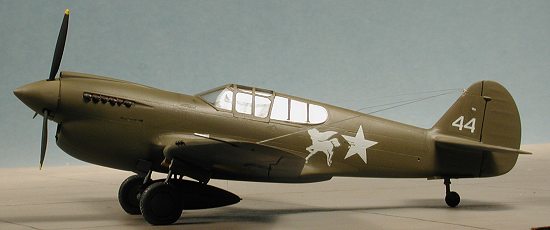 For
decals I used Superscale sheet 72-675 for 49 FG
P-40Es. The plane used was Lt. Eisenburg's 'DollyE'. This plane is
unusual in having no blue surround to the fuselage insignia. It also has a large
Pegasus on the fuselage to add some interest. The Superscale decals worked just
fine. Two minor things. First of all the name 'DollyE' wasn't on the sheet. the
carrier film was there, but no name! I also didn't use the decal sheet's wing
insignia. The insignia on this sheet just don't seem right to me so I dug out an
ancient Scalemaster sheet for replacements. These worked well, though they took
forever to come off the sheet (guess age will do that to you!). I applied a few
stencils just to break up the monotony of the scheme. I seriously doubt if these
stencils were actually on these planes as it seems that some were repainted at
Australian Depots. Usually stencils would have become a casualty of the repaint.
I applied Solvaset to force the decals into submission and it worked as
advertised.
For
decals I used Superscale sheet 72-675 for 49 FG
P-40Es. The plane used was Lt. Eisenburg's 'DollyE'. This plane is
unusual in having no blue surround to the fuselage insignia. It also has a large
Pegasus on the fuselage to add some interest. The Superscale decals worked just
fine. Two minor things. First of all the name 'DollyE' wasn't on the sheet. the
carrier film was there, but no name! I also didn't use the decal sheet's wing
insignia. The insignia on this sheet just don't seem right to me so I dug out an
ancient Scalemaster sheet for replacements. These worked well, though they took
forever to come off the sheet (guess age will do that to you!). I applied a few
stencils just to break up the monotony of the scheme. I seriously doubt if these
stencils were actually on these planes as it seems that some were repainted at
Australian Depots. Usually stencils would have become a casualty of the repaint.
I applied Solvaset to force the decals into submission and it worked as
advertised.
|
MORE CONSTRUCTION |
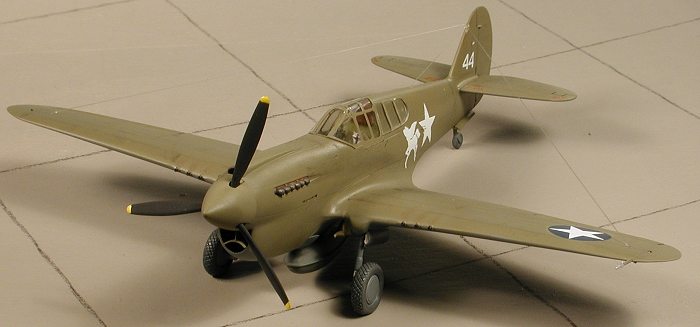
WIth the decals now on, I could attend to some more bits and pieces. These included the attachment of the resin wheels. These had previously been painted and drilled out so were just slipped on the axle stubs along with some superglue and left alone for a bit while the glue dried. Next the prop and spinner assembly was glued together. Finally, the gear doors were cut apart and glued in place. This is probably the weakest part of the kit next to the instructions. I never seem to be able to perfectly cut these doors. Haven't seen the Academy E but I do hope that these doors are precut.
 The model was then given a coat of clear flat using my age-old
mixture of Future and Tamiya flat-base. Then the pastels were brought out for
the engine exhaust and the gun stains. I also used it to highlight some panel
lines and wiped much of it away. Left the kit slightly dirty looking. The
masking was removed from the canopy and the quarter windows were glued in using
non-fogging superglue. Finally, the drop tank was glued in place. Then the hard
part; attaching the radio antenna.
The model was then given a coat of clear flat using my age-old
mixture of Future and Tamiya flat-base. Then the pastels were brought out for
the engine exhaust and the gun stains. I also used it to highlight some panel
lines and wiped much of it away. Left the kit slightly dirty looking. The
masking was removed from the canopy and the quarter windows were glued in using
non-fogging superglue. Finally, the drop tank was glued in place. Then the hard
part; attaching the radio antenna.
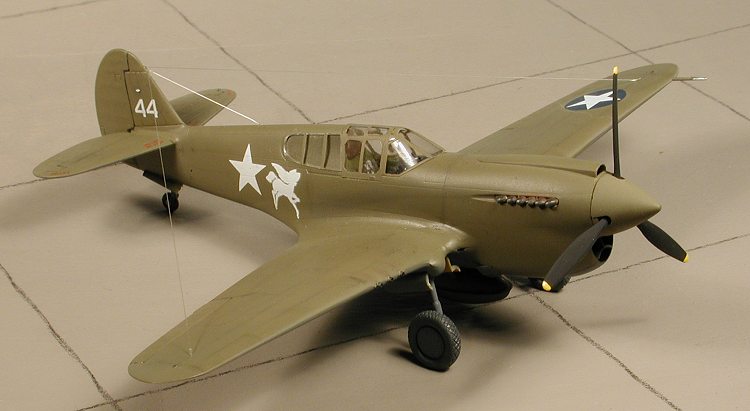
Those P-40s without antenna masts had an entry point for the long wire just above the radio compartment. From there a short length ran to the front of the upper fin. Then two long wires ran out to near the wing tip. Holes were drilled in these places with a #80 drill bit. Clear stretched sprue was used as these wires are all but invisible in photographs. It took several attempts to get all three wires properly attached and taut. The last steps were painting the formation lights and the prop. The spinner was glued on using white glue. I have a bottle of Elmer's that has to be 6-7 years old. It is very thick and dries quickly. That was the last construction step and the kit was photographed before I broke anything!
|
CONCLUSIONS |
You really cannot go wrong with any of the second generation Hasegawa single-engine prop kits. They all fit reasonably well with minimal hassles and can be improved upon with inexpensive aftermarket resin bits. For those who aren't as glacial a builder as I am the kits can be completed competently in about a week or even less. A great kit for even the newest builders.
June 2001
Copyright ModelingMadness.com. All rights reserved. No reproduction in part or in whole without express permission from the editor.
Review kit courtesy of me and my wallet!
If you would like your product reviewed fairly and fairly quickly , please contact the editor or see other details in the Note to Contributors.
Back to Reviews Page 2016