
Academy 1/72 P-38J Lightning
|
KIT # |
2209 |
|
PRICE: |
¥1600 (about $15) |
|
DECALS: |
Two options |
|
REVIEWER: |
Scott Van Aken |
|
NOTES: |
'Pacific Theater' boxing |
|
BACKGROUND |
For a look at what comes in the box and a history of the type, please visit the preview.
|
CONSTRUCTION |
Other readers have told me that this is very much like the 1/48 kit and I'm guessing that is good, as the Academy 1/48 P-38s are well liked. With this kit, I started off with the interior. First, I painted all the interior bits with Testors ModelMaster enamal US Interior Green. When it dried, I then painted some of the black parts using Floquil Engine Black lacquer while they were still on the trees. These were then cut off and cleaned up. Then glued into place on the cockpit tub. The tub (minus the sidewalls) was then glued to the lower wing.
 I turned my attention to the wheel wells next. There
are all sorts of conflicting ideas on what color these can be. I heard
bare metal, chromate yellow and interior green. The instructions
recommended interior green and though I originally painted them that
color, I later changed my mind and painted the whole thing aluminum. The wells
have some large ejector pin marks which will be nearly impossible to fill
so those were left as is.
I turned my attention to the wheel wells next. There
are all sorts of conflicting ideas on what color these can be. I heard
bare metal, chromate yellow and interior green. The instructions
recommended interior green and though I originally painted them that
color, I later changed my mind and painted the whole thing aluminum. The wells
have some large ejector pin marks which will be nearly impossible to fill
so those were left as is.
While all that was drying, I turned my attention to the booms. First I painted the radiator bits with ModelMaster Metallizer Steel. Then the forward radiator faces were glued on, followed by the radiator grille parts. These are very loose fitting so one has to take some care when installing them. I left the exhaust doors off for the time being. The small tear-drop shaped oil coolers were then glued in place. These are well done and have a sufficiently deep intake to them. Sure saves having to drill out something that large.
Then I started assembling the wheel well components. There is a small trunking that gets glued in and what appears to be a skid plate at the back of the well to stop the wheel from rotating. The instructions would have you install the gear at this time, but the idea of having the main gear there where I could break it off during the rest of the build just didn't appeal to me. Using one side, I experimented as to whether the main gear could be installed later. I installed a section of coolant pipe and then tried to get the main gear leg in. A tight fit, but it can be done.
 Emboldened by this, I decided to fit that wheel well
into one of the boom assemblies. The fit of these wells is excellent and
once it was in place, I could still install the main gear leg. Even with
the boom halves glued already, it is possible to slide in the wheel well,
though it isn't what I ended up doing. With the booms and wells drying, I
moved to the upper wing/fuselage piece and installed the upper cockpit
part. Moving back to the tailbooms, I glued in the forward intercooler
section to the front. These are the first problem. They are too narrow.
Not sure if this is the same on the 1/48 kit, but fixing them will be a
bit touchy. I also glued the turbocharger surrounds into the upper wings.
These are not interchangeable so be sure to get the proper ones in the
proper side. This was then all set aside while I let it all dry
overnight.
Emboldened by this, I decided to fit that wheel well
into one of the boom assemblies. The fit of these wells is excellent and
once it was in place, I could still install the main gear leg. Even with
the boom halves glued already, it is possible to slide in the wheel well,
though it isn't what I ended up doing. With the booms and wells drying, I
moved to the upper wing/fuselage piece and installed the upper cockpit
part. Moving back to the tailbooms, I glued in the forward intercooler
section to the front. These are the first problem. They are too narrow.
Not sure if this is the same on the 1/48 kit, but fixing them will be a
bit touchy. I also glued the turbocharger surrounds into the upper wings.
These are not interchangeable so be sure to get the proper ones in the
proper side. This was then all set aside while I let it all dry
overnight.
The next day, I started in with the sanding on the filler around the engine intakes. It required a second coat. I also sanded down the other filler I'd put in a few spots and sanded down the radiator intakes on the rear boom section as they are a touch too large. The rest of the cockpit parts were glued into the fuselage section and I glued the upper and lower wing halves. This required some filler as well, especially on the nose section.
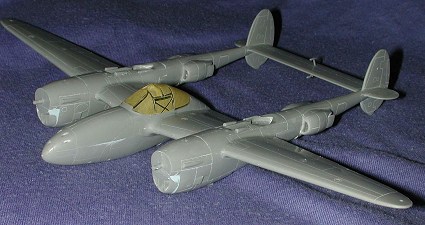 Once all that was sanded smooth, the missing panel
lines were rescribed. It was then time to bring these three major
subassemblies together. The fit of the booms onto the wings is very good
at the sides, fairly good at the front, and needs filler on the back,
just aft of the turbocharger area. This is because of gaps and a bit of a
step. During this the tailplane was glued in place. Before gluing on the
engine areas, I put a couple of weights in the front of these just to
make sure that I had enough. Turning to the nose, I crammed in a large
weight and then glued on the nose cap. This is a teeny bit larger than
the surrounding area, but nothing that sandpaper and rescribing couldn't
cure. I then used filler on the boom/wing join areas that needed it and
it was also set aside to dry. Here is the obligatory 'pre-painting'
photo. :o)
Once all that was sanded smooth, the missing panel
lines were rescribed. It was then time to bring these three major
subassemblies together. The fit of the booms onto the wings is very good
at the sides, fairly good at the front, and needs filler on the back,
just aft of the turbocharger area. This is because of gaps and a bit of a
step. During this the tailplane was glued in place. Before gluing on the
engine areas, I put a couple of weights in the front of these just to
make sure that I had enough. Turning to the nose, I crammed in a large
weight and then glued on the nose cap. This is a teeny bit larger than
the surrounding area, but nothing that sandpaper and rescribing couldn't
cure. I then used filler on the boom/wing join areas that needed it and
it was also set aside to dry. Here is the obligatory 'pre-painting'
photo. :o)
During this time, I painted the wheel hubs aluminum and sanded off the mold seam. Then after rescribing the tire tread, I painted them using Floquil's Weathered Black. Moving back to the airframe, I sanded off all the filler and rescribed the lost panel lines. Then I glued on the mass balances for the elevator. The small cooler exhaust doors were glued in place in a slightly open configuration just to add some interest. There are two canopies provided. One is in five sections so that you can pose the upper portion open. The other is a three piece canopy with the forward, center and rear portion in one piece. Oddly, the side panels are separate on this one as well. You'd think it would all be in one piece, but it isn't. Gluing the side pieces in place is a bit touchy as you don't want to get glue on any of the surrounding clear parts. Once that was done, the canopy was masked and glued into place.
|
COLORS AND MARKINGS |
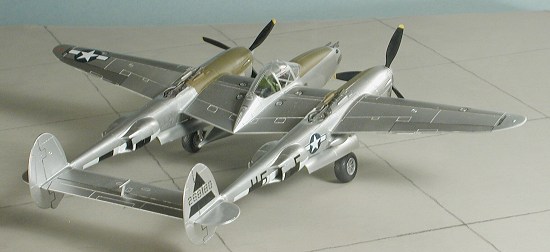
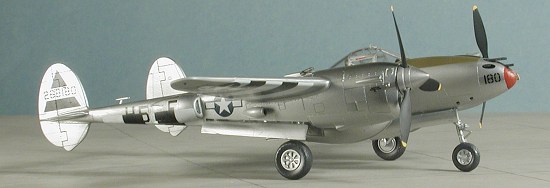
As much as I'd have liked to have done an OD over Neutral Grey aircraft, I just didn't have the decals needed. I didn't want to do either of the kit markings as the nose art was so poorly detailed. Picking an old Superscale sheet (72-757), I had two nice bare metal schemes to choose from. What's more, they were for the proper dash number, unlike several other sheets I had to pick from which were either for earlier or later models and inappropriate for this kit.
 The options on this sheet were both in
bare metal, so bringing out the Alclad II, I first sprayed on regular
Aluminum. Then I masked off several sections and painted them with Dark
Aluminum. Feeling that a bit more contrast was needed, I chose some more
sections for a treatment with Duralumin. These three shades are very
close to each other and give that kind of subtle difference to shade that
is normal with bare metal planes. Had I more time, I'd have done other
panels and hatches, but the overall effect was sufficient.
The options on this sheet were both in
bare metal, so bringing out the Alclad II, I first sprayed on regular
Aluminum. Then I masked off several sections and painted them with Dark
Aluminum. Feeling that a bit more contrast was needed, I chose some more
sections for a treatment with Duralumin. These three shades are very
close to each other and give that kind of subtle difference to shade that
is normal with bare metal planes. Had I more time, I'd have done other
panels and hatches, but the overall effect was sufficient.
I then glued in all the wheel well stuff and the landing gear. It was a bit of a tight fit and the main gear legs didn't glue at the same left/right angle. Not sure if it was me or a need to do a bit of trimming prior to installation, but it is something I noticed. I also wrapped the oleos with Bare Metal Foil Chrome as is the norm for me. The nose wheel fit very snugly, but the main wheels had quite a bit of slop that required me to hold them in place while the glue set up. With the plane now on its wheels, it was on to rest of the painting. All that weight I put in did its job and even with a tail-down attitude, this beast was not going to sit back!
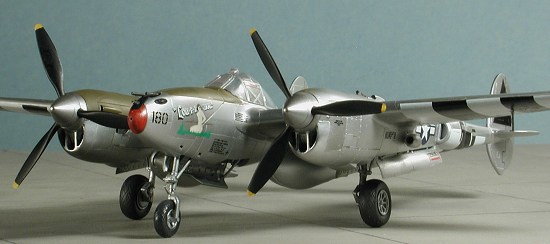
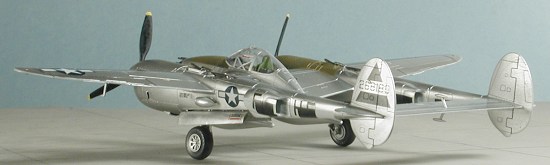
The anti-glare panels on the nose and engine were painted with Polly Scale OD. I chose this as I always have trouble with bleed-under when it comes to doing panels, so figured that an acrylic would be the easiest to clean up any errors. Boy, was I spot on with that choice as I had to clean up a lot of screw-ups. Fortunately, the alcohol that easily eats away fresh acrylic paint has zero effect on the Alclad so after several tries I finally got it right! The only other thing painted was the tip of the nose, and that in red. The aircraft I chose was a P-38J-10 'Lou-E-Z-Ann' of the 392 FS/367 FG in France during September 1944. Frankly, European theater P-38s were not as colorful as those in the Pacific, and for that reason are also not so frequently built.
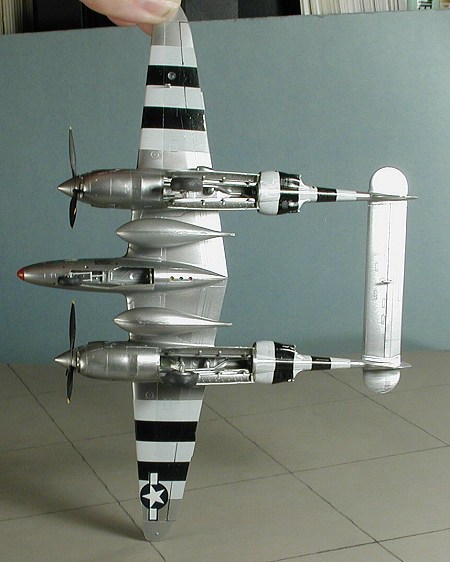
Deciding to do something I'll probably regret, I broke out Superscale sheet 72-754 that is for D-Day stripes for the P-38. Generally decals for these things don't work as well as paint, but I wanted the stripes and felt a bit lazy about doing even more masking. The sheet isn't designed for this kit, but seemed to fit well, although the bits seemed a bit large. I drowned the kit in Solvaset so that the decals would snuggle down. If it doesn't work, I can pretty easily remove the decals without harming the Alclad II.
 Much to my surprise, the stripe decals
worked fairly well. There was the usual issue of overlap thanks to the
semi-transparent white and I did need to do a bit of touchup, but overall
not bad. Were this to be a contest kit, then one would want to paint on
the stripes. The rest of the decals were put on and I did double up on
the lower wing insignia due to the lack of opacity and it did help quite
a bit. There are a myriad of barely legible data markings with the sheet
and I put on enough to make things look busy. I had registration problems
on this sheet with the white backing on some decals, primarily the
insignia and some of the red data markings that had white backgrounds.
However, it isn't that big a deal and the end result of all that stuff is
actually pretty good.
Much to my surprise, the stripe decals
worked fairly well. There was the usual issue of overlap thanks to the
semi-transparent white and I did need to do a bit of touchup, but overall
not bad. Were this to be a contest kit, then one would want to paint on
the stripes. The rest of the decals were put on and I did double up on
the lower wing insignia due to the lack of opacity and it did help quite
a bit. There are a myriad of barely legible data markings with the sheet
and I put on enough to make things look busy. I had registration problems
on this sheet with the white backing on some decals, primarily the
insignia and some of the red data markings that had white backgrounds.
However, it isn't that big a deal and the end result of all that stuff is
actually pretty good.
|
FINAL CONSTRUCTION |
 With the decals on and dry, I glued on the gear doors. The small tabs
require some careful gluing and I used super glue for all these bits. The
nose door actuating arm is a bit tricky to get in place and so I used
regular glue for this as it needed that extra fiddle time. I did some
touch up painting on the nose as the black decal for the central gun was
too small and I needed to repaint that. I also didn't like the color of
the red on the nose so painted over that section with thinned Testors red
that comes in the small square bottles. Being a gloss, it evened out
well.
With the decals on and dry, I glued on the gear doors. The small tabs
require some careful gluing and I used super glue for all these bits. The
nose door actuating arm is a bit tricky to get in place and so I used
regular glue for this as it needed that extra fiddle time. I did some
touch up painting on the nose as the black decal for the central gun was
too small and I needed to repaint that. I also didn't like the color of
the red on the nose so painted over that section with thinned Testors red
that comes in the small square bottles. Being a gloss, it evened out
well.
The last major construction was the props. These have a two part
spinner and separate blades. You already know how little I like separate
blades and this kit proceeded to give me fits when it came to blade
alignment. Once all the blades were on, I pushed them onto the prop
shafts and pushed the small hold-down into place. Then I glued on the
upper spinner. BTW, these 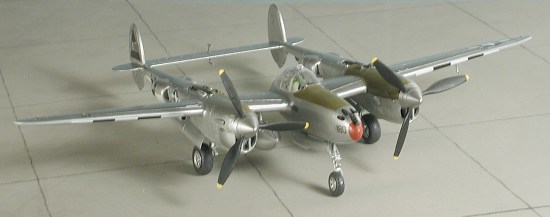 props are handed, so don't mess up by
intermixing the blades!
props are handed, so don't mess up by
intermixing the blades!
With the props on, I pushed on the turbocharger units. They are a very tight fit so no glue is needed. Next fiddly bit was the under-wing landing light. This part decided to take a trip off into the land of the carpet gnomes so I substituted a bit of white glue. The pitot and the guns were the next items glued in place. While that was drying, I removed the masking from the canopy and noted to my chagrin that I'd forgotten to install the gun sight, which was still patiently attached to the clear sprue awaiting installation! After picking off any tape residue with another piece of tape, I then painted the wing tip and recognition lights. Once that was accomplished, I glued on the drop tanks, and the kit was done. I then hurried to photograph it before something horrible happened to it!
|
CONCLUSIONS |
Talk about a really neat kit. This one is miles ahead of the Hasegawa, Revell, Airfix, Dragon, or any other 1/72 Lightning. It will be interesting to see if, like the 1/48 bunch, they do other versions as the fit on this one is really top notch. It is a kit I can highly recommend.
|
REFERENCES |
Lockheed P-38J-L Lightning, Robert Peczkowski, Mushroom Model Magazine Special # 6109, 2003
April 2004
# 1312 in a series
Copyright ModelingMadness.com. All rights reserved. No reproduction in part or in whole without express permission from the editor.
If you would like your product reviewed fairly and fairly quickly, please contact the editor or see other details in the Note to Contributors.