
| KIT: | Vintage Fighter Series 1/24 P-40B/C |
| KIT #: | VF 2402 |
| PRICE: | $119.98 ($107.96 at Squadron) |
| DECALS: | Two options |
| REVIEWER: | Scott Van Aken |
| NOTES: | Includes photo etched and vinyl parts |
| HISTORY |
While perhaps not totally combat ready by European standards, the front line fighter for the US Army in late 1941 was the P-40B/C Tomahawk. These planes were doing fairly well in the deserts of North Africa after some modifications were made, and while not able to really handle the Bf-109s that they were meeting in the air, a competent pilot could snag one from time to time. What was really appreciated was the ruggedness of the airframe and relative ease of maintenance.
When the Japanese attacked Pearl Harbor, only two types were able to get off the ground to meet the enemy in the air. That was the P-36 and P-40s, both from outlying fields that were not assaulted in the initial wave. The vast majority of aircraft were destroyed on the ground and most of those that were able to get airborne (which was just a handful) were quickly shot down. However, the subjects of this kit, the P-40s of George Welch and Ken Taylor, were on these outlying fields and were able to get up and knock down a few of the attackers in several sorties. Of course, the P-40 then went on to gain fame as the Flying Tigers and the rest, as they say, is history.
| THE KIT |
 Arriving
in a huge box, the first thing that strikes one upon opening the box is the
vast amount of plastic. The folks at Vintage really know how to package a
kit as each sprue is individually packaged in its own bag. There is also
included vinyl wheels, an acetate instrument panel, and some heavy duty
photo-etched parts.
Arriving
in a huge box, the first thing that strikes one upon opening the box is the
vast amount of plastic. The folks at Vintage really know how to package a
kit as each sprue is individually packaged in its own bag. There is also
included vinyl wheels, an acetate instrument panel, and some heavy duty
photo-etched parts.
So the big question is, what's the
kit like? First off, you'll have to excuse me for not showing all the
sprues. The kit is just too big for that and since there is no parts layout
in the instructions, I'll have to show a few representative sections of the
kit. The kit does have engraved panel lines as you'd expect. A quick
inspection of the parts showed no problems with ejector pin marks in sticky
places, sink areas or flash. The general detail itself is quite good,
though I'd have to characterize it as being a tad on the 'soft' side. By
this, I mean that the corners are a teeny bit rounded, sort of like what
you'd see on a modern Airfix
 1/48
kit vice a modern Tamiya kit, for example. A couple of other things I
should bring up so as to stave
1/48
kit vice a modern Tamiya kit, for example. A couple of other things I
should bring up so as to stave
 off
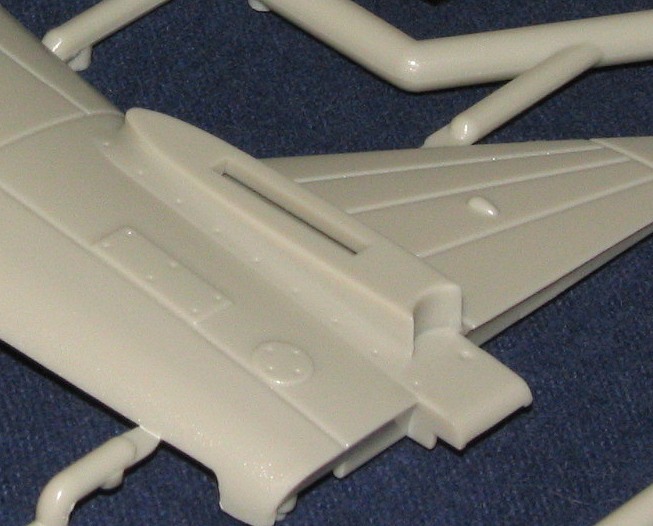
the usual onslaught of e-mails. First is that the fabric representation on
the control surfaces may be something other than what some modelers like. I
have no problem with it as I think it looks fine, but here is a shot of an
aileron to show what I mean. Secondly, many of the removable panels (such
as the radio access panel and other small panels) are proud of the surface.
You can see this on a closeup of the tail section which will also give you
an idea of the general detail level.
off
the usual onslaught of e-mails. First is that the fabric representation on
the control surfaces may be something other than what some modelers like. I
have no problem with it as I think it looks fine, but here is a shot of an
aileron to show what I mean. Secondly, many of the removable panels (such
as the radio access panel and other small panels) are proud of the surface.
You can see this on a closeup of the tail section which will also give you
an idea of the general detail level.
With that out of the way, I can tell
you that the fit of parts seems to be very good. I've dry fitted a few bits
and it looks as if the
 engineering
on this one is good. I'm also quite pleased to see that these folks have
not followed Trumpeter's example with all those photo-etched hinges. Having
them in plastic makes things so much
engineering
on this one is good. I'm also quite pleased to see that these folks have
not followed Trumpeter's example with all those photo-etched hinges. Having
them in plastic makes things so much
![]() easier,
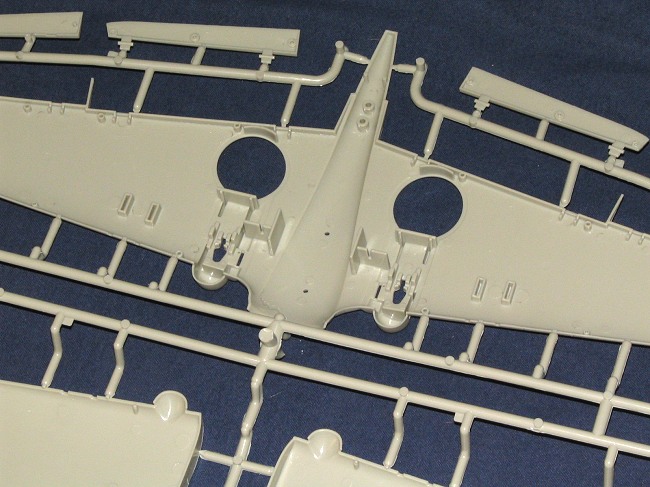
especially if you want to glue them in some sort of position. I also
appreciated the rather large mounting surfaces for some of the bits as
shown in this shot of the wing sprue. It makes for a very positive location
for these parts as I hate guess-work.
easier,
especially if you want to glue them in some sort of position. I also
appreciated the rather large mounting surfaces for some of the bits as
shown in this shot of the wing sprue. It makes for a very positive location
for these parts as I hate guess-work.
While on the subject of the wings, I'd like to point out that there are no separate gun access panels, but the guns do have to be installed if you want to see the barrels.
The kit includes a full engine, and much of the plastic is dedicated to this. It seems quite complete and well detailed. No vinyl bits on this one, just good old easy to paint and glue plastic. The engine and its mount attach to the cockpit, which is also well detailed. A couple of comments on the cockpit. One is that it seems to be missing the flap handle on the left side. While I've not built an early P-40 in decades, the P-36s had this handle and I'd suppose the P-40B/C would have it too. Secondly, though the instructions show a shoulder harness on the seat, none is included. A separate framework is included for the tail wheel to attach itself to. Looks quite prototypical.
I get the impression from looking at
the instructions that the landing gear may be able to be made operational.
By that, I mean you may be able to have it retract as separate 'closed'
tail wheel doors are provided. Personally, I'll leave mine fixed and glue
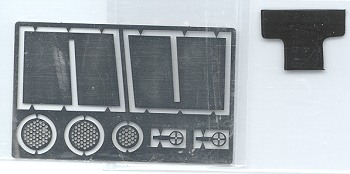
all the various gear bits. No stores are included save a drop tank. This
has very pronoun ced rivet
detail and looks a bit overdone to my eyes. I'll be sanding mine down a
bit. The etched plates you see in the image are used for the cowl flap
assembly. Since this kit is also boxed as a British Tomahawk II and as an
AVG Flying Tiger, the optional British pitot tube is provided. There is
also a separate inner glass section to fit behind the windscreen, a feature
missed by most if not all other early P-40 kits.
ced rivet
detail and looks a bit overdone to my eyes. I'll be sanding mine down a
bit. The etched plates you see in the image are used for the cowl flap
assembly. Since this kit is also boxed as a British Tomahawk II and as an
AVG Flying Tiger, the optional British pitot tube is provided. There is
also a separate inner glass section to fit behind the windscreen, a feature
missed by most if not all other early P-40 kits.
After doing all that work on the engine, you may not be able to see any of it as the side panels are fixed and to remove the upper cowling won't be easy as it would involve much care to not break the long blast tubes from the cowl guns. I have a feeling that many modelers will skip all the engine detail work, though you'll need to do at least the block so that you can have something on which to attach the exhaust and the prop. Two pilot figures are also given, one US/AVG and the other British.
Instructions are very well done and consist of 16 construction steps. Parts are named, generic colors are given, and any detail decals needed are shown in the appropriate steps. A color painting and decal guide is provided with the two subject aircraft on it., both from the 15th Pursuit Group. Really, these are some of the more boring markings applied to aircraft with little more than insignia and unit codes on the tail. I'm sure that aftermarket sheets will soon be on the way. The painting guide also shows the area behind the rear quarter windows to be painted Interior Green vice the outside color. This is your choice as there is still considerable debate about this. Decals are superbly printed with no sign of mis-registration.
| CONCLUSIONS |
I have to say that I'm pretty impressed with this initial kit from these fine British folks at Vintage. The subject is one that is interesting, the general look of things shows that thought has gone into the engineering and the level of detail is quite good. I should also add that the lack of 'Mickey Mouse' or fiddly construction is very much appreciated. Thanks to the size of the bits, those who complain about pieces being too small will not have any reason to fuss over this one! Look for a full-build review shortly.
June 2005
You can find this kit and many others at

If you would like your product reviewed fairly and quickly by a site that has nearly 300,000 visitors a month, please contact me or see other details in the Note to Contributors.