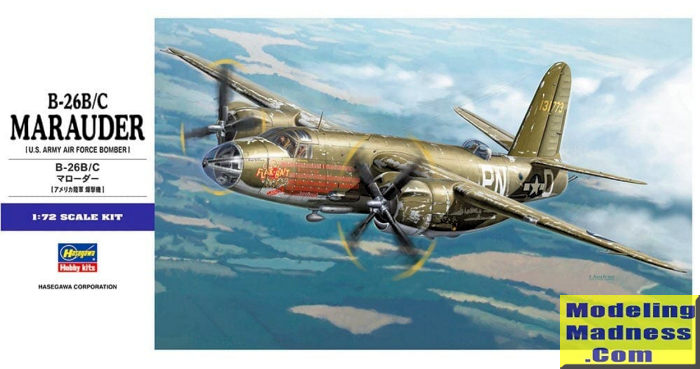
Hasegawa 1/72 B-26B/C Marauder
| KIT #: | 00556 |
| PRICE: | $15.00 in a bag from a vendor |
| DECALS: | Two options |
| REVIEWER: | Scott Van Aken |
| NOTES: | Base release |
| HISTORY |
| THE KIT |
 One
of the last aircraft kits in 1/72 that Hasegawa released was a pair of B-26
Marauders. They did an early B/C and a later F/G, the main difference being the
increase incidence of the wings on the latter versions to make them easier to
land. There were other differences for sure, but that was the biggie. This is
the B-26B/C boxing and it is the basic boxing.
One
of the last aircraft kits in 1/72 that Hasegawa released was a pair of B-26
Marauders. They did an early B/C and a later F/G, the main difference being the
increase incidence of the wings on the latter versions to make them easier to
land. There were other differences for sure, but that was the biggie. This is
the B-26B/C boxing and it is the basic boxing.
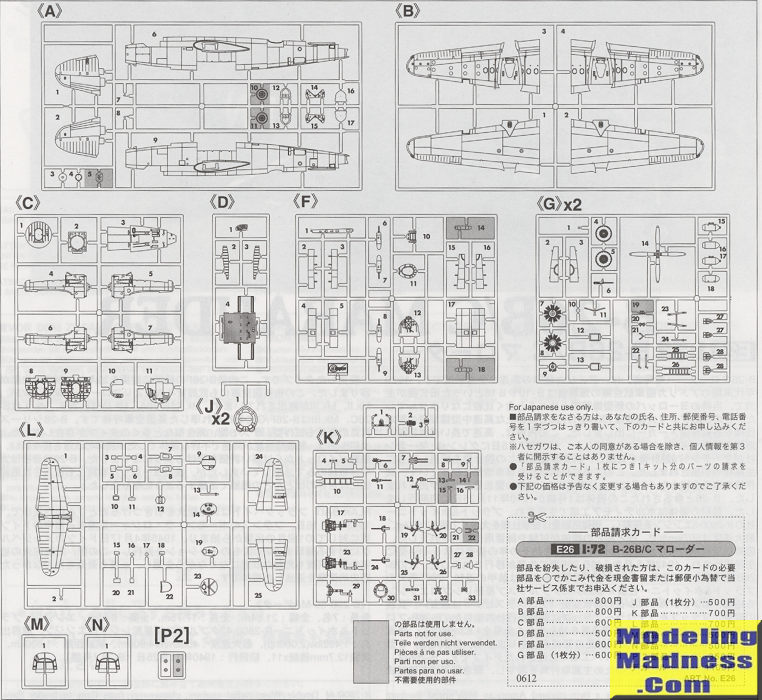
Hasegawa did not skimp on the detailing on this one and provides us with a full cockpit that uses decals for the instrument panel. It also includes a full bomb bay that incorporates stub wing spars to help hold the wings in place. In addition to the bomb bay are a full suite of bombs to fill it up. Conversely, you can install the closed bomb bay so you don't have to install all those bombs. You still have to install the basic bay in order to have the wing spar stubs. There is also a aft turret position and a tail gun position that needs to be installed before closing the fuselage halve. Note that if using the side fuselage gun packs, you need to open holes for those. All of the small fuselage windows can be installed from the outside.
Wings are upper and lower halves for each side and the main gear upper well is part of those pieces. Tail is a single upper horizontal piece with separate lower halves and a two piece fin. Each of the nacelles combrises all the bits needed to outfit the main gear wells along with a three piece engine and a single piece cowling. These are handed and fit on the appropriate wing. There are rear caps for each of the engine nacelles and these are also handed. The instructions would have you attach the nacelles to the wings before attaching the wings to the fuselage.
Fortunately for us, you do not have to attach the landing gear until
after the airframe is pretty well complete. This will allow you to install them
after the airframe is painted. If building the bomb bay doors open, this option
is taken into consideration as well. Once the turret is assembled it can simply
be dropped into place. It would be wise to see if the plane you are modeling
actually uses the side gun packs as some units did not install these in order to
save weight. There are two different canopies depending on which markings option
you choose. These differ in having additional panes in the windscreen. Since the
model will be a major tail sitter, a clear stand is provided. You can cram
sufficient nose weight into the kit during construction to where this won't be
needed, but it will take a lot of weight.
 Reading my
review of the F/G version, I noted that I filled the radio compartment with
weight and probably also put some in the engine nacelles. It takes more than
you'd think because the Marauder's main gear angles forward so much.
Reading my
review of the F/G version, I noted that I filled the radio compartment with
weight and probably also put some in the engine nacelles. It takes more than
you'd think because the Marauder's main gear angles forward so much.
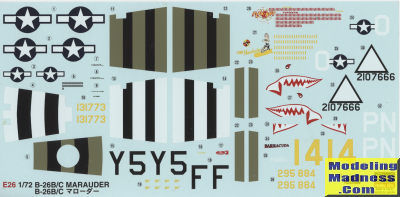
Instructions are standard Hasegawa fare with Gunze paint references. Three options are provided. Two B-26Bs are in OD over Neutral Grey. One is the box art plane, 'Flak Bait' with the'449th BS in 1945. The other is 'Miss Manchester' wit the 441st BS in 1944. Both have impressive mission tallies. The other is a B-26C 'Barracuda' with the 495th BS in 1944. This aircraft is in unpainted metal with invasion stripes, the upper ones being crudely overpainted in OD. It also sports a shark mouth. The decal sheet is nicely printed and should work quite well if you wish to use it.
| CONCLUSIONS |
This one is a bit more fiddly than some of Hasegawa's other twins. Based on the build of the later F/G, some of the parts fit very snugly and some just take some effort to properly get into place. I'd recommend building this one fairly slowly, ensuring parts actually fit as they should before applying cement. Any way you look at it, you'll have an excellent model once you get it finished.
January 2026
Copyright ModelingMadness.com. All rights reserved.
No reproduction in part or in whole without express permission. If you would like your product reviewed fairly and fairly quickly, please
contact
the editor
or see other details in the
Note to
Contributors.