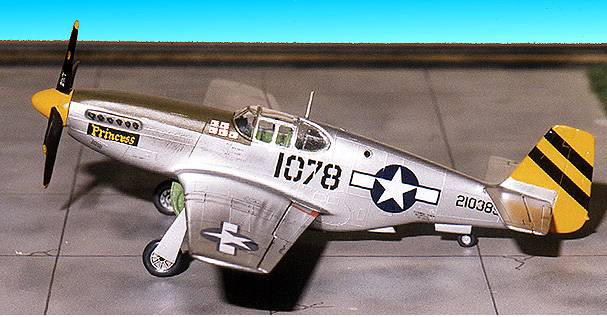
Kit: P-51B Mustang
Scale: 1/72
Kit Number: 6788
Manufacturer: Monogram
Price: $.98 (Back in the late 60's)
Media: Injected Plastic
Decals: One version; USAAF
Reviewer: Scott Van Aken
Date of Review: 8 August 1997

The Mustang is another aircraft that has had reams written about it. Nothing more for me to add so on to the kit. Looks like this will be a short review!
The Monogram P-51B is probably older than many of you reading this review! One of Monogram's first forays into mainstream 1/72 modelling, this kit was designed in the 60s but holds up remarkably well. It looks like this is just a scaled down version of the 1/48 kit and in many respects that is great. However there are a few differences. For one there is no nose piece that includes the intake as on the 1/48 kit.
Molded in olive drab with raised panel lines, this 51 has a rather highly detailed interior for the times, including an accurate seat and control stick. That is about it as there is no instrument panel, a decal just being attached to where one should be. Not a problem as the canopy cannot be built in the open position so it looks fine. There is also a box where the radio should be. Once the interior is constructed it can be placed in a fuselage half on specially designed posts. The tailwheel is designed to be trapped in the fuselage halves, but I simply broke off the attachment point and glued it in at the end of construction. a major problem is the underfuselage oil cooler intake. It is not a separate item like other Mustangs and a real hassle to get the intake interior smooth. You can fuss with it or leave it alone and tell people not to pick up and look at the under side of your kit. I chose plan B.
The wings were next. Again nothing fancy (like boxed in wheel wells) and a reasonable fit. What is not a reasonable fit is the wing to fuselage mating. Once this has been hassled with and fixed, it is time for the horizontal stabilizers. No surprise there and a relatively good fit. Next is the canopy. I have Never gotten one off the tree without screwing it up in some way. It is a bit undersized for the opening, but can be made to fit without too much surgery. The gear fit well, but the wheels have holes in the axles and ribbing that make them look like toys. Installation of the prop makes it look like there is a scoop under it. Good enough, I guess.
This particular aircraft was my first attempt at using SNJ metallic finishes, and I must say I am quite impressed. Although it takes several coats to get a good finish, it is durable and very shiny. The downside is that once the bottle is opened, if not used in a week or two, it reacts with the air and turns into a coagulated mess that is unusable. The buffing powder is great, but not really that usable without the base coat of paint. Don't know if this glitch has been fixed, but I have not used much SNJ since, sticking with Metallizer which isn't as good, but is a known quality and can be used for years after the bottle has been opened.
The decals for this are from Microscale. There is some question about the authenticity of the markings and who they are attributed to. Nonetheless, they are quite colorful and do look good on the shelf.
Bottom line, would I build this kit again? Sure I have done several. They are not show stuff, but build well and quickly. Would I recommend it to anyone? Sure again, especially to the youngsters and those who, like me, use a model as a canvas for a paint scheme. They aren't as pretty, or complicated, or expensive as the Hasegawa kits, but at least they have the correct wing!